Logs are a critical component of any software or operating system. Logs usually record user’s actions, system events, network activity and so much more, depending on what they are intended for. One of the most widely used logging systems on Linux systems is rsyslog.
Rsyslog is a powerful, secure and high-performance log processing system which accepts data from different types of source (systems/applications) and outputs it into multiple formats.
It has evolved from a regular syslog daemon to a fully-featured, enterprise level logging system. It is designed in a client/server model, therefore it can be configured as a client and/or as a central logging server for other servers, network devices, and remote applications.
Testing Environment
For the purpose of this guide, we will use the following hosts:
- Server: 192.168.241.140
- Client: 172.31.21.58
How to Install and Configure Rsyslog Server
Most Linux distributions come with the rsyslog package preinstalled. In case it’s not installed, you can install it using your Linux package manager tool as shown.
$ sudo yum update && yum install rsyslog 	#CentOS 7
$ sudo apt update && apt install rsyslog	#Ubuntu 16.04, 18.04
Once rsyslog installed, you need to start the service for now, enable it to auto-start at boot and check it’s status with the systemctl command.
$ sudo systemctl start rsyslog
$ sudo systemctl enable rsyslog
$ sudo systemctl status rsyslog
The main rsyslog configuration file is located at /etc/rsyslog.conf, which loads modules, defines the global directives, contains rules for processing log messages and it also includes all config files in /etc/rsyslog.d/ for various applications/services.
$ sudo vim /etc/rsyslog.conf
By default, rsyslog uses the imjournal and imusock modules for importing structured log messages from systemd journal and for accepting syslog messages from applications running on the local system via Unix sockets, respectively.

To configure rsyslog as a network/central logging server, you need to set the protocol (either UDP or TCP or both) it will use for remote syslog reception as well as the port it listens on.
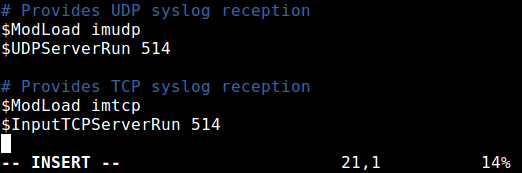
If you want to use a UDP connection, which is faster but unreliable, search and uncomment the lines below (replace 514 with the port you want it to listen on, this should match the port address that the clients send messages to, we will look at this more when configuring a rsyslog client).
$ModLoad imudp
$UDPServerRun 514
To use TCP connection (which is slower but more reliable), search and uncomment the lines below.
$ModLoad imtcp
$InputTCPServerRun 514
In this case, we want to use both UDP and TCP connections at the same time.
Next, you need to define the ruleset for processing remote logs in the following format.
facility.severity_level destination (where to store log)
Where:
- facility: is type of process/application generating message, they include auth, cron, daemon, kernel, local0..local7. Using
*means all facilities. - severity_level: is type of log message: emerg-0, alert-1, crit-2, err-3, warn-4, notice-5, info-6, debug-7. Using
*means all severity levels and none implies no severity level. - destination: is either local file or remote rsyslog server (defined in the form IP:port).
We will use the following ruleset for collecting logs from remote hosts, using the RemoteLogs template. Note that these rules must come before any rules for processing local messages, as shown in the screenshot.
$template RemoteLogs,"/var/log/%HOSTNAME%/%PROGRAMNAME%.log"
*.* ?RemoteLogs
& ~

Looking at the above ruleset, the first rule is “$template RemoteLogs,”/var/log/%HOSTNAME%/%PROGRAMNAME%.log””.
The directive $template tells rsyslog daemon to gather and write all of the received remote messages to distinct logs under /var/log, based on the hostname (client machine name) and remote client facility (program/application) that generated the messages as defined by the settings present in the template RemoteLogs.
The second line “*.* ?RemoteLogs” means record messages from all facilities at all severity levels using the RemoteLogs template configuration.
The final line “& ~” instructs rsyslog to stop processing the messages once it is written to a file. If you don’t include “& ~”, messages will instead be be written to the local files.
There are many other templates that you can use, for more information, see the rsyslog configuration man page (man rsyslog.conf) or refer to the Rsyslog online documentation.
That’s it with configuring the rsyslog server. Save and close the configuration file. To apply the recent changes, restart rsyslog daemon with the following command.
$ sudo systemctl restart rsyslog
Now verify the rsyslog network sockets. Use the ss command (or netstat with the same flags) command and pipe the output to grep to filter out rsyslogd connections.
$ sudo ss -tulnp | grep "rsyslog"

Next, on CentOS 7, if you have SELinux enabled, run the following commands to allow rsyslog traffic based on the network socket type.
$ sudo semanage -a -t syslogd_port_t -p udp 514
$ sudo semanage -a -t syslogd_port_t -p tcp 514
If the system has firewall enabled, you need to open port 514 to allow both UDP/TCP connections to the rsyslog server, by running.
------------- On CentOS -------------
$ sudo firewall-cmd --permanent --add-port=514/udp
$ sudo firewall-cmd --permanent --add-port=514/tcp
$ sudo firewall-cmd --reload

------------- On Ubuntu -------------
$ sudo ufw allow 514/udp
$ sudo ufw allow 514/tcp
$ sudo ufw reload
How to Configure Rsyslog Client to Send Logs to Rsyslog Server
Now on the client system, check if the rsyslog service is running or not with the following command.
$ sudo systemctl status rsyslog
If it’s not installed, install it and start the service as shown earlier on.
$ sudo yum update && yum install rsyslog 	#CentOS 7
$ sudo apt update && apt install rsyslog	#Ubuntu 16.04, 18.04
$ sudo systemctl start rsyslog
$ sudo systemctl enable rsyslog
$ sudo systemctl status rsyslog
Once the rsyslog service is up and running, open the main configuration file where you will perform changes to the default configuration.
$ sudo vim /etc/rsyslog.conf
To force the rsyslog daemon to act as a log client and forward all locally generated log messages to the remote rsyslog server, add this forwarding rule, at the end of the file as shown in the following screenshot.
*. * @@192.168.100.10:514
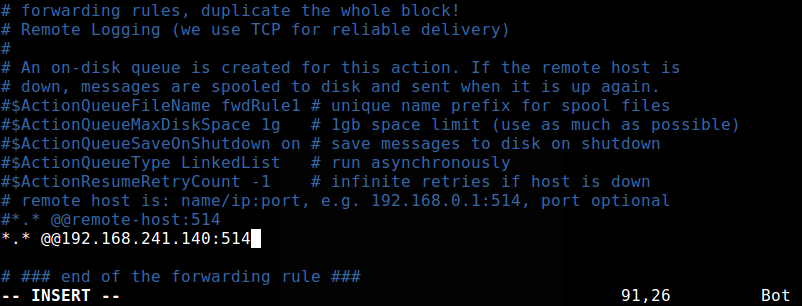
The above rule will send messages from all facilities and at all severity levels. To send messages from a specific facility for example auth, use the following rule.
auth. * @@192.168.100.10:514
Save the changes and close the configuration file. To apply the above settings, restart the rsyslog daemon.
$ sudo systemctl restart rsyslog
How to Monitor Remote Logging on the Rsyslog Server
The final step is to verify if the rsyslog is actually receiving and logging messages from the client, under /var/log, in the form hostname/programname.log.
Run a ls command to long listing of the parent logs directory and check if there is a directory called ip-172.31.21.58 (or whatever your client machine’s hostname is).
$ ls -l /var/log/
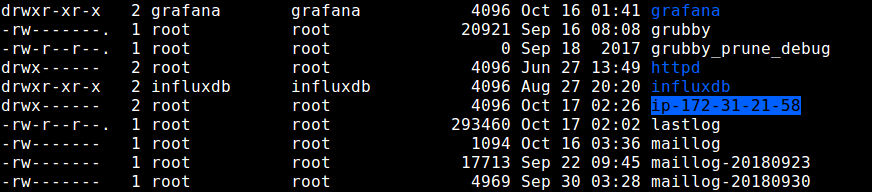
If the directory exists, check the log files inside it, by running.
$ sudo ls -l /var/log/ip-172-31-21-58/

Summary
Rsyslog is a high-performance log processing system, designed in a client/server architecture. We hope you are able to install and configure Rsyslog as a central/network logging server and as a client as demonstrated in this guide.
You may also want to refer to relevant rsyslog manual pages for more help. Feel free to give us any feedback or ask questions.


Did you get any solution for this situation? Am facing the same issue.
Hi Everyone,
I would like to share with the community about a critical instruction ‘rsyslog‘ which is mandatory in order to make work exporting to CentOS 7/RHEL 8 as a logs server with mariadb-mysql database.
Very usefull in uses with “Adiscon LogAnalyzer WebApp“. You just need to add to the “/etc/rsyslog.conf” file as follows gère :
Hoping to help others…
Best regards,
Antonio
The ‘stop’ is still wrong, it generates configuration error unless the given stop is the LAST line in the rsyslog configuration chain. I as chain, because /etc/rsyslog.d context is injected before any defined rules in the actual /etc/rsyslog.conf file.
A typical rsyslog.conf local file will have additional local rules defined. What happens right now, with ‘& stop’ replacing ‘& ~’ as I said the configuration error reported. If the stop directive is removed, then you get some local files populated as expected, and others directed to a directory that holds local information.
This can and will be confusing to support personnel. You need to add a test of the hostname and if the hostname IS NOT the local system name then and only then the template (rule) is leveraged. Doing this should leave local file content alone as is often defined in the actual rsyslog.conf file.
This article is outdated and confusing. The
"~"syntax is deprecated. The documentation says to replace it with “stop” but then everything after “stop” will be completely ignored.@Steffen
Thanks for the useful info, we will update the article soon.
What you need to do now is something like
if $fromhost-ip == '192.168.1.1' then {
  /var/log/router.log
 stop
}
which stops this very rule but not the rest of your config file.
@Steffen
Many thanks, ones again for sharing this. We are truly grateful.
Thank you! this saves me a lot of time!
Does rsyslog configuration support failover? for example does it work on primary secondary model?
If yes how I can defined in .conf file.
Hi Team,
I need to send non-standard logs to remote server via rsyslog. can you please share me steps ,
For Example, if i need to send a /var/opt/httpd/httpd.logs to my remote host via rsyslog . Please share me steps to my email ID ?
Thanks, worked on Centos 7 servers very well.
This works for remote logs coming in. However, this seems to prevent the local logs on the rsyslog server from being stored. How would you modify this so that the local logs for the rsyslog server itself are stored in the same directory structure as all the other logs from remote servers?
What are the different between rsyslog on Centos7 and Ubuntu? I really hard to identify it.
Hi,
Thank you for this article.
A little modification in lines of forward configurations, you have a space character between characters
.and*:Bye
@Sebastien
Using * means all facilities, using auth means only send auth logs.
Hi,
I have just a little comment because in your article you write a space character
"*. *"…Regards
Sebastien
Why did you choose to ignore the whole block of information above your single line forwarding rule? This client rule will hang if the syslog server isn’t answering.
@Robert
Okay, this is a great concern. We will update the article to include this point. Thanks for the feedback.