Varnish Cache is a free open source, modern and high-performance web application accelerator. It is a fast reverse HTTP proxy that caches content to speed up your web server performance, by storing web content in server memory – in a cache. It is configured to run in front of an origin server such as Apache (HTTPD) webserver.
When a client requests for content, Varnish accepts the HTTP request, sends the request to the origin server, caches the returned objects, and replies to the client request. The next time the client requests for the same content, Varnish will serve it from the cache. This way, it reduces the response time and network bandwidth consumption on future equivalent requests.
Varnish also works as an HTTP request router, web application firewall, load balancer, and more. It is configured using the flexible Varnish Configuration Language (VCL) which is extensible using Varnish Modules (also known as VMODs), supports for Edge Side Includes (ESL), Gzip compression and decompression, and much more.
In this article, you will learn how to install Apache HTTPD web server and Varnish Cache 6 on a fresh CentOS/RHEL 8 server, including configuring Varnish to run in front of HTTPD server.
Prerequisites:
- A server with CentOS 8 Installation
- A server with RHEL 8 installation with enabled Red Hat subscription on your system.
Step 1: Installing Apache Web Server on CentOS/RHEL 8
1. Begin by updating all installed software packages on the system as follows using the DNF command.
# dnf update
2. Next, run the following command to install the Apache HTTP web server from the AppStream repository.
# dnf install httpd
3. As soon as the installation is complete, start the httpd service, enable it to automatically start during system boot, and check its status to confirm that it is up and running, using the systemctl command.
# systemctl start httpd
# systemctl enable httpd
# systemctl status httpd
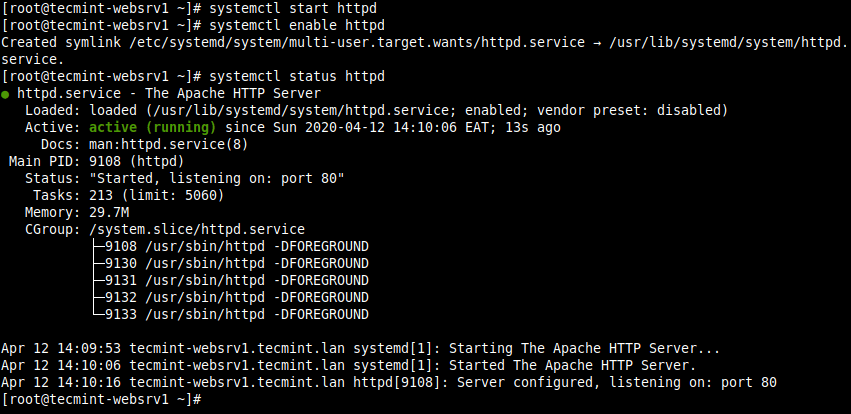
4. By default CentOS/RHEL 8 includes a fully locked down firewall (run firewall-cmd –state to confirm). You must open access to the HTTP service in the firewall to allow users access websites or applications running over HTTP, and also reload the firewalld settings to apply the new changes.
# firewall-cmd --zone=public --permanent --add-service=http
# firewall-cmd --reload
Step 2: Installing Varnish Cache 6.4 on CentOS/RHEL 8
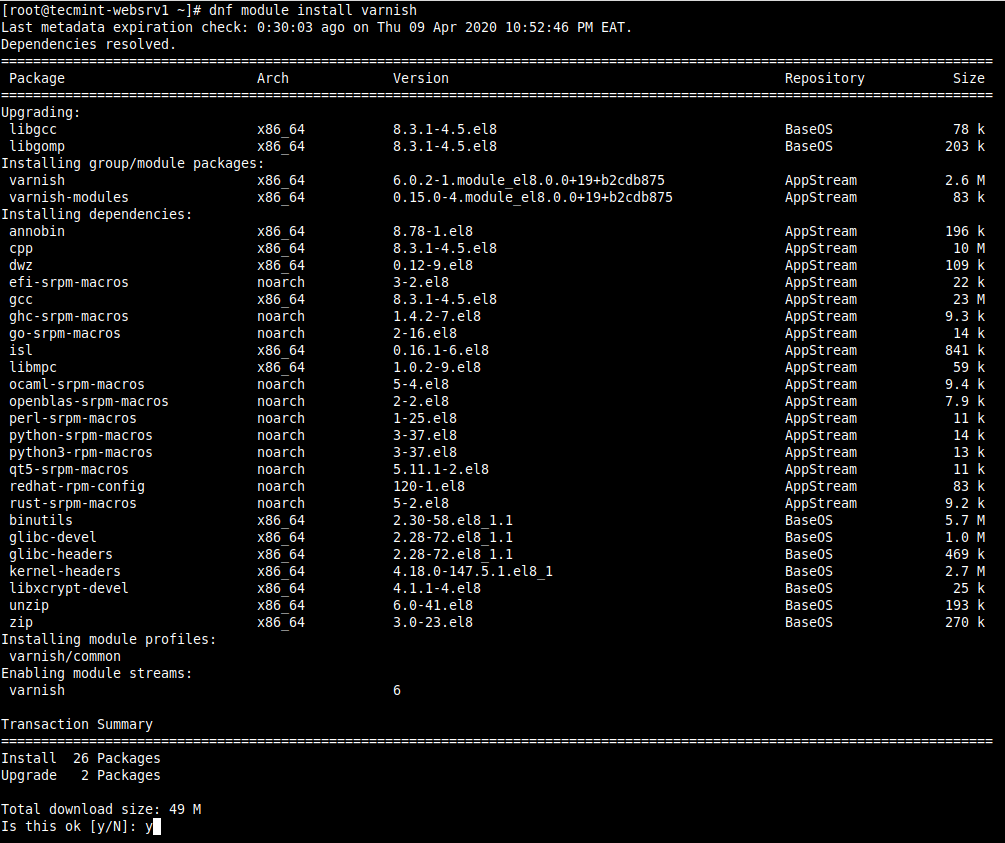
5. Now that the Apache web server is running, you can proceed further to install Varnish Cache on the system using the following command.
# dnf module install varnish
6. After a successful installation, you can verify the version of Varnish installed on your system.
# varnishd -V

7. Next, the main executable is installed as /usr/sbin/varnishd. Also, the Varnish configuration files are stored under the /etc/varnish directory, where:
- /etc/varnish/default.vcl – is the main varnish configuration file written using VCL.
- /etc/varnish/secret – is the varnish secret file.
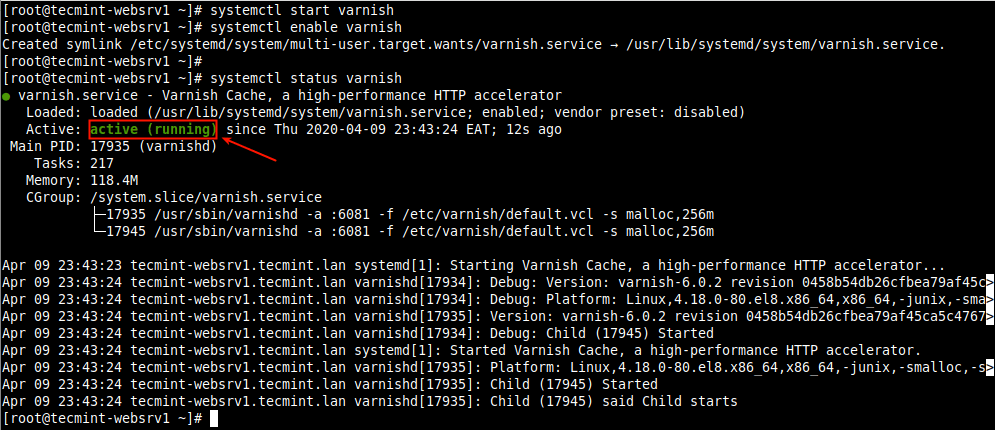
8. Now start the varnish service, for now, enable it to automatically start during system boot in case of a server restart and check its status to ensure that it up and running as follows.
# systemctl start varnish
# systemctl enable varnish
# systemctl status varnish
Step 3: Configuring Apache to Work with Varnish Cache
9. Now its time to configure Varnish Cache to run in front of the Apache service. By default the Apache server is configured to listen on port 80, this is defined in the main configuration file /etc/httpd/conf/httpd.conf.
Open it for editing using your favorite text editor.
# vi /etc/httpd/conf/httpd.conf
Look for the Listen parameter. To run Varnish in front of the Apache server, you should change the default port 80 to 8080 (or any other port of your choice) as shown in the following screenshot.
This port will be added as the backend server’s port in the Varnish configuration file later on.

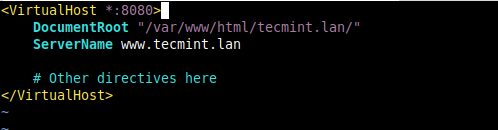
Also, the virtual host configuration for each web site/application that will serve via Varnish should be configured to listen to the above port. Here is the configuration for our test site (/etc/httpd/conf.d/tecmint.lan.conf).
<VirtualHost *:8080>
    DocumentRoot "/var/www/html/tecmint.lan/"
    ServerName www.tecmint.lan
    # Other directives here
</VirtualHost>
Important: To prevent the default Apache HTTP server test page from ever being used, comment out all the lines in the file /etc/httpd/conf.d/welcome.conf or simply delete the file.
# rm /etc/httpd/conf.d/welcome.conf
10. Next, test the httpd configuration syntax for any errors. If it’s OK, restart the httpd service to apply the new changes.
# httpd -t
# systemctl restart httpd

Configuring Varnish for Systemd
11. To deploy Varnish in front of HTTPD, you simply need to configure it to listen to client requests in the default HTTP port 80 as explained below.
Note that in Varnish Cache 6.0 and higher, you have to set the port varnish server listens on in the Varnish service file for systemd. First, open it for editing.
# systemctl edit --full varnish
Look for the ExecStart line, then change the value of the -a switch (which specifies the varnish listen to the address and port) from :6081 to :80 as indicated in the following screenshot.
Importantly, if you do not specify an address, varnishd will listen on all available IPv4 and IPv6 interfaces active on the server.
ExecStart=/usr/sbin/varnishd -a :80 -f /etc/varnish/default.vcl -s malloc,256m
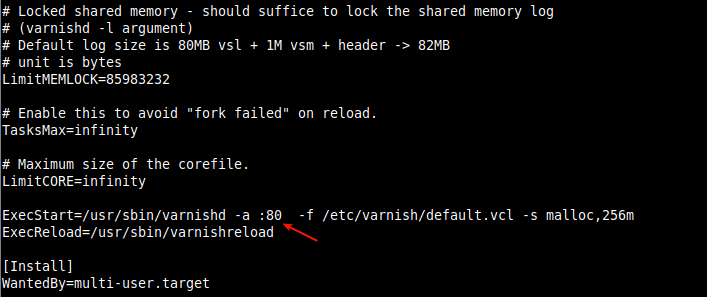
Save the changes in the file and exit.
Configuring Varnish Backend Servers using VCL
12. Now, you need to configure the origin server, known in Varnish terminology as a backend. It is the server that understands HTTP, Varnish talks to, to fetch content – httpd in this case. It is configured in the main configuration file /etc/varnish/default.vcl.
# vi /etc/varnish/default.vcl
There is a default backend configuration section called default. You may change “default” to server1 (or any name of your choice to meet your environment standards). By default, the host parameter points to the localhost, on assumption that the backend server is running on the localhost.
Then set the port to 8080 (the port you defined in Apache virtual host configuration file) as shown in the screenshot.
backend server1 {
    .host = "127.0.0.1";
    .port = "8080";
}
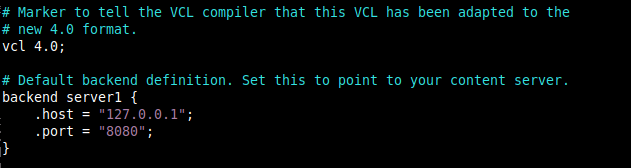
If your backend server is running on a different host, for example, another server with address 10.42.1.10, then the host parameter should point to this IP address.
backend server1 {
    .host = "10.42.1.10";
    .port = "8080";
}
Save the file and close it.
13. After making all the necessary changes concerning Varnish, reload the systemd manager configuration to reflect the new changes in the Varnish service file and also restart the Varnish service to apply the overall changes.
# systemctl daemon-reload
# systemctl restart varnish
14. At this point, Varnish and Apache should now be listening on port 80 and 8080 respectively. You can confirm this using the socket statistics command.
# ss -tpln

Step 4: Testing Varnish Cache and Apache Setup
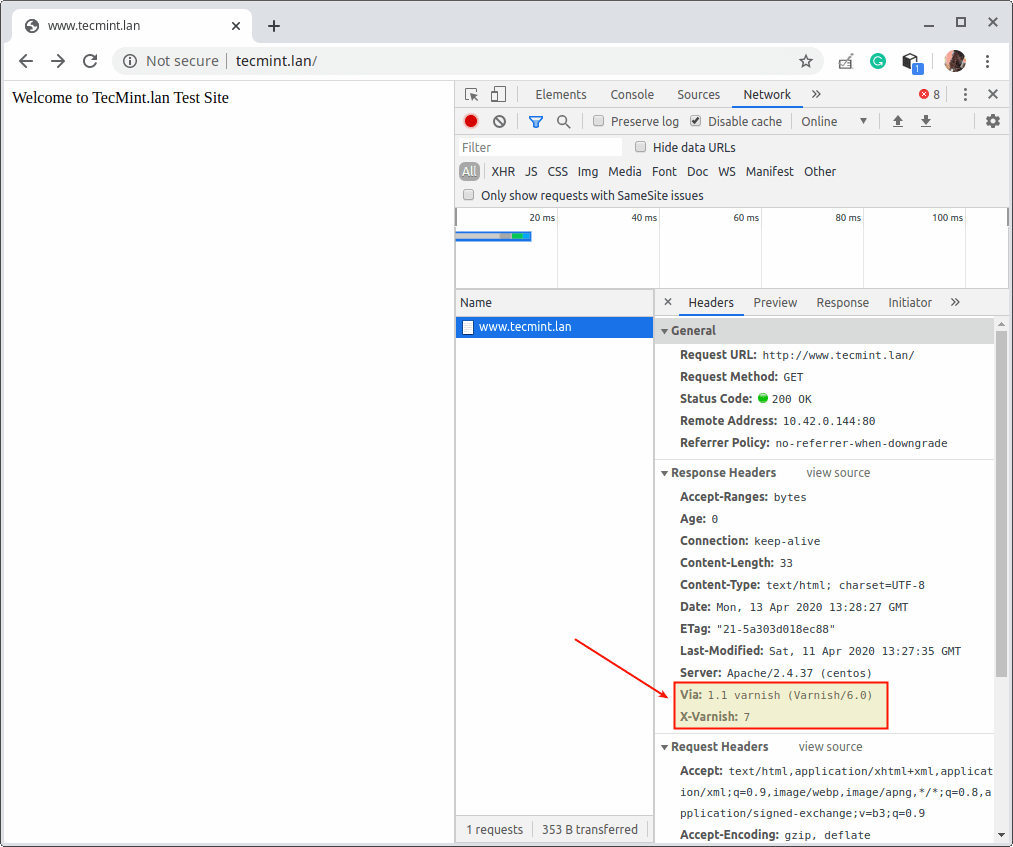
14. To test the Varnish Cache-HTTPD setup, open a web browser, and navigate using the server IP or FQDN as shown in the following screenshot.
http://10.42.0.144
OR
http://www.tecmin.lan
Then check if web pages are being served via Varnish Cache as follows. Check the HTTP headers by right-clicking on the displayed web page, select Inspect to open the developer tools, then click the Network tab, and reload the page. Then select a request to view the HTTP headers to confirm this as shown in the following screenshot.
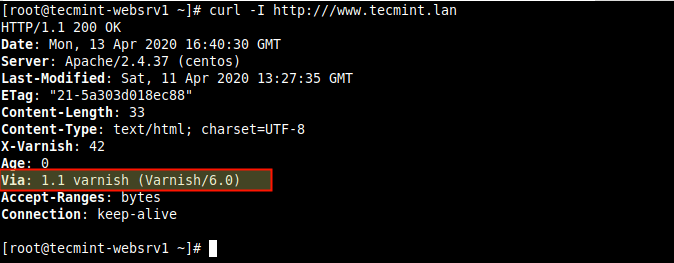
Alternatively, you can run the following curl command to verify it.
# curl -I http:///10.42.0.144
OR
#curl -I http:///www.tecmint.lan
Useful Varnish Cache Utility Programs
15. Let’s end this guide by looking at some of the useful programs that the Varnish Cache distribution comes with. They include utilities for varnish cache administration, displaying detailed log records, and view varnish performance statistics as described below.
varnishadm
The first is varnishadm which is used to administer a running Varnish instance. It establishes a command-line interface connection to varnishd. It can affect a running instance of Varnish by starting and stopping varnishd, changing configuration parameters, reloading the VCL, listing backends, and more.
# varnishadm
> backend.list
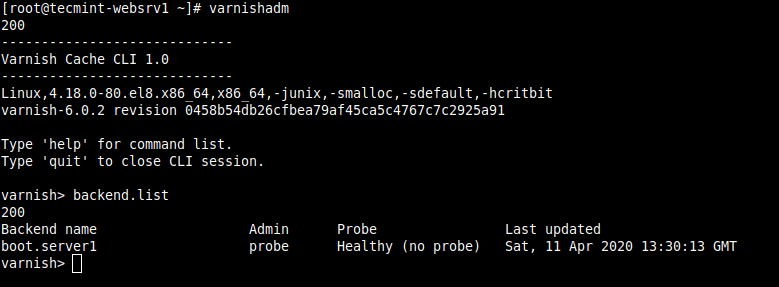
For more information, read man varnishadm.
varnishlog
The next program is varnishlog which is used to access request-specific data (i.e information about specific clients and requests). It provides large amounts of information, thus it is usually necessary to filter it.
# varnishlog
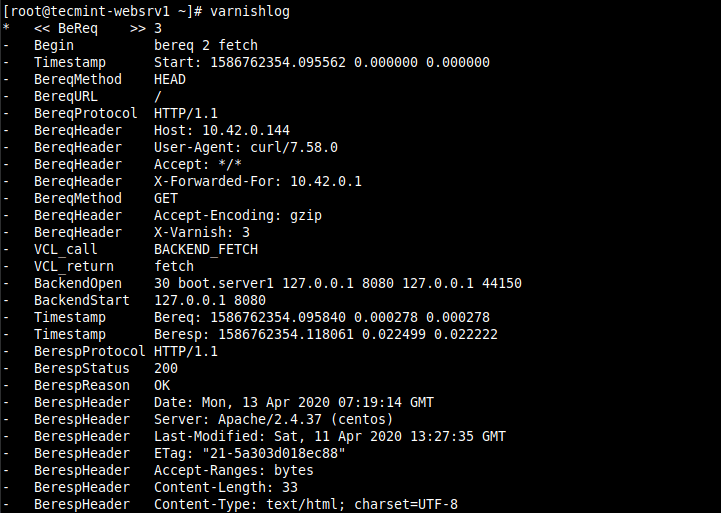
For more information, read the man varnishlog.
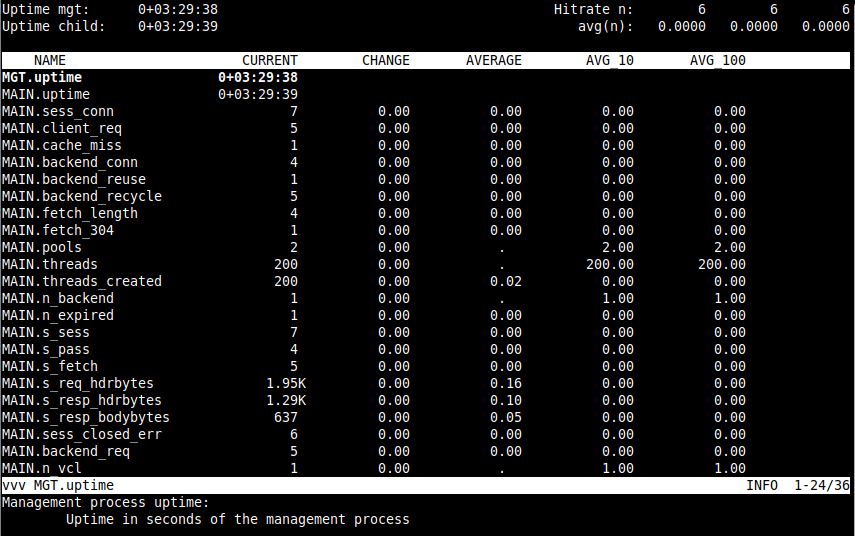
varnishstat
We also have varnishstat (varnish statistics) which is used to access overall statistics such as the number of total requests, number of objects, and more.
# varnishstat

For more information, read the man varnishstat.
varnishtop
Then we have varnishtop which a utility that reads the Varnish log and presents a continuously updated list of the most commonly occurring log entries.
# varnishtop
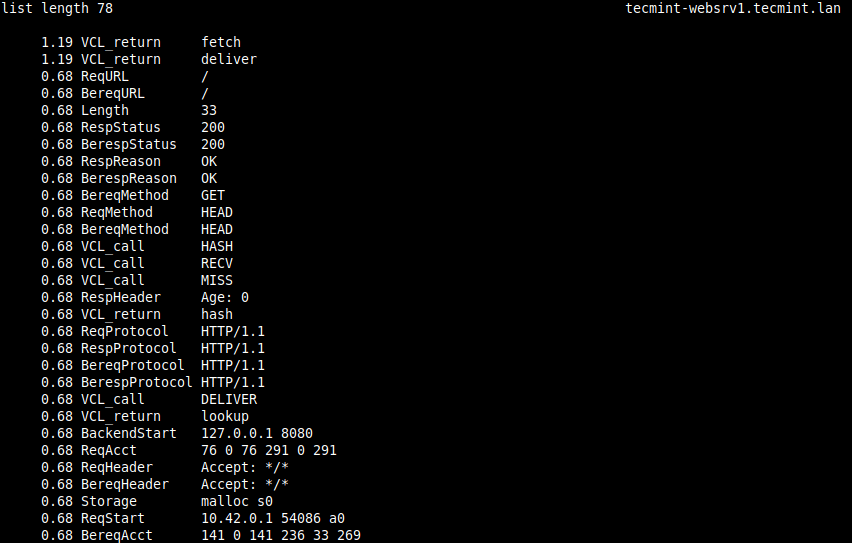
For more information, read the man varnishtop.
varnishhist
Another useful utility is varnishhist (varnish history) utility reads Varnish logs and presents a continuously updated histogram showing the distribution of the last N requests by their processing.
# varnishhist
For more information, read the man varnishhist.
There you have it! You have successfully deployed Varnish Cache to accelerate your web application content served using Apache HTTP Server on CentOS/RHEL 8.
If you have any queries about this topic or thoughts to share, use the feedback form below. Check out the Varnish Cache 6.0 documentation for more information.
If you want to enable HTTPS on your site, check our next article, which will show how to enable SSL/TLS for Varnish Cache using Hitch on CentOS/RHEL 8.


The varnish package for CentOS 8 is absolute rubbish. The unit file does not include EnvironmentFile=/etc/varnish/varnish.params so you will be banging your head against the wall when you start it and it doesn’t do what you want – it’s because it’s not reading ANY of your configuration parameters. You will need to edit/replace/drop-in the default unit file.