The Cacti tool is an open-source, web-based solution for network monitoring and system graphing in IT businesses. Cacti allows users to poll services regularly to create graphs using RRDtool.
It’s typically used to graph time-series data for metrics like network bandwidth utilization, CPU load, running processes, disk space, and more.
In this how-to, we will demonstrate how to install and set up a comprehensive network monitoring application called Cacti using the Net-SNMP tool on RHEL-based distributions such as CentOS Stream, Fedora, Rocky, and Alma Linux, using the YUM and DNF package manager tools.
Cacti Required Packages
The Cacti required the following packages to be installed on your Linux operating system.
- Apache : A Web server to display network graphs created by PHP and RRDTool.
- MySQL : A Database server to store cacti information.
- PHP : A script module to create graphs using RRDTool.
- PHP-SNMP : A PHP extension for SNMP to access data.
- NET-SNMP : An SNMP (Simple Network Management Protocol) is used to manage the network.
- RRDTool : A database tool to manage and retrieve time series data like CPU load, Network Bandwidth, etc.
For demonstration purposes, we used Rocky Linux 9 to install the Cacti tool, but the same instructions work for all RHEL-based distributions.
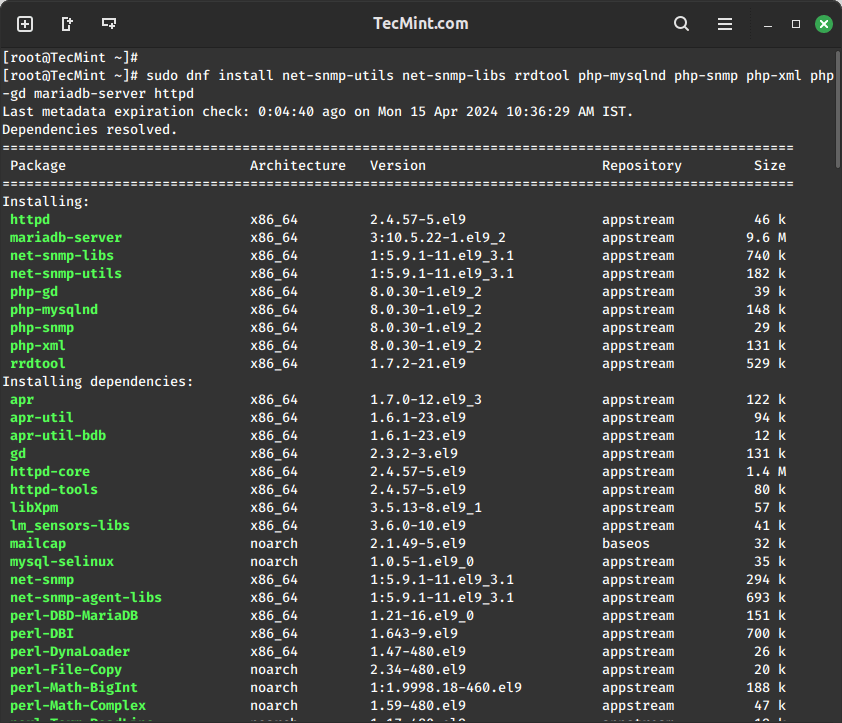
Step 1: Install Required Packages in Linux
First, begin by updating your system’s package repository to ensure you have the latest versions of software packages available.
sudo dnf update
Next, install the necessary packages for Cacti and its dependencies using the following command.
sudo dnf install net-snmp-utils net-snmp-libs rrdtool php-mysqlnd php-snmp php-xml php-gd mariadb-server httpd
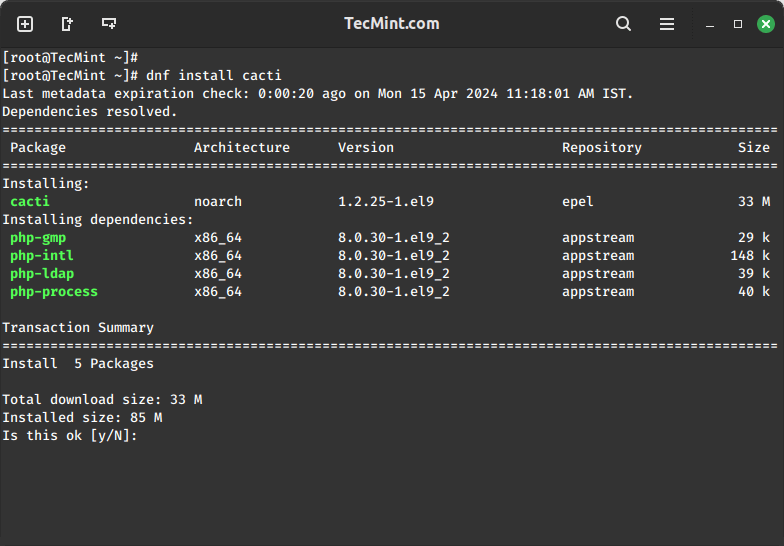
Step 2: Install Cacti Tool in Linux
To install Cacti, make sure that the EPEL repository is enabled on your system.
sudo yum install epel-release
Once the EPEL repository is enabled, you can install Cacti by running the following command.
sudo yum install cacti
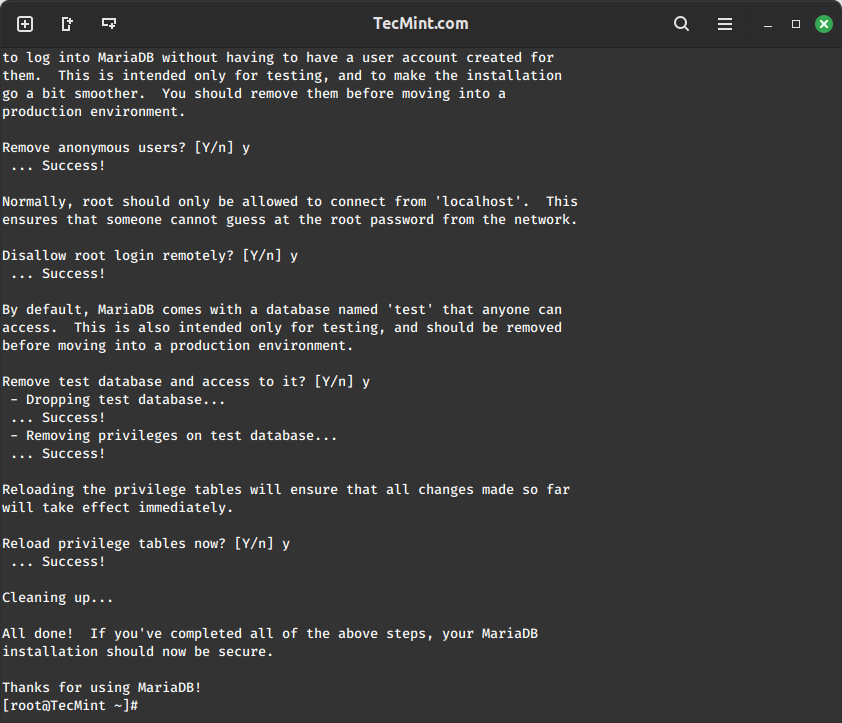
Step 3: Secure MariaDB Database
To configure MySQL for Cacti, we must first secure the newly installed MySQL server and then create the Cacti database with the user “Cacti“. If your MySQL is already installed and secured, you don’t need to do this again.
sudo mysql_secure_installation
Follow the prompts to set up a root password, remove anonymous users, disallow remote root login, and remove the test database.
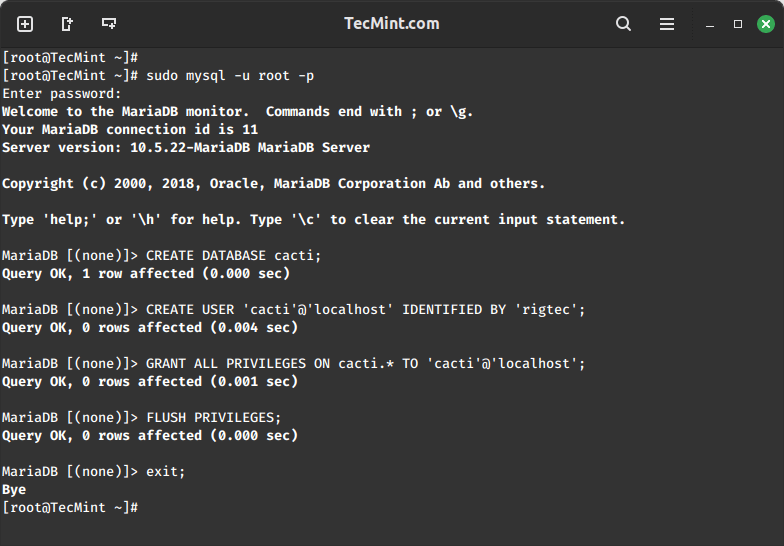
Step 4: Create Cacti Database
Log in to the MySQL server using the newly created password, and then create the Cacti database with the user “Cacti” setting a password for it.
sudo mysql -u root -p
CREATE DATABASE cacti;
CREATE USER 'cacti'@'localhost' IDENTIFIED BY 'your_password';
GRANT ALL PRIVILEGES ON cacti.* TO 'cacti'@'localhost';
FLUSH PRIVILEGES;
EXIT;
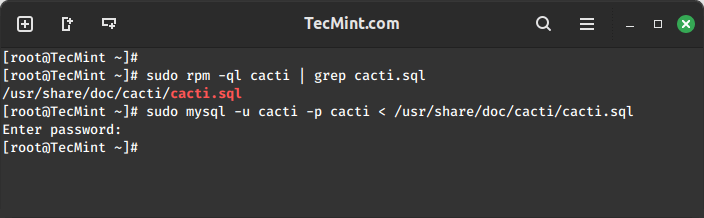
Next, you need to import the default Cacti database schema into the newly created database, but before that, you need to find out the database file path using the rpm command and import it as shown.
sudo rpm -ql cacti | grep cacti.sql
sudo mysql -u cactiuser -p cacti < /usr/share/doc/cacti/cacti.sql
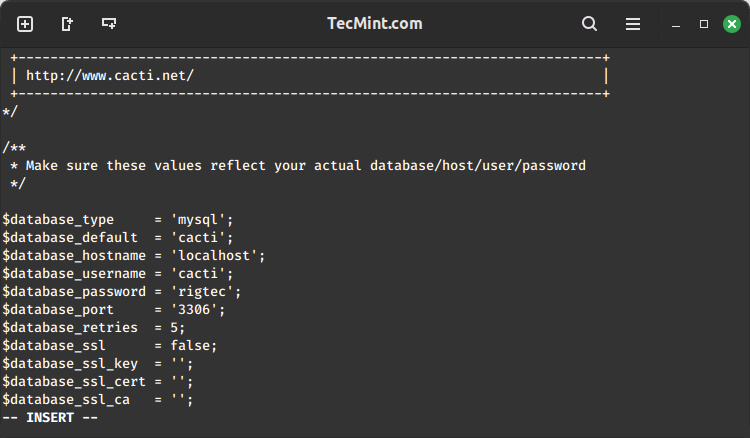
Step 5: Configure Cacti Database Connection
To configure the Cacti database connection, you need to open the configuration file as shown.
sudo vi /etc/cacti/db.php
Update the following lines with your database information.
$database_type     = 'mysql';
$database_default  = 'cacti';
$database_hostname = 'localhost';
$database_username = 'cacti';
$database_password = 'your_password';
Step 6: Configure Apache for Cacti
Open a file called /etc/httpd/conf.d/cacti.conf with your choice of editor.
sudo vi /etc/httpd/conf.d/cacti.conf
Add the following lines to the file:
Alias /cacti /usr/share/cacti
<Directory /usr/share/cacti/>
    Options +FollowSymLinks
    AllowOverride None
    <IfModule mod_authz_core.c>
        # Apache 2.4
        Require all granted
    </IfModule>
    <IfModule !mod_authz_core.c>
        # Apache 2.2
        Order Deny,Allow
        Deny from all
        Allow from all
    </IfModule>
</Directory>
Save and close the file.
Finally, restart the Apache and MariaDB services to apply the changes.
sudo systemctl restart httpd
sudo systemctl restart mariadb
Step 7: Configure Cacti Cron Job
Now open the crontab file to schedule polling intervals for Cacti.
sudo vi /etc/cron.d/cacti
Remove the comment from the following line. The poller.php script runs every 5 minutes to gather data from known hosts, which Cacti uses to create graphs.
*/5 * * * * cacti /usr/bin/php /usr/share/cacti/poller.php > /dev/null 2>&1
Step 8: Access Cacti Web Interface
To access the Cacti web interface, you need to open port 80 on the firewall to allow inbound traffic on that port.
sudo firewall-cmd --zone=public --add-port=80/tcp --permanent
sudo firewall-cmd --reload
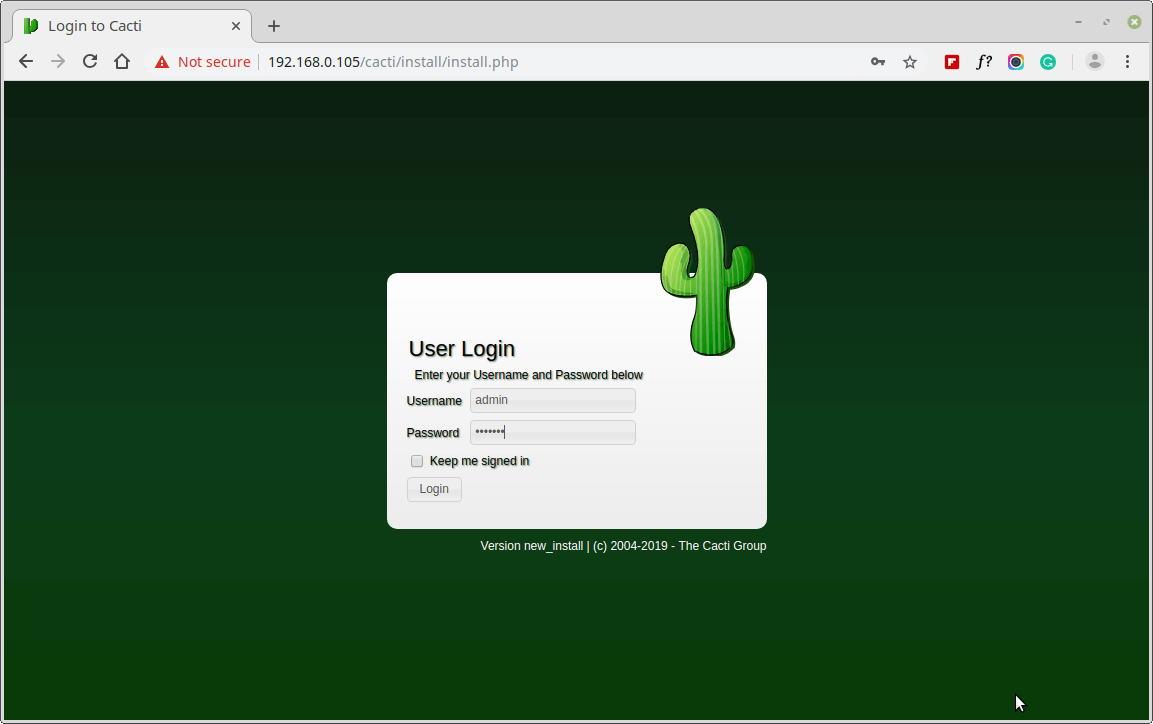
You can now access Cacti via a web browser using the server’s IP address or domain name as shown.
http://your_server_ip/cacti
OR
http://domain.com/cacti
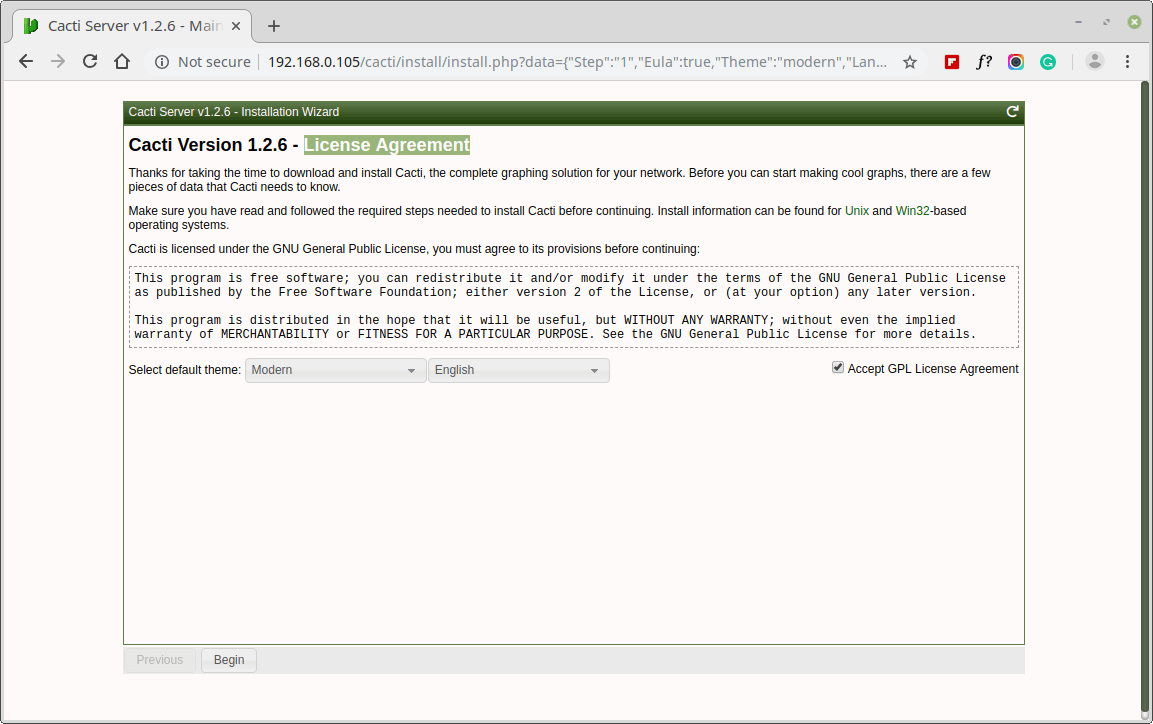
Now, follow the on-screen instructions to complete the installation process
User: admin
Password: admin
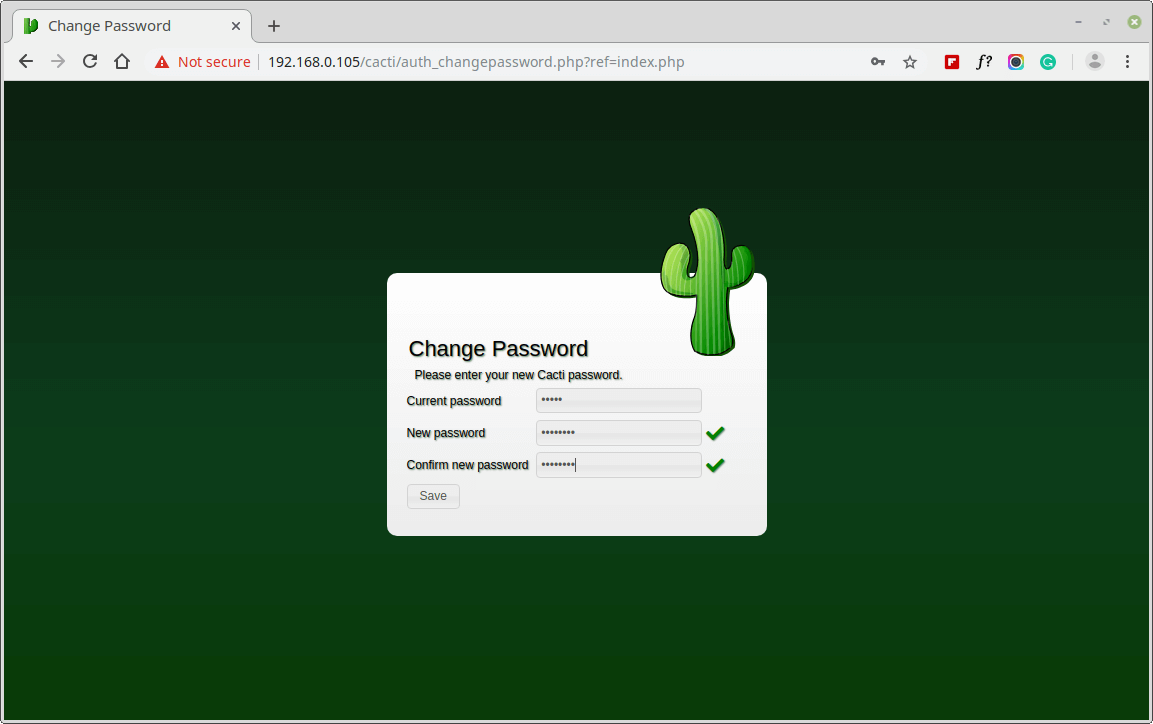
Next, change the default Cacti password.
Accept Cacti License Agreement.
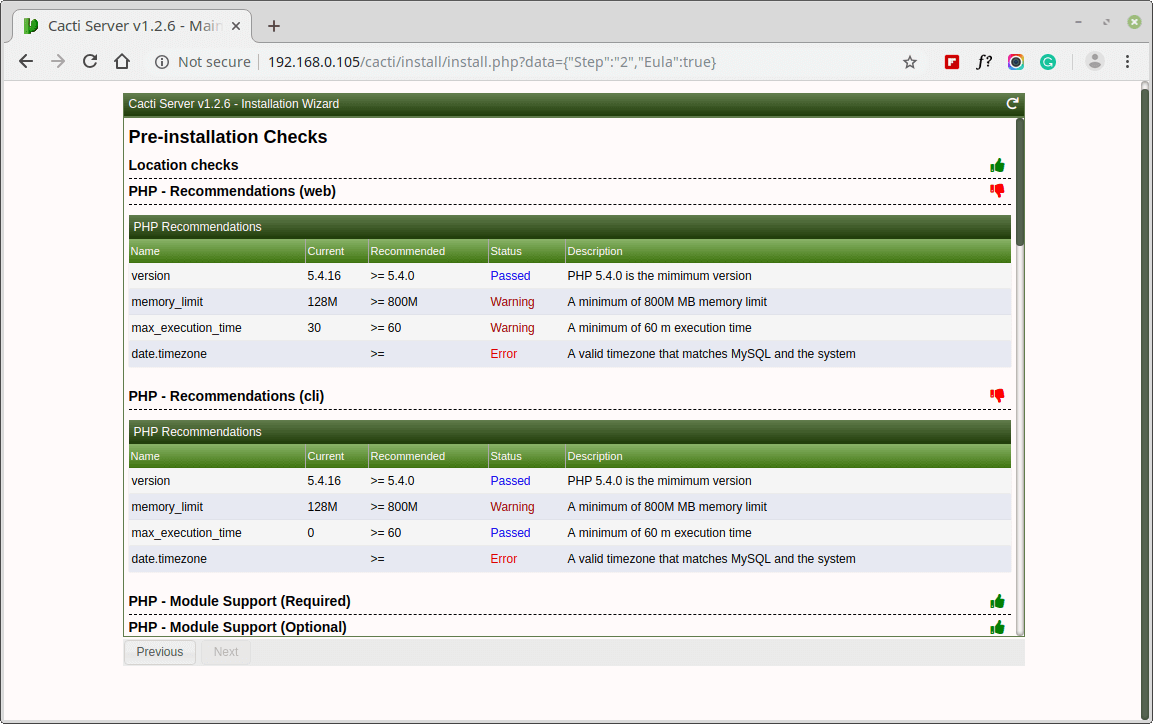
Next, the screen shows Pre-installation Checks for Cacti installation, please correct the suggested settings in your /etc/php.ini file as shown and restart Apache after making changes.
memory_limit = 800M
max_execution_time = 60
date.timezone = Asia/Kolkata
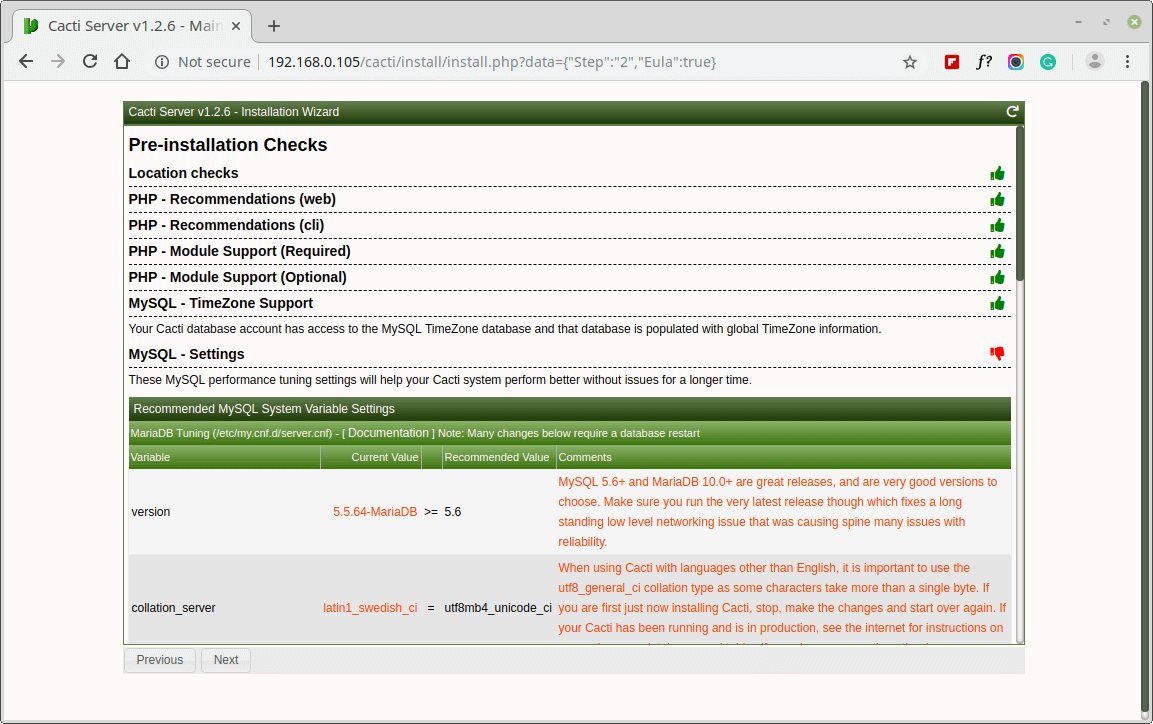
Similarly, you also need to grant access to the MySQL TimeZone database for user Cacti, so that the database is populated with global TimeZone information.
mysql> use mysql;
mysql> GRANT SELECT ON mysql.time_zone_name TO cacti@localhost;
mysql> flush privileges;
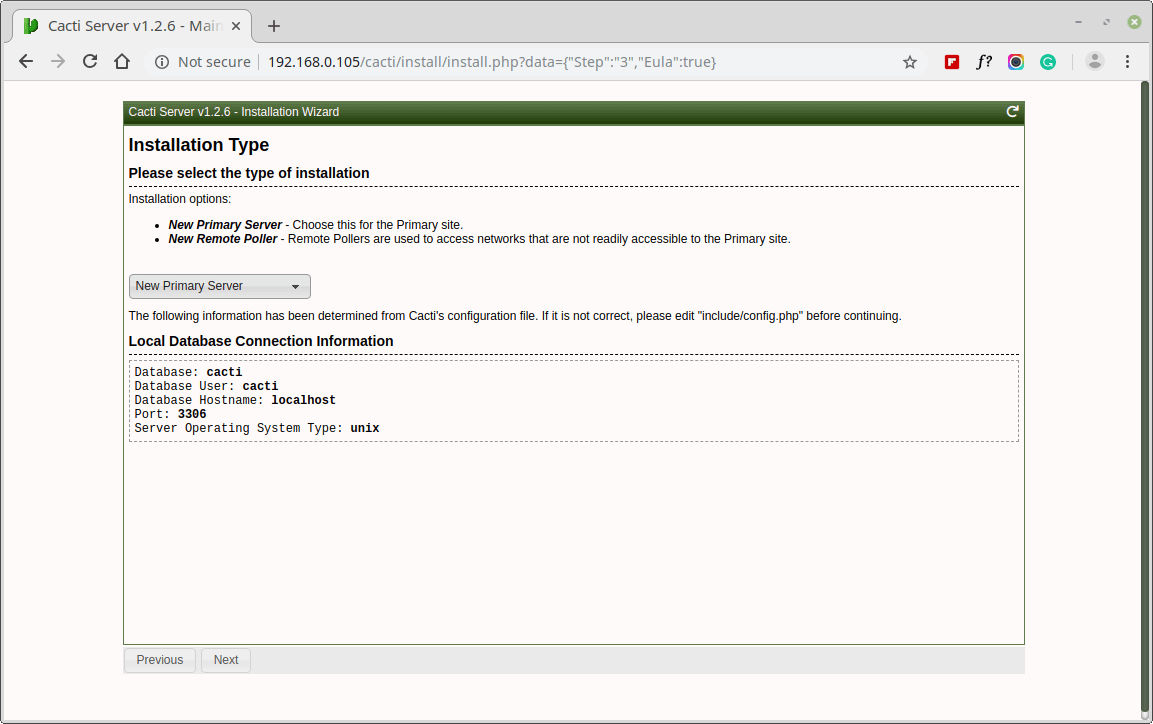
Please choose the installation Type as “New Install“.
Make sure all the following directory permissions are correct before continuing.

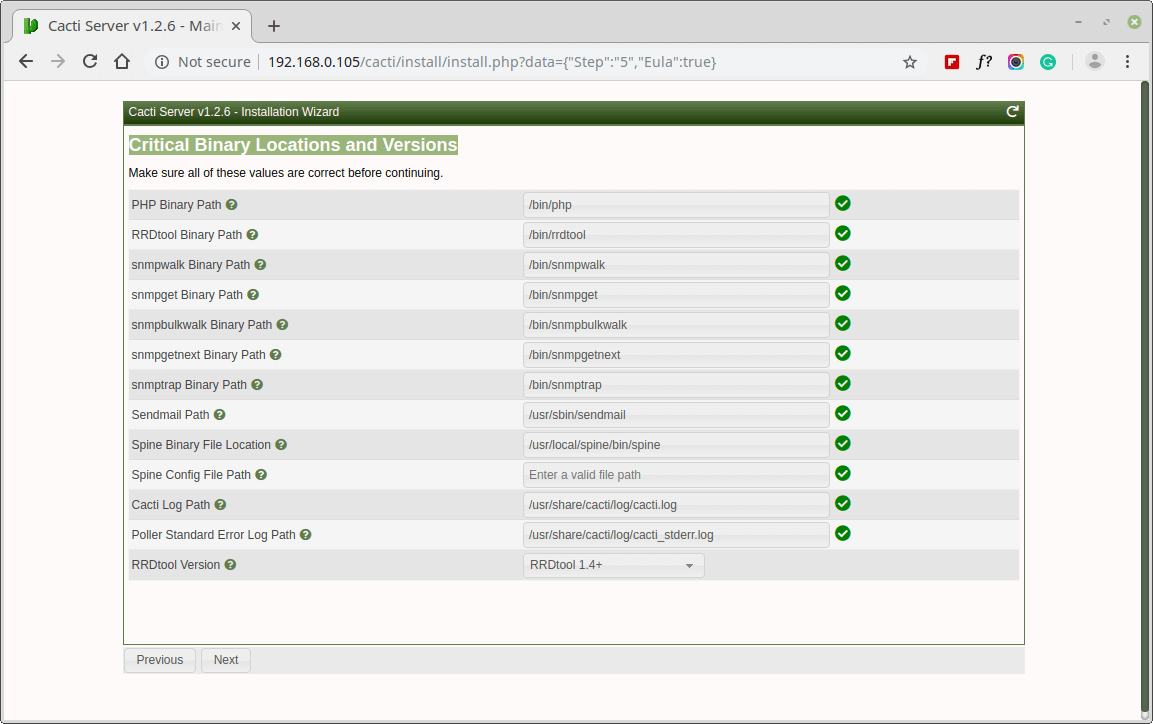
Make sure all of these Critical Binary Locations and Versions values are correct before continuing.
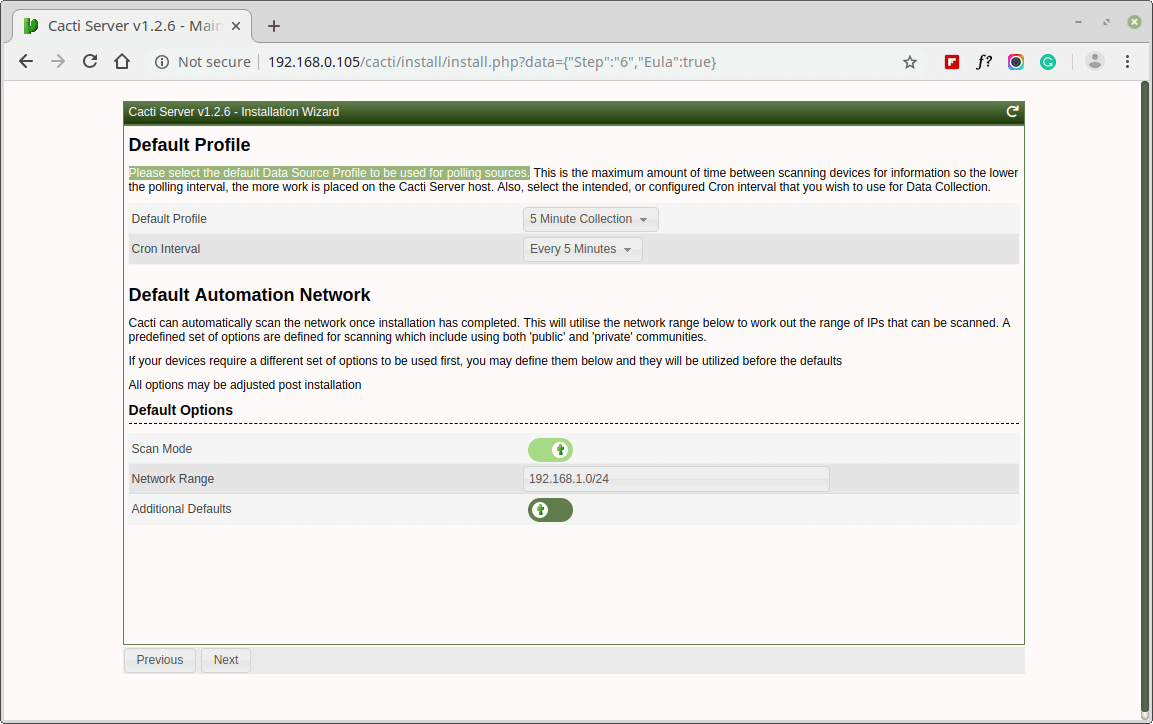
Please choose the default Data Source Profile to be used for polling sources.
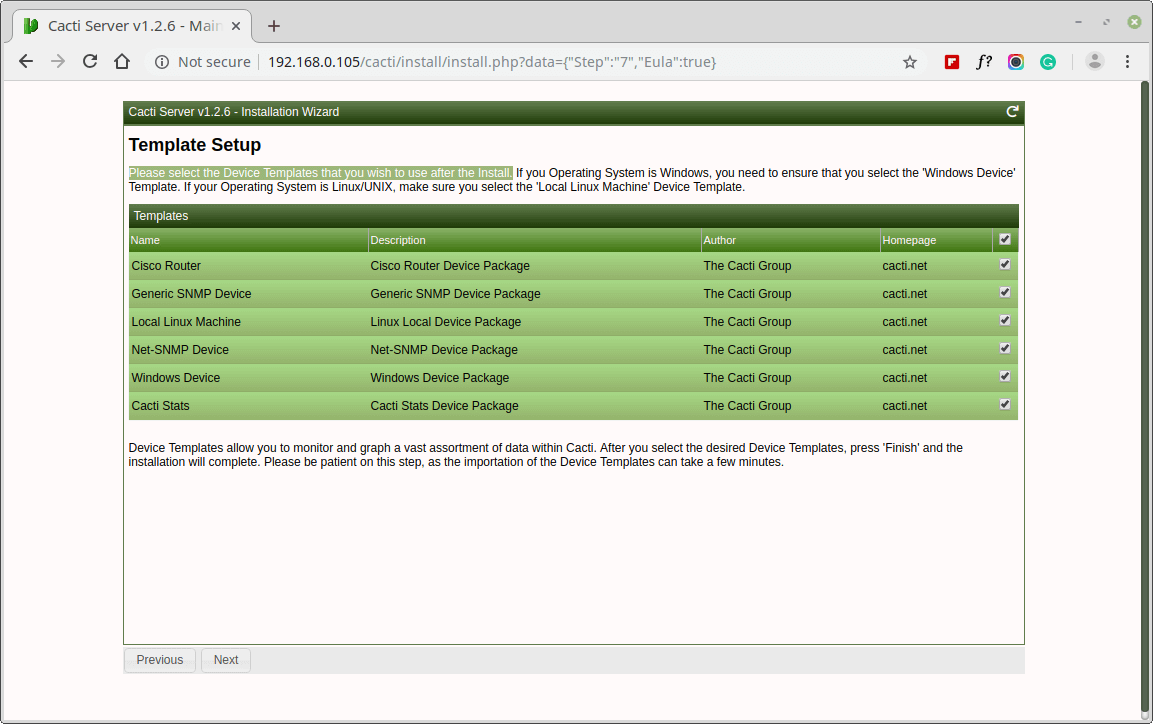
Please, choose the Device Templates that you wish to use after the Cacti Install.
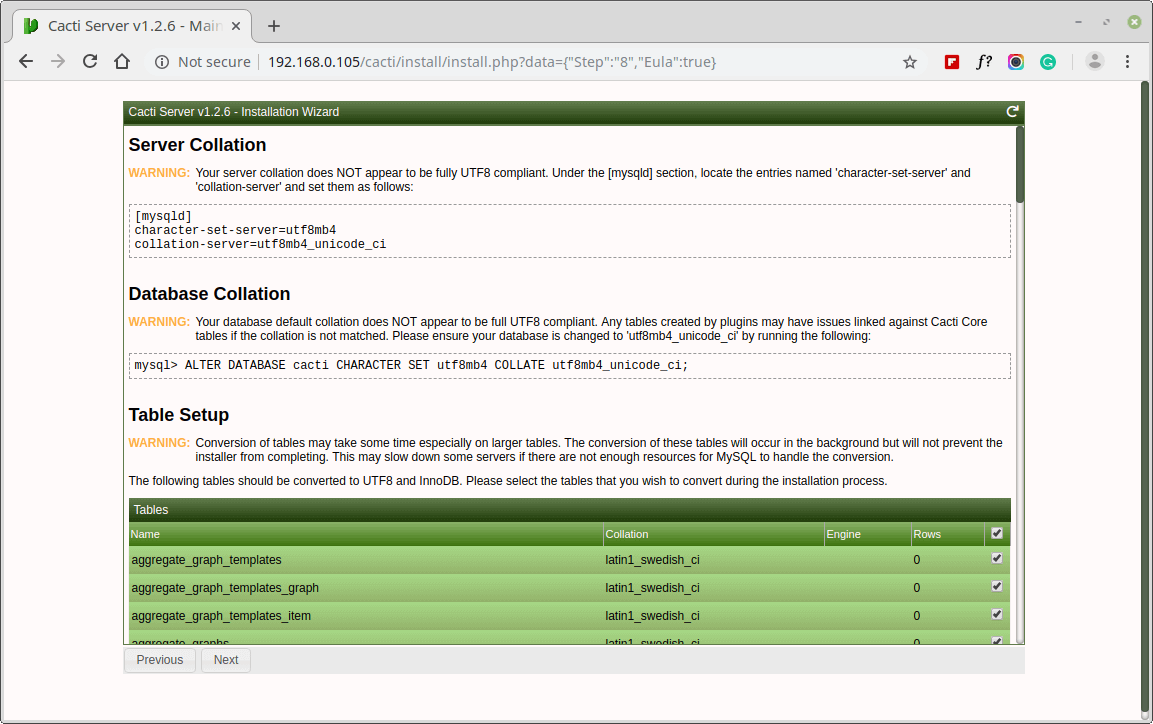
Set the Server Collation in your MySQL configuration file /etc/my.cnf under the [mysqld] section as shown.
[mysqld]
character-set-server=utf8mb4
collation-server=utf8mb4_unicode_ci
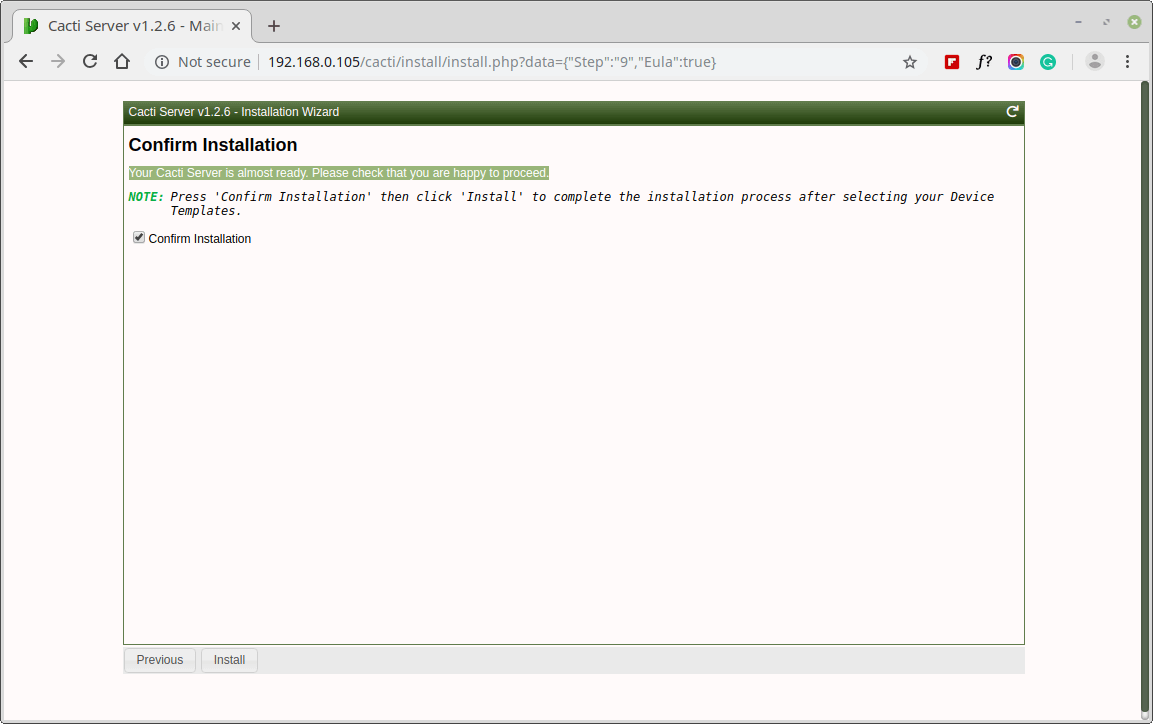
Your Cacti Server is almost ready. Please confirm that you are happy to proceed.

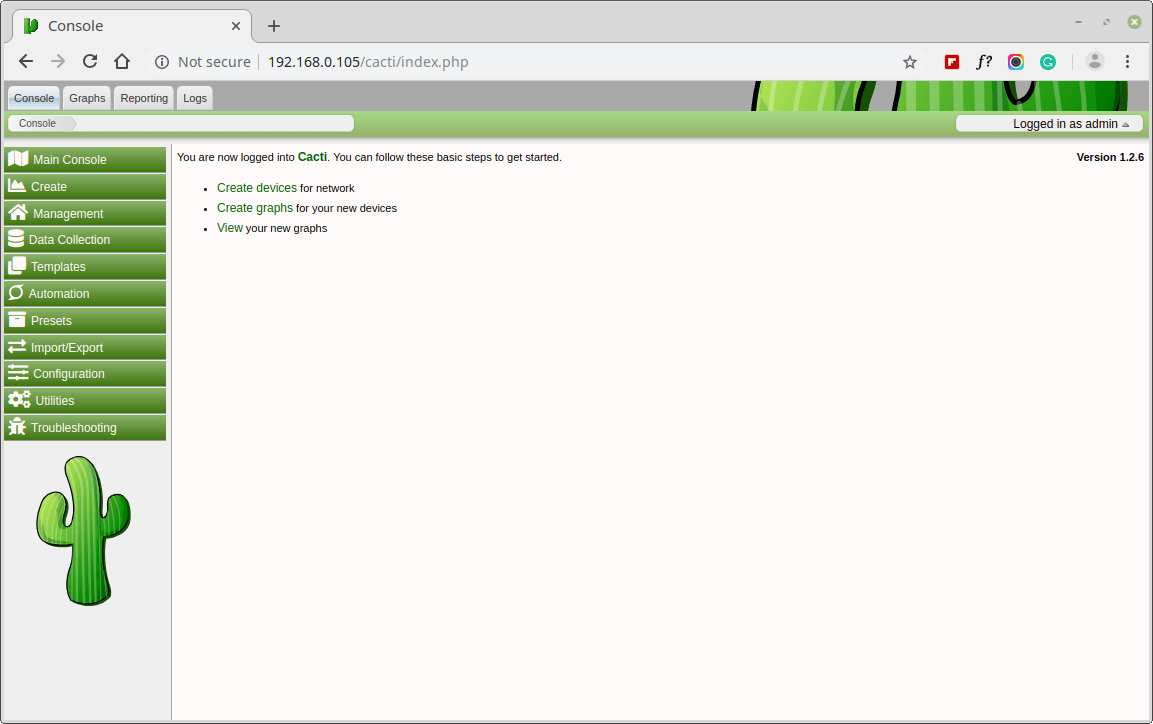
Congratulations! You have successfully installed Cacti on RHEL-based systems. You can now start monitoring your network infrastructure by adding devices, creating graphs, and setting up alerts within the Cacti web interface.


Another tutorial for installing Cacti, but it would be much better if you could post a guide on how to use it.
Hi, Please help. I have done everything right. All commands are executed without errors. For some reason. I cannot go past the “your mysql database is not populated” please help.
Thanks, it works. and how to upgrade?
I am facing this issue with mysql error when try to deploy it.
This guide is much easier to follow than the manual on Cacti, thank you. I’m having trouble with the Pre-Installation Checks. I went into the /etc/php.ini and changed the three settings you say to, but it only corrects the errors on the PHP (cli) section, not the (web) section. I’ve restarted apache about a dozen times, restarted MariaDB, and it’s not recognizing it. I can’t continue to the next section from here.
Rebooting my server fixed this issue.
@Daniel,
Could you share the errors here? so that we can have a solution for you…
I am getting no output from this command.
Sorry, this is the comment.
Thanks for the tutorial, but it was not so easy for me since it was no more than the first login, and what I did was edit the following file:
and look for the line that says: session.auto_start = 0 and changed it to: session.auto_start = on.
and went on with the installation.
I have installed this by following all the steps. But when I try to login with
admin/adminnothing happens. I can’t see any error in the logs.Any idea?
I have the same situation as Salman, log in with admin/admin nothing happens.
I found the solution on login with the user “admin” and password admin. Add two
//on this line: $cacti_cookie_domain = ‘cacti.net’; found here: ~$ sudo nano /usr/share/cacti/include/config.phpHi,
I changed the date.timezone = “Asia/Kabul” in php.ini but still when I open cacti shows the date.timezone error, please help me to solve this issue.
uncomment ;date.timezone = America/New York in /etc/php.ini and restart apache, it should work.
date.timezon >= Error, I couldn’t fix, I tried to install cacti in Centos7 and it in VMware, please help me to install
I have disabled Selinux, still cannot fix the issue and cannot continue the “next” step. Please help
Dear Ravi,
I am new in Cacti and just following your step to install Cacti. I got /usr/share/cacti/log/ “Not writable” at Installation Wizard page. I have tried chown -R apache.apache /usr/share/cacti/log/ and chown -R root.root /usr/share/cacti/log/ still cannot not fix the issue and cannot continue “next” step. Please help
@Clive,
This is likely an SELinux issue, check the context set on the log directory or else you can disable SELinux to fix it.
Thanks Ravi’s information. It is working now when I disable the selinux. Thank you very much.
Your mixing too many things in one post, Do it for one Os release, it will be better.
@Gurudatta,
But, most of these instructions are similar on these mentioned Linux distributions..
Why my graphs are empty after still a hour
Forbidden
You don’t have permission to access
/cacti/on this server.I am facing this error while visit
http://localhost/cacti/.Please give me solutions.
Thanks.
@Dev,
Please check your Cacti installation and also enable access to IP address on Apache. If you still get same error, check the logs for solution.
I have an error, while running the following command.
Please how to to do fix?
@Aung,
Could you share what error you getting while importing cacti database into MySQL?
Thanks for your reply. I have get this error message.
ERROR 1049 (42000): Unknown database ‘/usr/share/doc/cacti-0.8.8b/cacti.sql’
@Aung,
Have you created cacti database with user and privileges?
I ran into the below error.
MySQL TimeZone Support
ERROR: Your Cacti database login account does not have access to the MySQL TimeZone database. Please provide the Cacti database account “select” access to the “time_zone_name” table in the “mysql” database, and populate MySQL’s TimeZone information before proceeding.
and I followed these following instructions to resolve.
No package mariadb-server available.
What to do?
@Bhushan,
Add the MariaDB official Yum repository to install Mariadb.
My Cacti Graphs are not showing. Where should I check?
Thanks for your post. You can add epel repo installation to the post for CentOS7 with “yum install epel-release -y”
Hi, could you updated this guide for the latest version of cacti? seem there are some file permission needed for it to install the template.
I have installed Cacti but its not polling. It simply shows a white box with cacti logo.
Hi Ravi,
Great article, thank you.
It is just that I got stuck in running the Cacti installer. When I go to http://127.0.0.1, I got the infamous “You don’t have permission to access /cacti/ on this server” error.
I read through the documentation and various forums but it seems I cannot understand what is wrong and cannot get pas this error.
My /etc/httpd/conf.d/cacti.conf is:
--------
Alias /cacti    /usr/share/cacti


                # httpd 2.4
                Require all granted


                # httpd 2.2
                Order allow,deny
                # Deny from all
                Allow from 192.168.1.0/24


 -------
My network is 192.168.1.x network and I am running Fedora 27 on x86_64.
Any ideas on what I am missing?
Thank you.
@Tolga,
Please add the following lines to your cacti.conf file and restart the apache server.
Alias /cacti /usr/share/cacti <Directory /usr/share/cacti/> <IfModule mod_authz_core.c> # httpd 2.4 Require all granted </IfModule> <IfModule !mod_authz_core.c> # httpd 2.2 Order deny,allow Deny from all Allow from all </IfModule> </Directory>Thanks @Ravi!
mysql -u cacti -p raju < /usr/share/doc/cacti-1.1.28/cacti.sql
Enter password:
ERROR 1044 (42000): Access denied for user 'cacti'@'localhost' to database 'raju'
hi. I am getting the above error. can you please help me with this?
@Raju,
Better to import Cacti.sql to Cacti database using root and then grant permission to whole Cacti database as cacti user..
i want a guide to install the cacti
Hi,
Getting below error, please advise, thanks
# mysql -u cacti -p cacti < /usr/share/doc/cacti-1.1.24/cacti.sql
Enter password:
ERROR 1045 (28000): Access denied for user 'cacti'@'localhost' (using password: YES)
Forbidden
You don't have permission to access /cacti on this server.
@Sanmao,
Have you created Create MySQL Cacti Database? Please follow instructions carefully..
i create the database but still, i am getting the error.
MariaDB [(none)]> GRANT ALL ON cacti.* TO cacti@localhost IDENTIFIED BY ‘raju’; Query OK, 0 rows affected (0.02 sec)
is that ok?
@Raju,
Yes the MySQL query for granting permission on Cacti database to user cacti is correct. Could you please check the logs or post error here?
Hi, I am install cacti successfully, but when i install plug-ins, it can’t work and i am install older version of cacti it is work fine please resolve this issue.
@Arpit,
What errors you see while installing cacti Plugins? could you share here so that we can help you out.
ERROR: Your MySQL TimeZone database is not populated. Please populate this database before proceeding.
If I want use domain-name to access to my cacti server, instead of ip address. How could we do this?
For example: cacti.abc.com, instead of typing my ip address 192.168.X.X.
Thanks
@Danza,
Create a local virtualhost on Apache and point DocumentRoot to Cacti directory and in your desktop machine add local domain to hosts file.
when i tape ‘yum install cacti’ it says that no package cacti are available. What should i do ?!
@Maurin,
First, you need to enable EPEL Repository in your system to install Cacti package.
when entering on browser
http://myIP/cacti then it’s showing
This page isn’t working
103.74.227.22 is currently unable to handle this request.
HTTP ERROR 500
but when I enter
http://myIP/cacti/install
then install screen appears.
what could be the problem, and how to get rid of it.
Note: I turned off my firewall still the same problem.
hey Brother..
i have done everything .
only problem i am facing now is that when i enter
http://103.xx.101.10/cacti – its shows
This page isn’t working
103.xx.101.10 is currently unable to handle this request.
HTTP ERROR 500
but if i enter
http://103.xx.101.10/cacti/install/
then the install screen is working.
what could be the problem and how to solve it ?
I’m also getting a 500 error, I’ve gone through the procedures 3 times. What fixed it?
I am getting an error.
Error: your MYSQL timezone database is not populated. please populate the database before proceeding
I found many solutions on via google but none is working for me.
the most popular solutions are
1) shell> mysql_tzinfo_to_sql /usr/share/zoneinfo | mysql -u root mysql
when I run the above command it shows an arrow like this ( —-> ), after that I don’t know what to do.
2) second solution was
grant select on mysql.time_zone_name to cacti@localhost identified by ‘**your pass**)
when I run this second solution command it accepts it but still error is same.
please help ASAP
@Sam,
Try these commands to fix that MYSQL timezone database is not populated error.
it will solve your problem..
thanks for the reply
now I am having an error at cacti installation wiz screen as
Spine Binary File Location: The path to Spine binary.
/usr/local/spine/bin/spine (X)
means there is some problem with the location of the file or maybe the file is not on correct location, or maybe the file is not present on the server
i found out that i have to install the spine manually done installing it and configuring it
im not getting how to set spine file location
second main issue im facing is that snmp queries not writable error at directory permissions checks screen
i saw a video a person entered command
# chown -R apache:apache cacti
and the issue got resolved ..but he entered this command in a directory names as “html” . may be he created it or whatever ..i cant find this directory
please help
my cron job never runs. If I run it mannually I get following error:
Thanx Ravi! Everything is working great so far with one hiccup. All the devices report ‘Up’. I add the create graphs for the device but when I view the graphs they are all blank. However, if I click on the graph in real-time the graph is populated. I am not sure what to do at this point any ideas?
Thanks
jack
Will these instructions work on Fedora 25 server?
@Jack,
Yes, you can easily install Cacti on Fedora 25 by following these instructions..
Hello,
I having this error “FATAL: Cannot connect to MySQL server on ‘localhost‘. Please make sure you have specified a valid MySQL database name in ‘include/config.php‘ ” When I tried to connect the webserver. I am installing in a hyper-V enviorment with host also in same subnet . Do I need to change anything from the above? the “localhost ” would remain the same right ?
this one settled now as I had to change the password on database !
@Deepak,
Please include the correct host and database settings in include/config.php file and make sure your MySQL is running..
Ravi,
Maybe it’s just me but to get back to the last comments in this thread on your webpage I’ve had to hit the newer comments button literally about 15 times. You really need a button that takes everyone to the end.
@Jason,
Actually its difficult to show all comments in one page, it will make the page bigger in size and leads to slow loading, that’s the reason we have to break the comments into pages for easier navigation..
Nick,
In the instructions
GRANT ALL ON cacti.* TO cacti@localhost IDENTIFIED BY ‘tecmint’;
So you might want to try the password “tecmint” versus “YES”
I have run all the steps successfully as best I can validate. I’m running the latest Fedora with Apache 2.4 and I can’t get to http://localhost/cacti or http://localIPAddress/cacti or http://127.0.0.1/cacti.
Any hints?
@Jason,
I think Cacti installation was not successful, try to follow the instructions again carefully and see, if you still gets same error try to view the logs files of cacti and see what error it showing there?
I seemed to have missed something. When I type: [root@tecmint ~]# mysql -u cacti -p cacti < /usr/share/doc/cacti-0.8.8b/cacti.sql
(This is the correct location of the cacti.sql db on my machine)
Where is that password coming from? Am I creating a user called cacti on the local machine? I tried editing the db.php so that the $database_username was 'cacti' and the password was [password] but I get access denied when I use that password. I also tried creating a user on the local host named 'cacti' and giving it a password but I get the same error.
Just to be clear, the error I get after attempting to use any passwords I’ve set is:
ERROR 1045 (28000): Access denied for user ‘cacti’@’localhost’ (using password: YES)
@Nick,
Have you followed Set MySQL Password and Create MySQL Cacti Database sections in the article carefully? if not try to follow these steps and set root password (if not set) and create cacti user as shown…then you can able to import cacti database to cacti db..
Dear Support,
I have a problem on show cacti.log on cacti. It say “Error /usr/share/cacti/log/cacti.log is not readable“. I try to give full permission to user apache and cacti but it still got same error.
[root@localhost log]# ll /usr/share/cacti/log/cacti.log
-rwxrwxrwx. 1 apache cacti 1606 Nov 26 03:00 /usr/share/cacti/log/cacti.log
@Leng,
I think you should assign permission apache user like:
Hi, Ravi
I followed step by step for centos7 and when i go to http://YOUR-IP-HERE/cacti/
I have this message : You don’t have permission to access /cacti/ on this server.
Why ? how can i resolve it ?
thank you
@Karim,
Make sure you’ve disabled SELinux mode, if not disable it and try again..
Hi, i am from Paris and i followed your tutorial, i have this error at this step ;
mysql -u cacti -p cacti < /usr/share/doc/cacti-0.8.8b/cacti.sql
Enter password: (what is the password ???)
ERROR 1045 (28000): Access denied for user 'cacti'@'localhost' (using password: YES)
Could you help me ? I use CentOS 7.2
I have the same error. I think it has something to do with the way the guide sets the username compared to the default username but I can’t figure it out.
Hi,
I have configured cacti. It was asking for the login details as well but at the password change page it is showing below error:
“The requested URL /auth_changepassword.php was not found on this server.”
Please suggest.
Dear Ravi,
Thanks for your support , one more thing ..it seems to be a time mismatch in cacti time range..i have edited RTC to local timezone but still my graphs are not showing on current timings instead they are shown with a differnce of 5 hours. My timezone is Asia/Karachi
@Aun,
I think you should sync your sever time with NTP, here is the guide on how to do it: https://www.tecmint.com/install-ntp-server-in-centos/
Dear Ravi,
Hope you are fine. I have installed cacti as per your guide and I have then added Localhost in devices and template of load average, I am getting NAN value in graphs, should i wait for 24 hours to get it to poll ??
I have disabled SElinux and run this command as you told (php /usr/share/cacti/poller.php), I hope for your usual support..
@Aun,
Yes, I am find, hope you too as well, yes you should wait at least 24 hours after running poller.php script to gather data and generate report using graphs..
Hi Ravi,
I get Http Error 500 when i go http://serverip/cacti…please help
@Aun,
It seems your Cacti installation was not successful, I suggest you to follow instructions carefully and step-by-step to avoid any issues..
Please provide configure guide in network monitor tool for cacti.
Assalamu ‘alaikum wa rahmatullahi wa barakatuh.
Dear Ravi,
I really appreciated your effort doing this. I have only one problem encountered which is [ERROR: FILE NOT FOUND] /usr/share/cacti/log/cacti.log.
Would you please advise if I have to create manually the cacti.log file. Thank you very much in advance.
Kind regards,
Ali
@Ali,
Yes, you can create manually that Cacti log file as shown:
All set Ravi. Your the man.
[OK: FILE FOUND]
Thank you so much. ^_^
Hi,
I have been trying to install cacti monitoring tools for one of our internal server, unforfunalty im facing this issue while the installation process going on..
Step: Install Cacti Tables to MySQL
# /usr/share/doc/cacti-0.8.8b/cacti.sql
[root@localhost ~]# mysql -u cacti -p cacti < /usr/share/doc/cacti-0.8.8b/ cacti.sql
-bash: /usr/share/doc/cacti-0.8.8b/: No such file or directory
What could be the issue for the above step?
@Cvaa,
The error is self explanatory, the file
cacti.sqldoesn’t exist on the specified location, do you see the file under/usr/share/doc/cacti-0.8.8b/directory?Ravi,
Can you ping me offline to discuss the issue I am having?
@Chris,
You can contact me at [email protected] for any Cacti related issues, I will love to help you till the problem gets sorted.
Still no luck….Built a new VM server and did the same install, without any security loaded. Any ideas are welcome.
I have cacti working as shown in this howto. I appreciate all your effort. It has been a learning experience…
My issues are that the RRD background is shown and the SNMP is capturing stats.
I do not get any actual graph data.
If you can contact me offline or respond soonest. RHEL 7.2 with SELINUX permissive.
I can send pics if you need them. Debugging shows snmp working and the DB talking…..
tried 777 etc before and get the same results…thank in advance.
@Chris,
Thanks for appreciating our efforts in creating such easy article for you guys, regarding your issue, just give a day to pull the data from the server, or else you can manually run the poller.php script to update the graphs on the fly..
HI
under settings there is a – RRDTool Default Font Path option
what do i need to put in this field?
@Max,
No need to add anything, we are not using any fancy fonts for graphs, just skip this step and continue cacti installation.
I’m done the installation. Now i’m facing problem to add device, I added my pc to devices but the status is unknown, no graph is generate and just showing broken image. Any solution?
@Max,
Have you disabled SELinux mode? could you share the screenshot of the graph with us? so that we can help you out..
Hi Ravi,
Yes, I already disabled SELinux mode. Please refer link below.
Screenshot: http://www.filetolink.com/b1f31c8311
@Max,
Check two things, first check the logs under /var/log/ what error exactly you seeing in the logs and secondly try to run the following command and see what output you getting on the screen, share both results with me..
HI Ravi,
I re-install cacti from the scratch but now I have the same problem all guys have in http://192.168.8.102/cacti/install/index.php
[NOT FOUND] Cacti Log File Path: The path to your Cacti log file.
/usr/share/cacti/log/cacti.log
[ERROR: FILE NOT FOUND].
so please if there is any solution for this because i searched and i didn’t
find the solution.
thanks Ravi for your support
@Erramah,
This should resolve your issue.
It’s works!.. awesome.. thanks Ravi.
Dear,
I follow everything from this guidelines but after I entering to browser by using http://myip/cacti/, there was error : FATAL: Cannot connect to MySQL server on ‘localhost’. Please make sure you have specified a valid MySQL database name in ‘include/config.php’
What should I do? Your advise is much appreciated.
Thank you.
Dear Ravi,
Problem was resolved after I reconfigure the include.php. But the problem now, the graph doesn’t appear, it’s showing broken image. Kindly assist. Looking forward for you reply.
Thank you.
@Misterbux,
Try to disable SELinux and see..
Dear Ravi,
I will try and revert back to you the outcome.
Thanks.
Hello Ravi,
Thank you for these useful information I really appreciate you. I really need using cacti in my work. so I followed all the steps correctly. however, when I entered my ip add http://ipadd/cacti it is showed nothing, I changed all the value to allow my ip but nothing is change. then after I followed some posts but I really lost and many issues raised. Now I am getting The requested URL cacti was not found on this server.
@Erramah,
It seems your Cacti installation wasn’t successful, try following the instructions carefully again and make sure your SELinux is in disabled mode..If you don’t know how to make SELinux to disable state, try reading our article here: https://www.tecmint.com/disable-selinux-temporarily-permanently-in-centos-rhel-fedora/
Re:
[NOT FOUND] Cacti Log File Path: The path to your Cacti log file.
/usr/share/cacti/log/cacti.log
[ERROR: FILE NOT FOUND]
This should resolve your issue.
mkdir /var/log/cacti
touch /var/log/cacti/cacti.log
/usr/share/cacti/log is a symlink to /var/log/cacti which doesn’t exist
I got the same error as Saguu
@Samuel,
May I know on which Linux distribution version you guys trying? so that I can setup locally on my VM to test it myself and will give you proper solution to this problem. I still think its something that Cacti was not installed properly or may be bug in the cacti release..
@Ravi
For informations : CentOS 6.8 and cacti version 0.8.8h from repo el6
@Saguu,
Thanks for sharing Linux OS information, will give a try right away with solution…stay tuned till then..
Hello, I just try again in a moment. But it still does not work. It seems that this is a problem of authorization on file .. What do you think?
Nice job ! Perhaps, i have a problem with http://ip/cacti/install/index.php
In this page, i have this error :
[NOT FOUND] Cacti Log File Path: The path to your Cacti log file.
/usr/share/cacti/log/cacti.log
[ERROR: FILE NOT FOUND]
Have you an idea for this ?
Regards,
Saguu
@Saguu,
I don’t think your Cacti installation was successful, please try to re-install again and see..
Nice try but it’s the second installation (clean VM). I followed your tutorial step by step. :(
For informations : CentOS 6.8 and cacti version 0.8.8h from repo el6
Thank you! Very clear and concise!
Hello,
Please could someone advise, I am not getting any graphs and it displays broken image.
mysql> show databases;
+——————–+
| Database |
+——————–+
| information_schema |
| cacti |
| mysql |
| test |
+——————–+
I am only using username root on mysql…
vi /etc/cron.d/cacti
*/5 * * * * root /usr/bin/php /usr/share/cacti/poller.php > /dev/null 2>&1
vi /etc/cacti/db.php
$database_type = “mysql”;
$database_default = “cacti”;
$database_hostname = “localhost”;
$database_username = “root”;
$database_password = “xxxxxxxx”;
$database_port = “3306”;
$database_ssl = false;
cd /usr/share/cacti/
ls -ls
8 -rw-r–r– 1 root root 5860 May 9 16:20 about.php
8 -rw-r–r– 1 root root 5348 May 9 16:20 auth_changepassword.php
16 -rw-r–r– 1 root root 14690 May 9 16:20 auth_login.php
12 -rw-r–r– 1 root root 10366 Jun 15 12:26 cacti.log
20 -rw-r–r– 1 root root 20257 May 9 16:20 cdef.php
0 lrwxrwxrwx 1 root root 18 Jun 14 12:24 cli -> /var/lib/cacti/cli
28 -rwxr-xr-x 1 root root 26620 May 9 16:20 cmd.php
8 -rw-r–r– 1 root root 6731 May 9 16:20 color.php
24 -rw-r–r– 1 root root 23082 May 9 16:20 data_input.php
36 -rw-r–r– 1 root root 33807 May 9 16:20 data_queries.php
60 -rw-r–r– 1 root root 57419 May 9 16:20 data_sources.php
32 -rw-r–r– 1 root root 31482 May 9 16:20 data_templates.php
8 -rw-r–r– 1 root root 6108 May 9 16:20 gprint_presets.php
4 -rw-r–r– 1 root root 3657 May 9 16:20 graph_image.php
16 -rw-r–r– 1 root root 13060 May 9 16:20 graph.php
12 -rw-r–r– 1 root root 9438 May 9 16:20 graph_settings.php
20 -rw-r–r– 1 root root 17980 May 9 16:20 graphs_items.php
40 -rw-r–r– 1 root root 39491 May 9 16:20 graphs_new.php
60 -rw-r–r– 1 root root 57810 May 9 16:20 graphs.php
12 -rw-r–r– 1 root root 10229 May 9 16:20 graph_templates_inputs.php
20 -rw-r–r– 1 root root 18710 May 9 16:20 graph_templates_items.php
28 -rw-r–r– 1 root root 25602 May 9 16:20 graph_templates.php
44 -rw-r–r– 1 root root 42189 May 9 16:20 graph_view.php
8 -rw-r–r– 1 root root 6480 May 9 16:20 graph_xport.php
56 -rw-r–r– 1 root root 57011 May 9 16:20 host.php
20 -rw-r–r– 1 root root 18756 May 9 16:20 host_templates.php
4 drwxr-xr-x 2 root root 4096 Jun 14 12:24 images
4 drwxr-xr-x 5 root root 4096 Jun 14 12:24 include
4 -rw-r–r– 1 root root 2323 May 9 16:20 index.php
4 drwxr-xr-x 2 root root 4096 Jun 14 12:24 install
4 drwxr-xr-x 3 root root 4096 Jun 14 12:24 lib
0 lrwxrwxrwx 1 root root 15 Jun 14 12:24 log -> /var/log/cacti/
4 -rw-r–r– 1 root root 2838 May 9 16:20 logout.php
4 drwxr-xr-x 2 root root 4096 Jun 14 12:24 plugins
28 -rw-r–r– 1 root root 24716 May 9 16:20 plugins.php
8 -rw-r–r– 1 root root 4310 May 9 16:20 poller_commands.php
4 -rw-r–r– 1 root root 3374 May 9 16:20 poller_export.php
20 -rwxr-xr-x 1 root root 18596 May 9 16:20 poller.php
4 drwxr-xr-x 5 root root 4096 Jun 14 12:24 resource
0 lrwxrwxrwx 1 root root 18 Jun 14 12:24 rra -> /var/lib/cacti/rra
8 -rw-r–r– 1 root root 7475 May 9 16:20 rra.php
0 lrwxrwxrwx 1 root root 22 Jun 14 12:24 scripts -> /var/lib/cacti/scripts
12 -rw-r–r– 1 root root 10819 May 9 16:20 script_server.php
8 -rw-r–r– 1 root root 6202 May 9 16:20 settings.php
8 -rw-r–r– 1 root root 6227 May 9 16:20 templates_export.php
8 -rw-r–r– 1 root root 5771 May 9 16:20 templates_import.php
20 -rw-r–r– 1 root root 19673 May 9 16:20 tree.php
44 -rw-r–r– 1 root root 42623 May 9 16:20 user_admin.php
60 -rw-r–r– 1 root root 58501 May 9 16:20 utilities.php
Thanks tecmint for responding to my post. The problem was symbolic link to log file
Hi!
Thanks for manual, just installed on Centos 6.8. When allowing 80 port in firewall better to use insertion (iptables -I), because in my case, rules was added after reject rule, and http service was unavailable
Hi, for installing plugins on Cacti, do i need to install anything else, do you have a manual for this version of Cacti 0.8.8g?
Regards,
@Pablo,
No you don’t need to install anything else, other than Cacti and this article shows instructions for the cacti 0.8.8b version and I am sure there’s nothing much difference in Cacti 0.8.8g.
Hi. I make what is missing?
http://prntscr.com/ba6os9
Images do not appear :/
@Volkan,
Thanks for sharing the screenshot, I think it’s due to SELinux, could you disable it and check again?
Thank you Ravi. I could not find a solution, and erased everything :D Now I’ll try to install again. (CentOS 6.8 64BIT)
@Volkan,
Good luck, and make sure to follow instructions carefully, if you stuck somewhere around while installing Cacti, do comment here, I will love to help you out..
Thank you Ravi. I found my mistake.;
#*/5 * * * * cacti /usr/bin/php /usr/share/cacti/poller.php > /dev/null 2>&1
I delete the # sign :D
Now it is running smoothly.
I’ll try to build add-ons. (plugins)
@Volkan,
I am glad that finally you found the mistake yourself and corrected, good luck for rest of things..
HI Ravi,
Just want to know why my graph all show “rrd file does not exist”?
@Dennis,
Please let me know what’s the group:owner permission of rrd files and directory? it should be apache:apache to function properly..
[root@hpdcentos3 ~]# ls -l /usr/share | grep rrd
drwxr-xr-x. 2 root root 6 Nov 21 2015 rrdtool
[root@hpdcentos3 ~]# ls -l /usr/share/cacti/lib | grep rrd
-rw-r–r–. 1 root root 91557 Feb 8 03:26 rrd.php
@Dennis,
It should be user/group apache, change the rrd directory and files ownership to apache recursively as shown
now my graph doesnt show any CPU utilization.
@Dennis,
After making changes, did you ran the poller.php file manually to collect data?
Hi Ravi, how to run the poller.php?
@Dennis,
Here is the command to execute and populate cacti graphs with data..
Hi Ravi,
thanks, I’ve run the command you gave me. But my poller time seems a bit off, it seem to be pulling data from my servers at 8 hrs late. i check all timezones are set to +8 including the ones in php.ini file. Please advise.
@Dennis,
Better sync your server time with NTP, here is the guide on how to do it https://www.tecmint.com/install-ntp-server-in-centos/
Hi Ravie,
Have setup NTP and configured according to yout tutorial. here is my system date.
[root@hpdcentos3 local]# date
Fri Jun 3 14:20:52 MYT 2016
[root@hpdcentos3 local]# timedatectl
Local time: Fri 2016-06-03 14:21:11 MYT
Universal time: Fri 2016-06-03 06:21:11 UTC
RTC time: Fri 2016-06-03 06:21:11
Time zone: Asia/Kuala_Lumpur (MYT, +0800)
NTP enabled: yes
NTP synchronized: yes
RTC in local TZ: no
DST active: n/a
[root@hpdcentos3 local]# date -R
Fri, 03 Jun 2016 14:21:36 +0800
[root@hpdcentos3 local]# date
Fri Jun 3 14:21:40 MYT 2016
[root@hpdcentos3 local]#
but my graph is still 8hr late.
did i miss anything??
@Dennis,
Everything seems perfect, don’t know why such delay in generating graphs, let me dig into this and get back to you..
what is the cacti user password?
@Nick,
It should be admin as username and password as admin, try it and see..
After installing and doing all the steps of the guide I go to my cacti page and see just a blank page. Please your help I’m trying to install this server for 2 weeks now.
Thanks
@Gabriel,
Sorry to hear that, may I know on which Linux distributions you’re trying? and you’ve followed cacti installation instructions correctly, could you give a try again? or else give me access to your server, let me setup for you for free.
Hello Ravi,
Thanks for your reply, I’m installing Cacti on CentOS 6.3. I’ve followed all the instructions. I should re-install again?
Regards,
@Pablo,
Give a re-try and see, if you still not able to install properly, will help out in setting up.
Ravi, i just finished the re-install and the cacti server started and is working now, a little weird, thank you for your help anyway.
Regards,
@Gabriel,
Good to know that finally you managed to install Cacti successfully…
If you could please I can give you access through TV.
@Gabriel,
Please mail the TeamViewer details to [email protected] with suitable timing to connect.
I followed all the steps and all I see is a blank page, please your help with this.
@Plaza,
Please let me know on which Linux distributions you’re trying to install cacti? have you installed all required packages correctly?
hi, t have error “SNMP ERROR” when t try “add new device”, pls help me fix this
it is also not pulling any data from my servers using snmp but data from network switches came thru.
Hi, my graphs are 8hours late. How do i go about this? Thx
@Dennis,
I think you should sync your system time with NTP to have proper graphs based on correct time, just check your system time is correct?
hi Ravi,
i read in another forum that suggest to install webmin. After i install & configured admin hardware time setting, my graph time is accurate.
@Dennis,
Thanks for sharing your findings, and I am glad that it finally showing correct graphs based on time…
Where’s the cacti path installed?
@Banu,
There isn’t any one place, the Cacti tool gets installed all over the file-system, but the main configuration files resides under /etc/cacti directory..
In case of mysql is not on localhost you also need to enable network access for httpd (SElinux) else you will have errors like :
FATAL: Cannot connect to MySQL server on ‘192.168.1.10’. Please make sure you have specified a valid MySQL database name in ‘include/config.php’
setsebool -P httpd_can_network_connect=1
I have a problem same as Jhay, When I have got “FATAL: Cannot connect to MySQL server on ‘10.0.0.1’. Please make sure you have specified a valid MySQL database name in ‘include/config.php’”.
My server is running on 10.0.0.1.
I have created cacti database on mysql, and mysql is working fine. How I can solve?
@Zaya,
Please add the 10.0.0.1 IP address in db.php file under /etc/cacti/ directory like this:
I hope it will solve your MySQL connectivity problem..
When I try to start mysql service I get the following error
[vagrant@server1 /]$ sudo service mysqld start
Redirecting to /bin/systemctl start mysqld.service
Failed to start mysqld.service: Unit mysqld.service failed to load: No such file or directory.
What file or directory is missing?
Dear Mr. Ravi Saive, thank you for a great explanation.
Dear Mr. Ravi Can you please provide some thorough tutorial on oracle DBA administration. from very first installation to common problems manage/troubleshoot oracle 11G/12C. I will be thankful to you.
@Subhasish,
We’ve already covered about Oracle related articles, here is the installation of Oracle 11g and 12c:
https://www.tecmint.com/oracle-database-11g-release-2-installation-in-linux/
https://www.tecmint.com/oracle-12c-installation-in-centos-6/
Hi
I have error on Cacti Installation which is “FATAL: Cannot connect to MySQL server on ‘localhost’. Please make sure you have specified a valid MySQL database name in ‘include/config.php'” pls help me to fix this
@Jhay,
It’s clear that the MySQL cacti database doesn’t exits on the server, have you created Cacti database in the MySQL server, before attempting installation? Please create one as instructed it this article and try again the installation..
Hi Sir @Ravi Saive, I already fixed my problem. I noticed the password that i set in MySql Settings for cacti was not match to my root password. I am now able to use CACTI. Thank you for your response and thanks for this great tutorial. Hope you post a tutorial of Installation and configuration of Samba file server and Squid proxy server. God bless you Sir….
@Jhay,
That’s good to hear that you’ve fixed problem yourself and thanks for appreciating my work. Yes, we’re already covered about Samba and Squid server related articles here, you can go through it.
https://www.tecmint.com/setup-samba-file-sharing-for-linux-windows-clients/
https://www.tecmint.com/configure-squid-server-in-linux/
Keep visiting and God bless you too brother..:)
Hi,
I have finished Cacti installations but i still can’t see graphs. For rrd files RRDTools says ‘ERROR: opening ‘/usr/share/cacti/rra/localhost_load_1min_5.rrd’: No such file or directory’.. I’ve tried changing the group ownership of rra directory to apache as mentioned above but it didn’t work.
What I’m supposed to do next? Hope that there’s someone who can help here.
Thanks!
@Jolene,
It seems that rrdtool tool didn’t generating those files, it could be the permission issues on /usr/share/cacti/ directory or try to rebuild Poller Cache from System Utilities (bottom of console).
I have another problem, that all graps are not showing anything, they are empty, just none.
Where the problem could be?
@Aleksei,
Please check your SELinux settings and try to disable it and run the poller cron again and see the graphs are generating or not. Also check logs for any errors..