Oracle database is the set of related data collections, we can call it as Relational database management system (RDBMS) or just Oracle. While comparing to any other database solution oracle is one of the powerful DBMS with many features such as tune-able, reliable and scalable. Oracle produce separate hardware for oracle software’s, but same can be used in any other vendor products too.
Update: How to Install Oracle Database 12c on RHEL/CentOS 7
In 1977 Larry Ellison and his friends founded a software development system as oracle. In 1978 Oracle released its 1st version and later in 1979 they released the version 2 which was commercially used. The current version of oracle is 12c (C stands for Cloud) with cloud features. Oracle provides several supports regarding the products which includes troubleshooting supports patches and updates, which makes it rock solid, because it is very easy to organize different applications data. While comparing to any other database management Oracle is costly and mostly used for commercial purpose, almost everywhere, e.g: Banking, Universities for results, commerce related departments etc.
Oracle supports almost every operating systems such as Linux, HP-UX, AIX, Oracle Solaris, IBM zLinux64, and Windows. Oracle packages are available for both 32bit and 64bit platforms.
Requirements
- For large-scale installation we need to use multicore processors with High availability.
- Recommended minimum RAM needed for Oracle is 2GB or more.
- Swap must be enabled double the size of RAM.
- Disk space must be more than 8GB, its depends on edition which are we going to choose for installing.
- /tmp directory must have free space more than 1GB for error free installation.
- Supported Linux operating systems are RHEL, Centos, Oracle.
- Both x86_64 and i686 packages are required for installation.
- Screen resolution must be more than 1024×768 resolution.
If your systems meets all the above requirements, then we are ready to move forward to start oracle installation. Please remember, here I am using CentOS 6.5 operating system with 32GB size of Virtual HDD and 4GB Memory for installation, but same steps can also be followed in RHEL, Oracle Linux too.
My Testing Environment
IP Address	:	192.168.0.100
Host-name	:	oracle12c.tecmint.local
OS		:	Centos 6.5 Final
Note: I’ve used ‘tecmint‘ user with sudo privileges for this Oracle installation, but I strongly recommend you to use root login for all below installation instructions.
Step 1: Setting Hostname and Upgrading System
1. Before, heading up for the installation process, first makes sure your / and /tmp partitions has enough available space to carry error free installation.
$ df -h
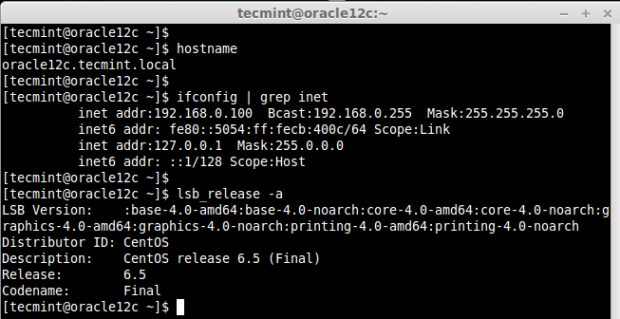
2. Next, verify that your system has correct hostname, static IP address and distribution version, using following commands.
$ hostname
$ ifconfig | grep inet
$ lsb_release -a
3. If you’ve not set your system hostname, edit the system hosts file ‘/etc/hosts‘ and enter your hostname entry along with IP address as shown below.
$ vim /etc/hosts

127.0.0.1       localhost  oracle12c.tecmint.local
192.168.0.100   oracle12c.tecmint.local

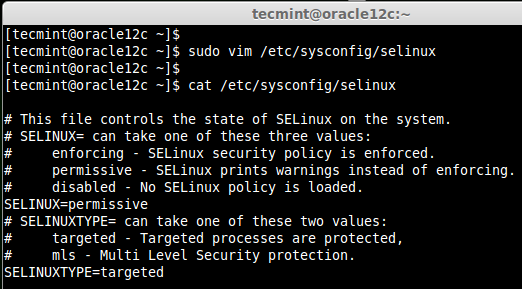
4. Now change the SELinux mode to permissive and restart the system to make Permanent changes for selinux.
$ sudo vim /etc/sysconfig/selinux
$ sudo init 6
Step 2: Installing Packages and changing Kernel Values
5. Once your system boots up properly, you can do a system upgrade and then install following required dependencies.
$ sudo yum clean metadata && sudo yum upgrade

$ sudo yum install binutils.x86_64 compat-libcap1.x86_64 compat-libstdc++-33.x86_64 compat-libstdc++-33.i686 \
compat-gcc-44 compat-gcc-44-c++ gcc.x86_64 gcc-c++.x86_64 glibc.i686 glibc.x86_64 glibc-devel.i686 glibc-devel.x86_64 \
ksh.x86_64 libgcc.i686 libgcc.x86_64 libstdc++.i686 libstdc++.x86_64 libstdc++-devel.i686 libstdc++-devel.x86_64 libaio.i686 \
libaio.x86_64 libaio-devel.i686 libaio-devel.x86_64 libXext.i686 libXext.x86_64 libXtst.i686 libXtst.x86_64 libX11.x86_64 \
libX11.i686 libXau.x86_64 libXau.i686 libxcb.i686 libxcb.x86_64 libXi.i686 libXi.x86_64 make.x86_64 unixODBC unixODBC-devel sysstat.x86_64
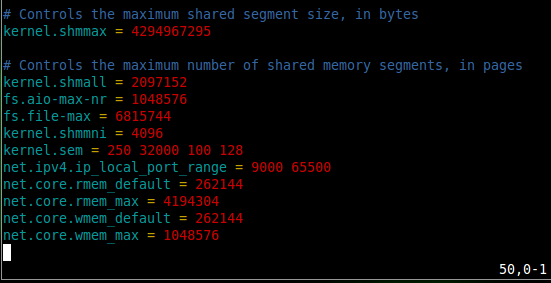
6. After installing all the above needed packages, now it’s time to do some changes at kernel level parameters in ‘/etc/sysct.conf file.
$ sudo vim /etc/sysctl.conf
Add or change the following values as suggested. Save and quit using wq!.
kernel.shmmax = 4294967295
kernel.shmall = 2097152
fs.aio-max-nr = 1048576
fs.file-max = 6815744
kernel.shmmni = 4096
kernel.sem = 250 32000 100 128
net.ipv4.ip_local_port_range = 9000 65500
net.core.rmem_default = 262144
net.core.rmem_max = 4194304
net.core.wmem_default = 262144
net.core.wmem_max = 1048576
7. Once you’ve added above values, now issue following command to take new changes into effect.
$ sudo sysctl -p
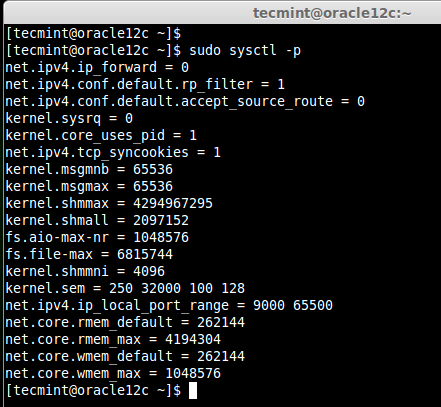
Note: The above values are half the size of physical memory in bytes. For example, have assigned 5GB memory for my virtual machine. So I’m using half of the memory for these settings.
8. Now it’s time to restart the machine and move further instructions on installing Oracle database.
$ sudo init 6
Step 3: Configuring System for Oracle Installation
9. Create the new groups Oracle inventory, OSDBA and OSOPER for Oracle installation.
$ sudo groupadd -g 54321 oracle
$ sudo groupadd -g 54322 dba
$ sudo groupadd -g 54323 oper

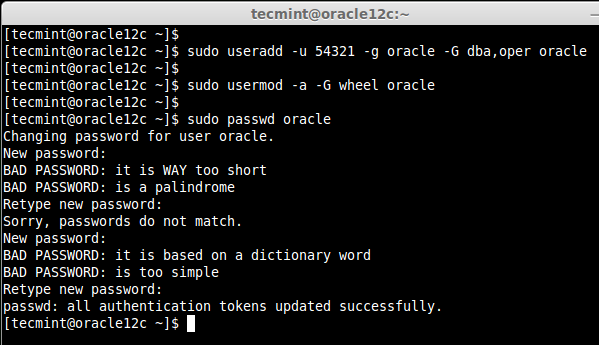
10. Create the new user oracle and add the user to already created groups.
$ sudo useradd -u 54321 -g oracle -G dba,oper oracle
$ sudo usermod -a -G wheel oracle
$ sudo passwd oracle
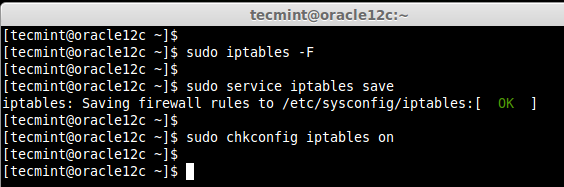
11. If your system is enabled with firewall, you need to disable or configure it according to your needs. To disable it, run the following commands.
$ sudo iptables -F
$ sudo service iptables save
$ sudo chkconfig iptables on
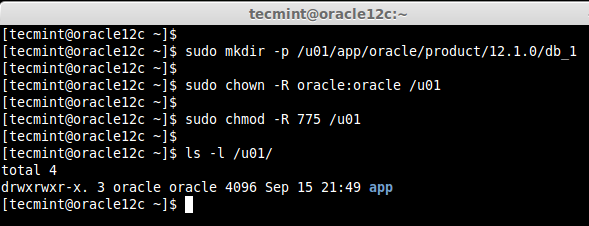
12. Create the following directory for installing Oracle and change the ownership and grand permission to the newly created directory using recursive.
$ sudo mkdir -p /u01/app/oracle/product/12.1.0/db_1
$ sudo chown -R oracle:oracle /u01
$ sudo chmod -R 775 /u01
$ ls -l /u01
13. Switch to root user to create environment for oracle user. You can skip this step, if you’re already using root login.
$ su - root
14. Next, we need to add the environmental variable for oracle user. Open and edit the profile file of oracle user and append the oracle environment entries. Here we don’t need to use sudo command, as we are already logged in as root user.
# vim /home/oracle/.bash_profile
Append the below Environment Entry. Save and exit the vi editor using wq!.
## Oracle Env Settings

export TMP=/tmp
export TMPDIR=$TMP

export ORACLE_HOSTNAME=oracle12c.tecmint.local
export ORACLE_UNQNAME=orcl
export ORACLE_BASE=/u01/app/oracle
export ORACLE_HOME=$ORACLE_BASE/product/12.1.0/db_1
export ORACLE_SID=orcl

export PATH=/usr/sbin:$PATH
export PATH=$ORACLE_HOME/bin:$PATH

export LD_LIBRARY_PATH=$ORACLE_HOME/lib:/lib:/usr/lib
export CLASSPATH=$ORACLE_HOME/jlib:$ORACLE_HOME/rdbms/jlib

Now exit from root user and login again as tecmint user and switch to oracle user. Again, this step is not required, if you are already using root account, just switch to oracle user for further instructions.
# exit
# su - oracle
15. Here we need to check for the resource limits for oracle installing user. Here our Oracle installer user is oracle. So we must be logged in as oracle user, while doing resource check. Check for the soft and hard limits for file descriptor settings before installation.
$ ulimit -Sn
$ ulimit -Hn
$ ulimit -Su
$ ulimit -Hu
$ ulimit -Ss
$ ulimit -Hs
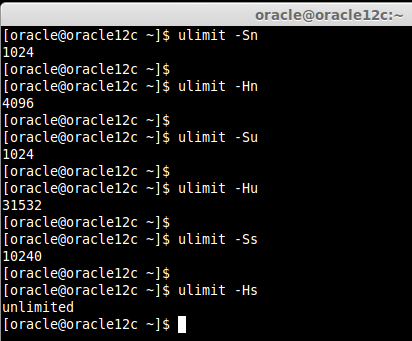
You may get different values in the above command. So, you need to manually assign the values for limits in configuration file as shown below.
$ sudo vim /etc/security/limits.conf

oracle	soft	nofile	1024
oracle	hard	nofile	65536
oracle	soft	nproc	2047
oracle	hard	nproc	16384
oracle	soft	stack	10240
oracle	hard	stack	32768
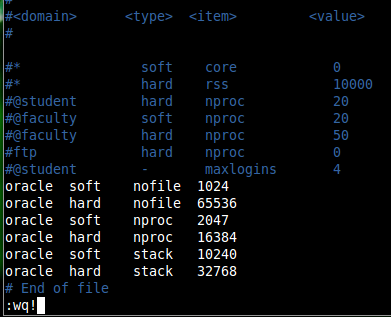
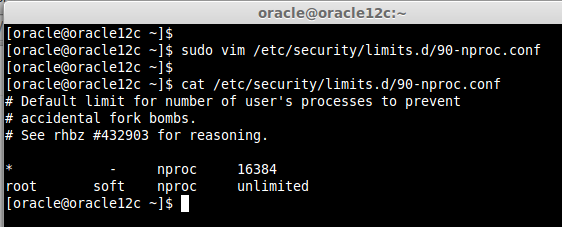
Next, edit the below file to set the limit for all users.
$ sudo vim /etc/security/limits.d/90-nproc.conf
By default it was set to
* soft nproc 1024
We need to change it to.
* - nproc 16384
Step 4: Downloading Oracle Packages
16. Then its time to pull down the oracle zip package from official site. To download Oracle package, you must be registered user or else sing-up and download the package using the below link.
I have already downloaded the zip package and extracted the contents of oracle installer.
$ cd ~
$ ls
$ unzip linuxamd64_12c_database_1of2.zip
$ unzip linuxamd64_12c_database_2of2.zip
That’s it for now, the article getting too lengthy and I can’t include all instructions in a one single page. So, in our next article we will show you step-by-step instructions on Oracle 12c installation and further configurations, till then stay tuned to Tecmint for latest updates.
Read Also: Installing Oracle 12c in RHEL/CentOS/Oracle Linux 6.5 – Part II


Is there a link other than the oracle website that I can download the linuxamd64_12c_database_1of2.zip packages? I was unable to download on oracle after even registering on the website. Thanks
Hi,
This is a very good article, but just wondering to ask why use “54321” as ground and user ID of “oracle”?
Hi Bob,
It’s the default UID and GID for oracle installation you can define your own, But if you keep the default and common for every installation in your environment it will be easier for migration, mount NFS etc..
good article i love it
Thank you, this is good article, very clear. just my opinion it would be nice if you mention to change hostname same as the machine hostname. ini this part : export ORACLE_HOSTNAME=oracle12c.tecmint.local. in my first attempt I just copy paste all the syntax, and my netca cannot be started after I follow instruction on chapter II. the error mention the host oracle12c.tecmint.local. once I change the hostname same as my hostname everything is good. now I can use oracle db as well. thank you so much
Hi,
I am unable to edit the limits.conf file [Step: 3 =>15], i got “oracle is not in the sudoers file. This incident will be reported.” message.
Note: I logged in root user.
Kindly help me.
Thanks in Advance,
Senthilkumar
@Senthil Kumar
Please perform 1-15 steps using root user, Here i have used sudo privileged user tecmint.
To know more about granting sudo privilege to any users please refer below URL
https://www.tecmint.com/su-vs-sudo-and-how-to-configure-sudo-in-linux/
Thanks. I had to prepare a RH 6.5 server for an Oracle install. The DBA gave me a link to some Oracle documentation which was not helpful at all so I used this. No complaints so far. Thanks again.
step reboot hangs can’t recover
Interesting article. Hope you have one for RAC on Linux as well. We are planning on installing a 4 node Linux (OL) cluster using 12c, and just wanted to compare all the different tricks to install.
@Thanks
@ Jorge
Will update soon with new article
A lot of the prerequisites can be handled using the following package install
sudo yum install -y oracle-rdbms-server-12cR1-preinstall
> Note: I’ve used ‘tecmint‘ user with sudo privileges
> for this Oracle installation, but I strongly recommend
> you to use root login for all below installation instructions.
Thank you for this nice tutorial. One minor question: why do you “strongly recommend” against the use of sudo?
Hi
Thanks for sharing this article. It is really very imp topic. Can you please sahre the performance tunning and post installation steps for Oracle database.
Thanks again.
@Mithilesh oh sure in future post it will be continued.
super Babin
@Yoga Thanks mate.