

Nginx is a free open source, high-performance, reliable, scalable and fully extensible web server, load balancer and reverse proxy software. It has a simple and easy-to-understand configuration language. It also supports a multitude of modules both static (which have existed in Nginx since the first version) and dynamic (introduced in version 1.9.11).
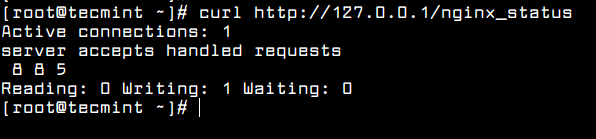
One of the important modules in Nginx is the ngx_http_stub_status_module module which provides access to basic Nginx status information via a “status page”. It shows information such as total number of active client connections, those accepted, and those handled, total number of requests and number of reading, writing and waiting connections.
Read Also: Amplify – NGINX Monitoring Made Easy
On most Linux distributions, the Nginx version comes with the ngx_http_stub_status_module enabled. You can check out if the module is already enabled or not using following command.
# nginx -V 2>&1 | grep -o with-http_stub_status_module

If you see --with-http_stub_status_module as output in the terminal, means the status module is enabled. If the above command returns no output, you need to compile NGINX from source using the –with-http_stub_status_module as configuration parameter as shown.
# wget http://nginx.org/download/nginx-1.13.12.tar.gz
# tar xfz nginx-1.13.12.tar.gz
# cd nginx-1.13.12/
# ./configure --with-http_stub_status_module
# make
# make install
After verifying the module, you will also need to enable stub_status module in the NGINX configuration file /etc/nginx/nginx.conf to set up a locally reachable URL (e.g., http://www.example.com/nginx_status) for the status page.
location /nginx_status {
 	stub_status;
 	allow 127.0.0.1;	#only allow requests from localhost
 	deny all;		#deny all other hosts
 }
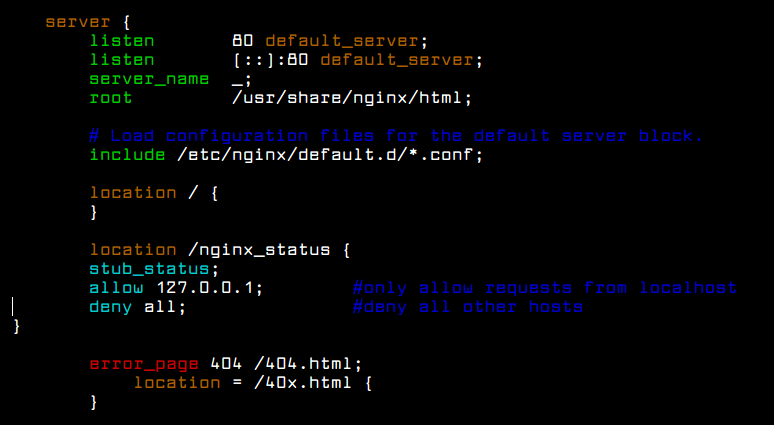
Make sure to replace 127.0.0.1 with your server’s IP address and also make sure that this page accessible to only you.
After making configurations changes, make sure to check nginx configuration for any errors and restart the nginx service to effect the recent changes using following commands.
# nginx -t
# nginx -s reload

After reloading nginx server, now you can visit the Nginx status page at the below URL using curl program to see your metrics.
# curl http://127.0.0.1/nginx_status
OR
# curl http://www.example.com/nginx_status
Important: The ngx_http_stub_status_module module has been superseded by the ngx_http_api_module module in Nginx 1.13.0 version.
Read Also: How to Enable PHP-FPM Status Page in Nginx
That’s all! In this article, we have showed how to enable Nginx status page in Linux. Use the comment form below to ask any questions.
