Kernel-based Virtual Machine (KVM in short) is an open-source and de facto standard virtualization solution that is tightly integrated into Linux. It is a loadable kernel module that turns Linux into a type-1 (bare-metal) hypervisor that creates a virtual operating platform used to run virtual machines (VMs).
Under KVM, each VM is a Linux process that is scheduled and managed by the kernel and has private virtualized hardware (i.e CPU, network card, disk, etc.). It also supports nested virtualization, which allows you to run a VM inside another VM.
Some of its key features include support for a wide range of Linux-supported hardware platforms (x86 hardware with virtualization extensions (Intel VT or AMD-V)), it provides enhanced VM security and isolation using both SELinux and secure virtualization (sVirt), it inherits kernel memory management features, and it supports both offline and real-time migration (migration of a running VM between physical hosts).
In this article, you will learn how to install KVM virtualization, create and manage Virtual Machines in CentOS 8 and RHEL 8 Linux.
Prerequisites
- A fresh installation of CentOS 8 server
- A fresh installation of RHEL 8 server
- A RedHat subscription enabled on RHEL 8 server
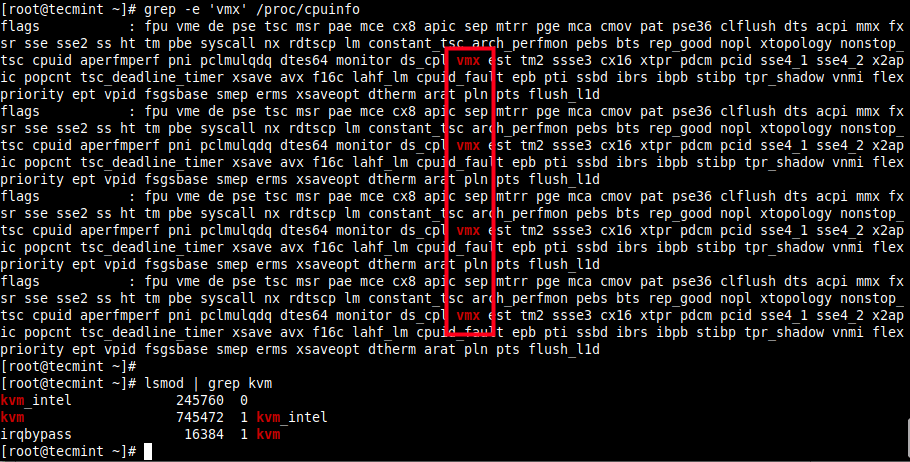
Additionally, make sure that your hardware platform supports virtualization by running the following command.
# grep -e 'vmx' /proc/cpuinfo		#Intel systems
# grep -e 'svm' /proc/cpuinfo		#AMD systems
Also, confirm that KVM modules are loaded in the kernel (they should be, by default).
# lsmod | grep kvm
Here is sample output on the test system which is Intel-based:
In a previous series of KVM guides, we showed how to create virtual machines in Linux using KVM (Kernel-based Virtual Machine) where we demonstrated how to create and manage VMs using virt-manager GUI tool (which is now deprecated according to the RHEL 8 documentation). For this guide, we will take a different approach, we will use the Cockpit web console.
Step 1: Setup Cockpit Web Console on CentOS 8
1. The cockpit is an easy-to-use, integrated and extendable web-based interface to administer a Linux server in a web browser. It enables you to perform system tasks such as configuring networks, administering storage, creating VMs, and inspecting logs with a mouse. It uses your system’s normal user logins and privileges, but other authentication methods are supported as well.
It comes pre-installed and enabled on freshly installed CentOS 8 and RHEL 8 system, if you don’t have it installed, install it using the following dnf command. The cockpit-machines extension should be installed to manage VMs based on Libvirt.
# dnf install cockpit cockpit-machines
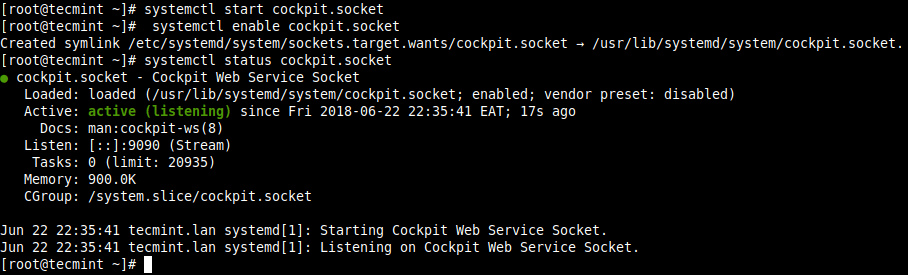
2. When the package installation is complete, start the cockpit socket, enable it to auto-start at system boot and check its status to confirm that it is up and running.
# systemctl start cockpit.socket
# systemctl enable cockpit.socket
# systemctl status cockpit.socket
3. Next, add the cockpit service in the system firewall which is enabled by default, using the firewall-cmd command and reload the firewall configuration to apply the new changes.
# firewall-cmd --add-service=cockpit --permanent
# firewall-cmd --reload
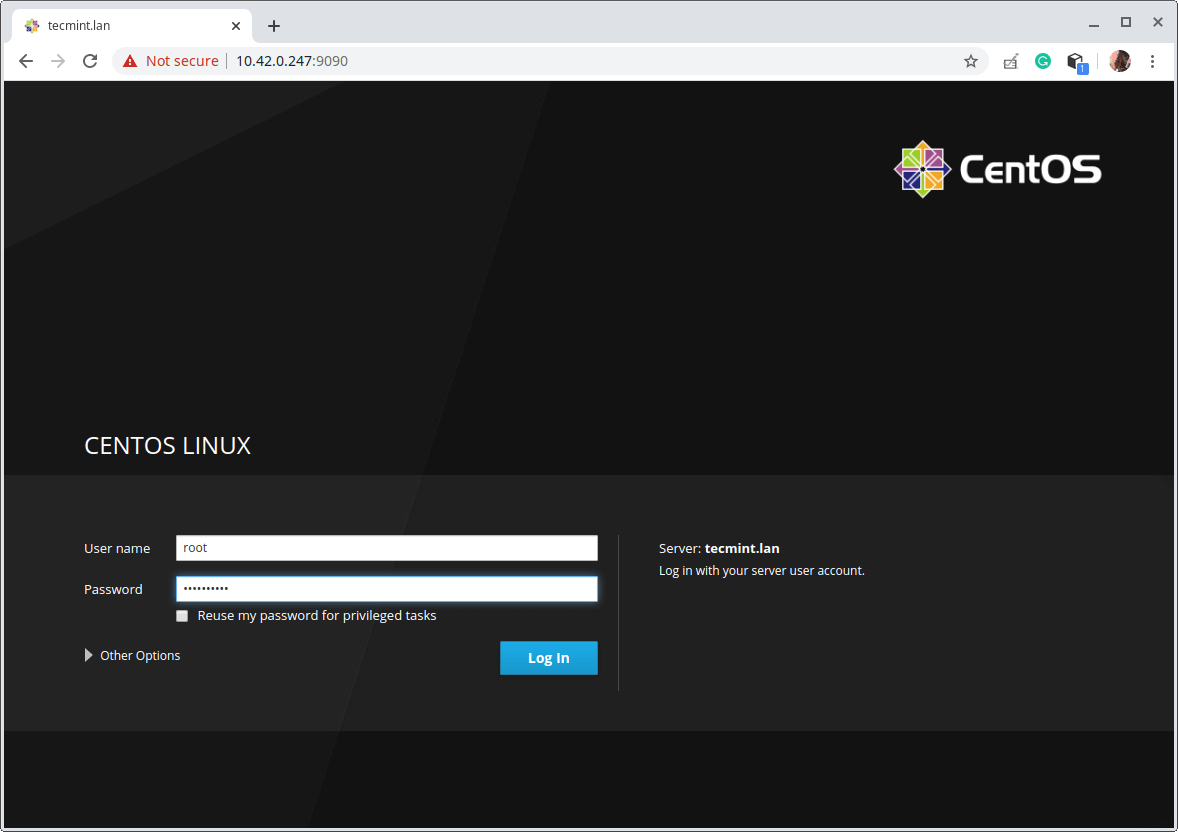
4. To access the cockpit web console, open a web browser and use the following URL to navigate.
https://FQDN:9090/
OR
https://SERVER_IP:9090/
The cockpit uses a self-signed certificate to enable HTTPS, simply proceed with the connection when you get a warning from the browser. At the login page, use your server user account credentials.
Step 2: Installing KVM Virtualization CentOS 8
5. Next, install the virtualization module and other virtualization packages as follows. The virt-install package provides a tool for installing virtual machines from the command-line interface, and a virt-viewer is used to view virtual machines.
# dnf module install virt
# dnf install virt-install virt-viewer
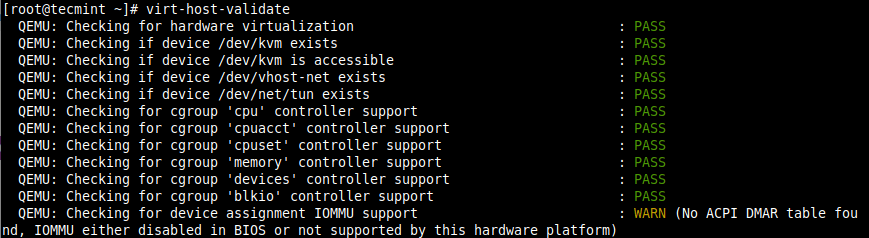
6. Next, run the virt-host-validate command to validate if the host machine is set up to run libvirt hypervisor drivers.
# virt-host-validate
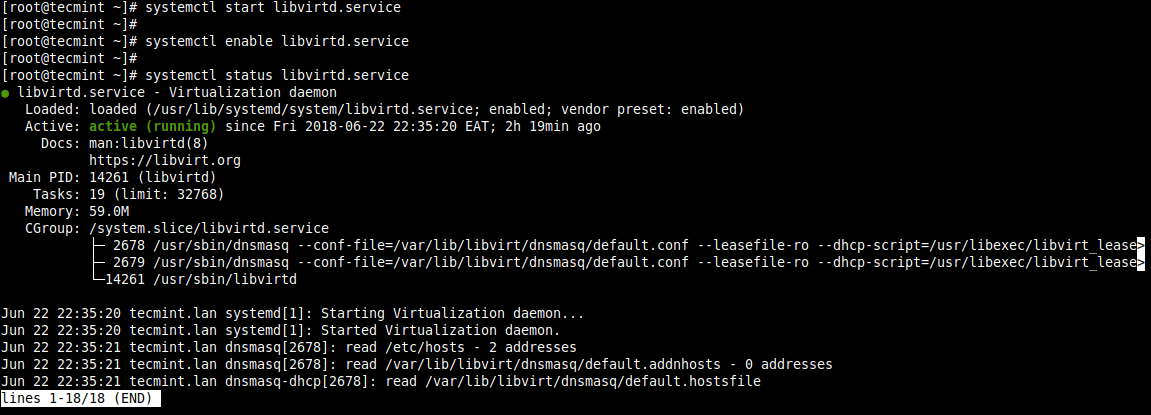
7. Next, start the libvirtd daemon (libvirtd) and enable it to start automatically on each boot. Then check its status to confirm that it is up and running.
# systemctl start libvirtd.service
# systemctl enable libvirtd.service
# systemctl status libvirtd.service
Step 3: Set Up Network Bridge (Virtual Network Switch) via Cockpit
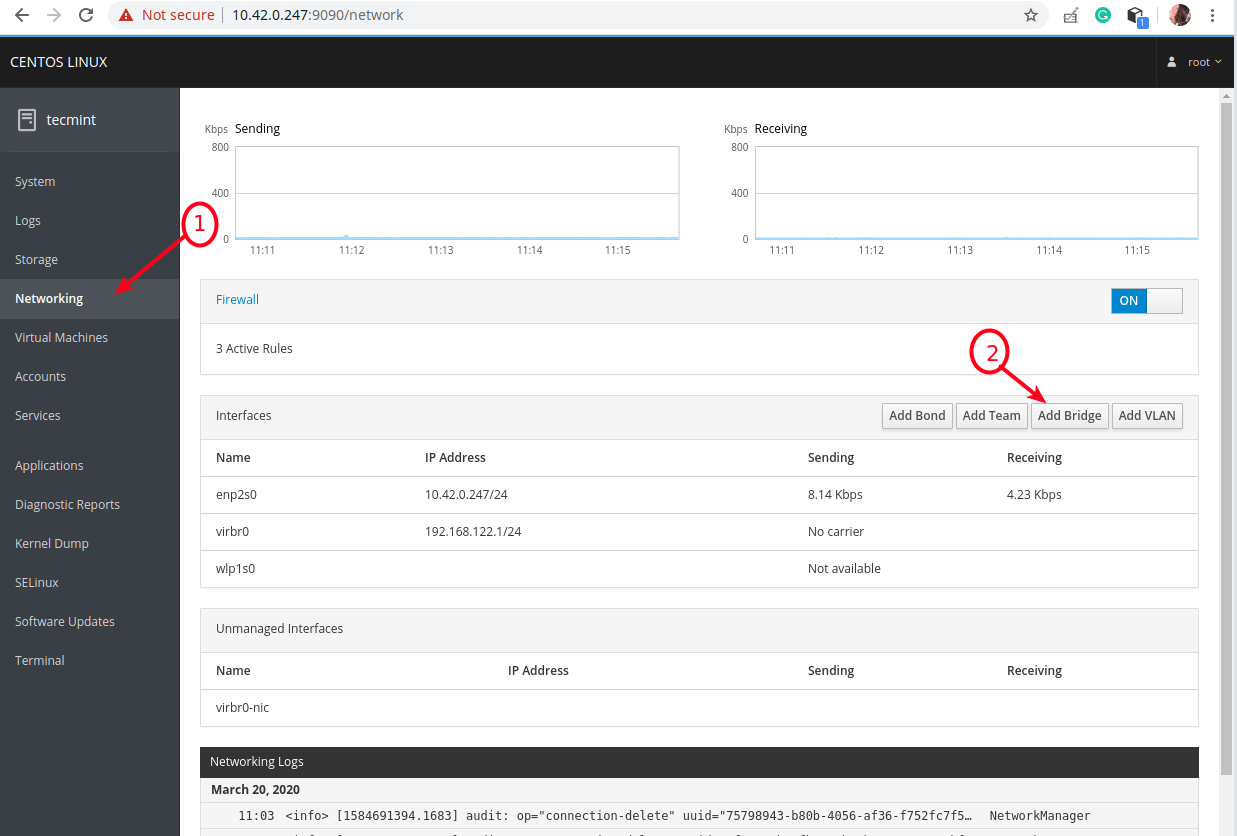
8. Now create a network bridge (virtual network switch) to integrate virtual machines to the same network as the host. By default, once libvirtd daemon is started, it activates the default network interface virbr0 that represents the virtual network switch which operates in NAT mode.
For this guide, we will create a network interface in a bridged mode called br0. This will enable virtual machines to be accessible on the host networks.
From the cockpit main interface, click on Networking, then click Add Bridge as indicated in the following screenshot.
9. From the pop-up window, enter the bridge name and select the bridge slaves or port devices (e.g enp2s0 representing the Ethernet interface) as shown in the following screenshot. Then click Apply.

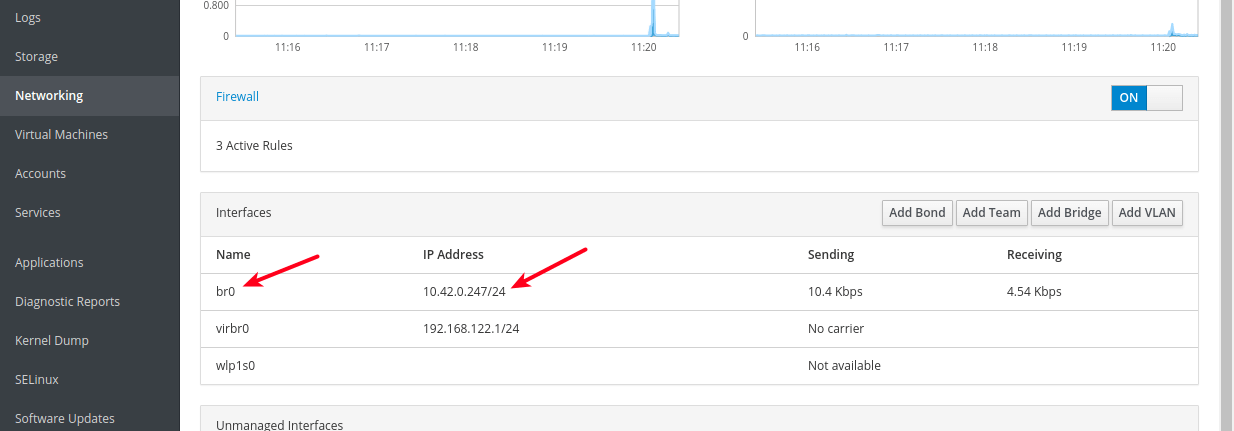
10. Now when you look at the list of Interfaces, the new bridge should appear there and after a few seconds, the Ethernet interface should be disabled (taken down).
Step 4: Creating and Managing Virtual Machines via Cockpit Web Console
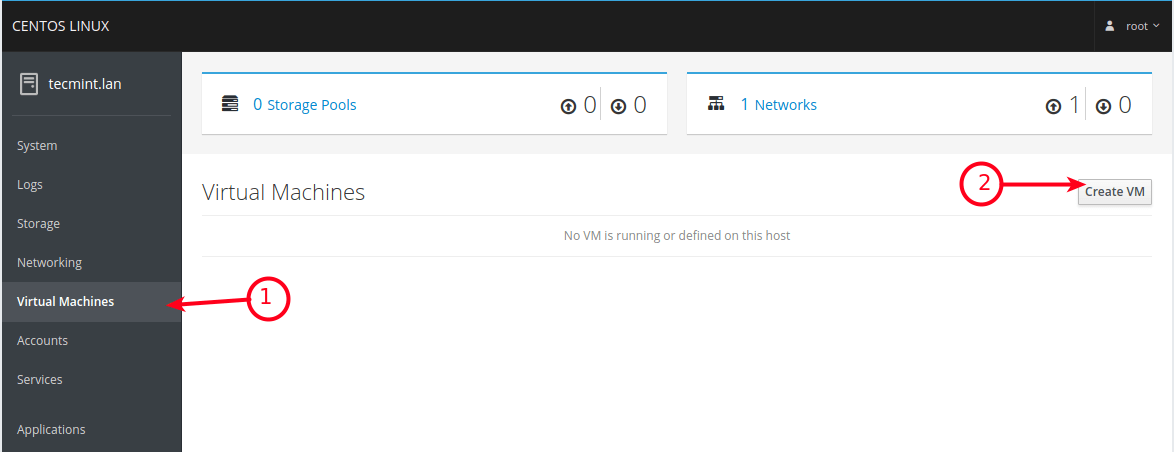
11. From the cockpit main interface, click on the Virtual Machines option as highlighted in the following screenshot. From the Virtual Machines page, click on Create VM.
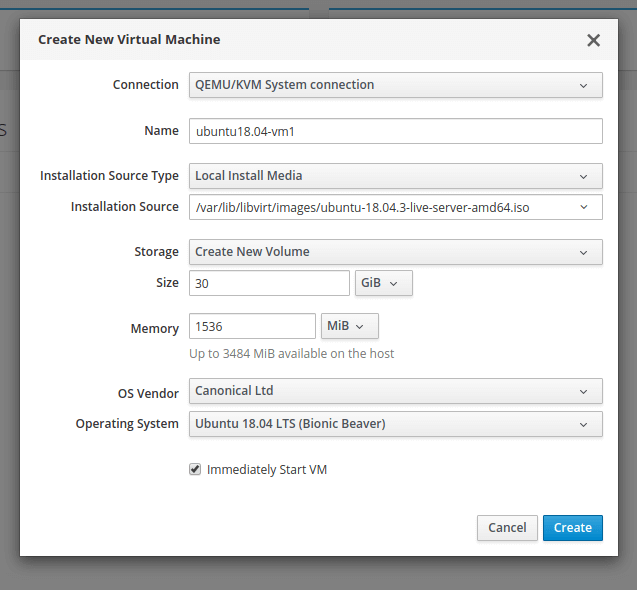
12. A window with options to create a new VM will display. Enter the Connection, Name (e,g ubuntu18.04), Installation Source Type (on the test system, we have stored ISO images under the storage pool i.e /var/lib/libvirt/images/), Installation Source, Storage, Size, Memory as shown in the following image. The OS Vendor and Operating System should be picked automatically after entering Installation Source.
Also check the option to immediately start the VM, then click Create.
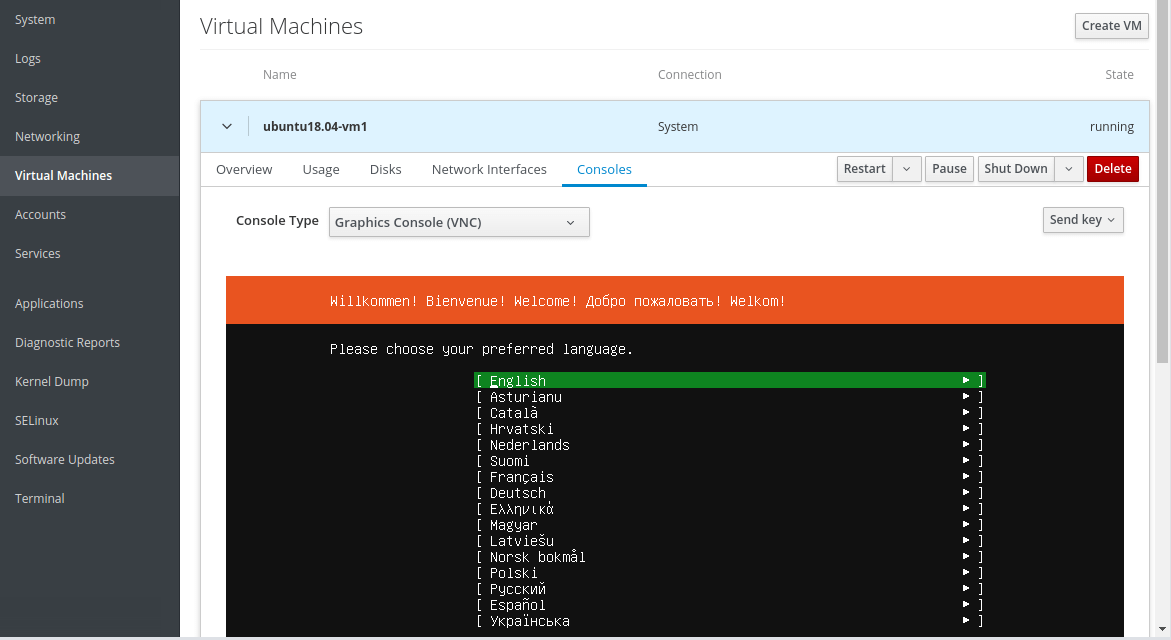
13. After clicking Create from the previous step, the VM should be automatically started and it should boot using the ISO image provided. Proceed to install the guest operating system (Ubuntu 18.04 in our case).
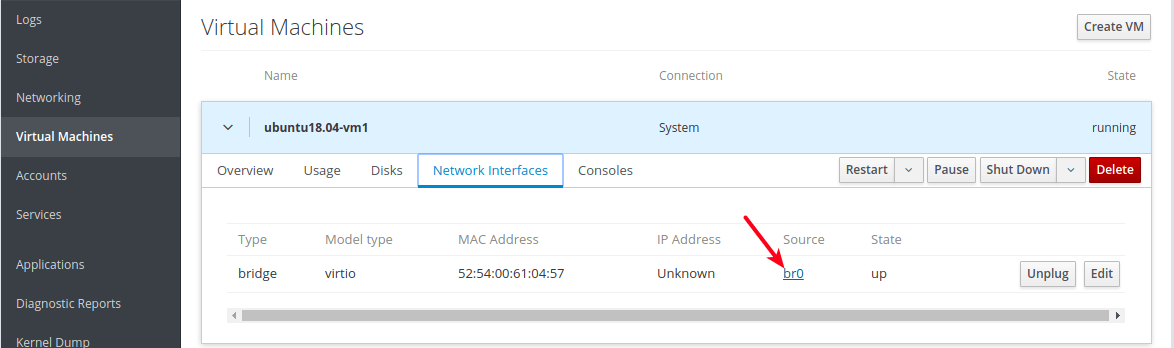
If you click on Network Interfaces of the VM, the network source should indicate the newly created bridge network interface.
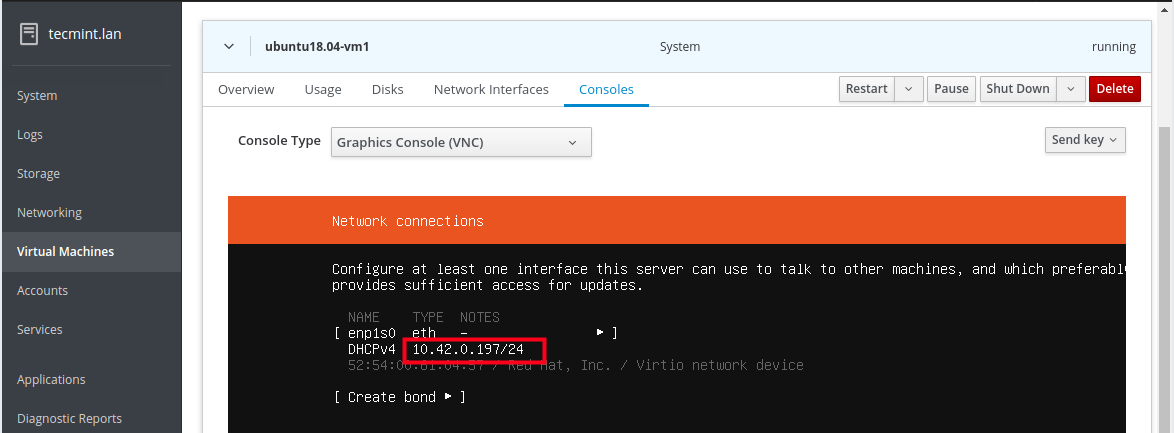
And during the installation, at the step of configuring a network interface, you should be able to notice that the VMs Ethernet interface receives an IP address from the DHCP server of the host network.
Note that you need to install the OpenSSH package to access the guest OS via SSH from any machine on the host network, as described in the last section.
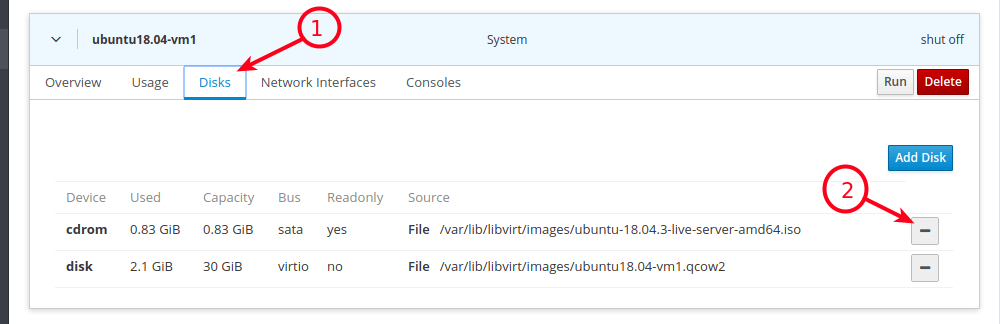
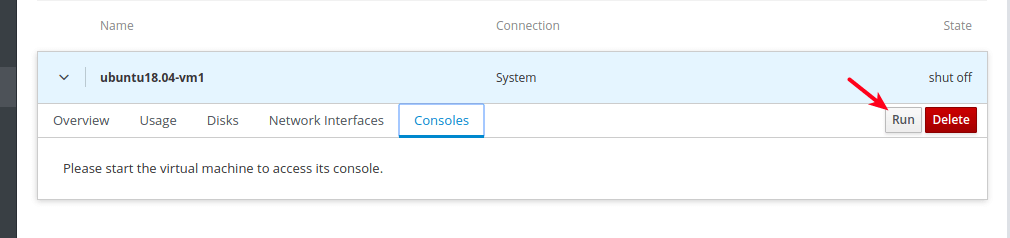
14. When the guest OS installation is complete, reboot the VM, then go to Disks and detach/remove the cdrom device under the VMs disks. Then click Run to start the VM.
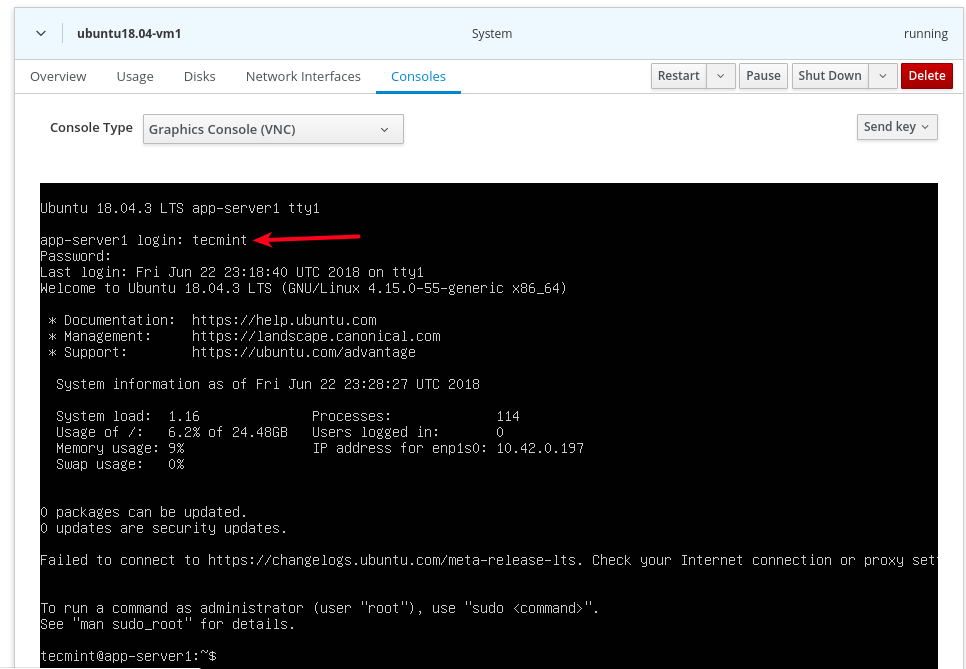
15. Now under Consoles, you can log into the guest OS using a user account you created during the installation of the OS.
Step 5: Accessing a Virtual Machine Guest OS via SSH
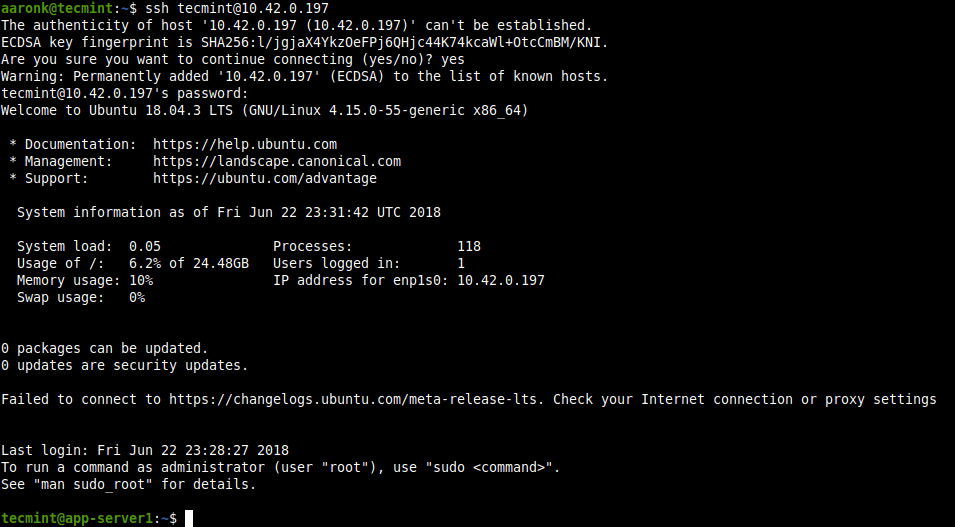
16. To access the newly installed guest OS from the host network via SSH, run the following command (replace 10.42.0.197 with your guest’s IP address).
$ ssh [email protected]
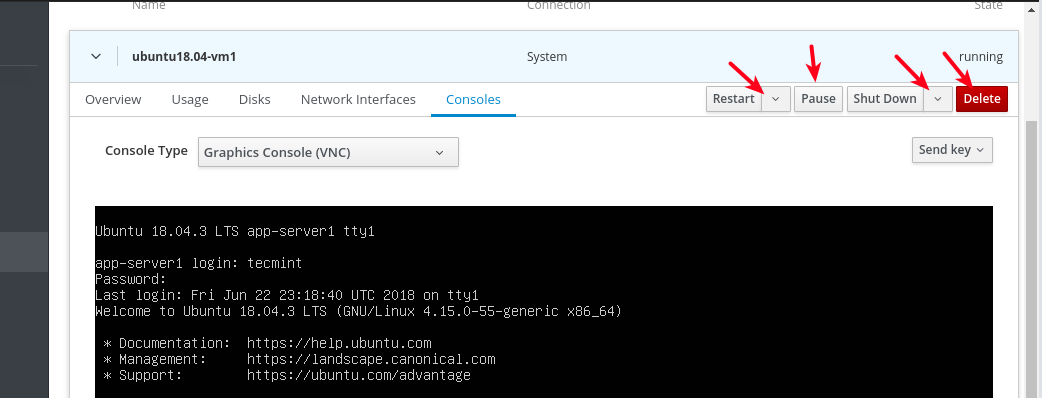
17. To shut down, restart or delete a VM, click on it from the list of VMs, then use the buttons highlighted in the following screenshot.
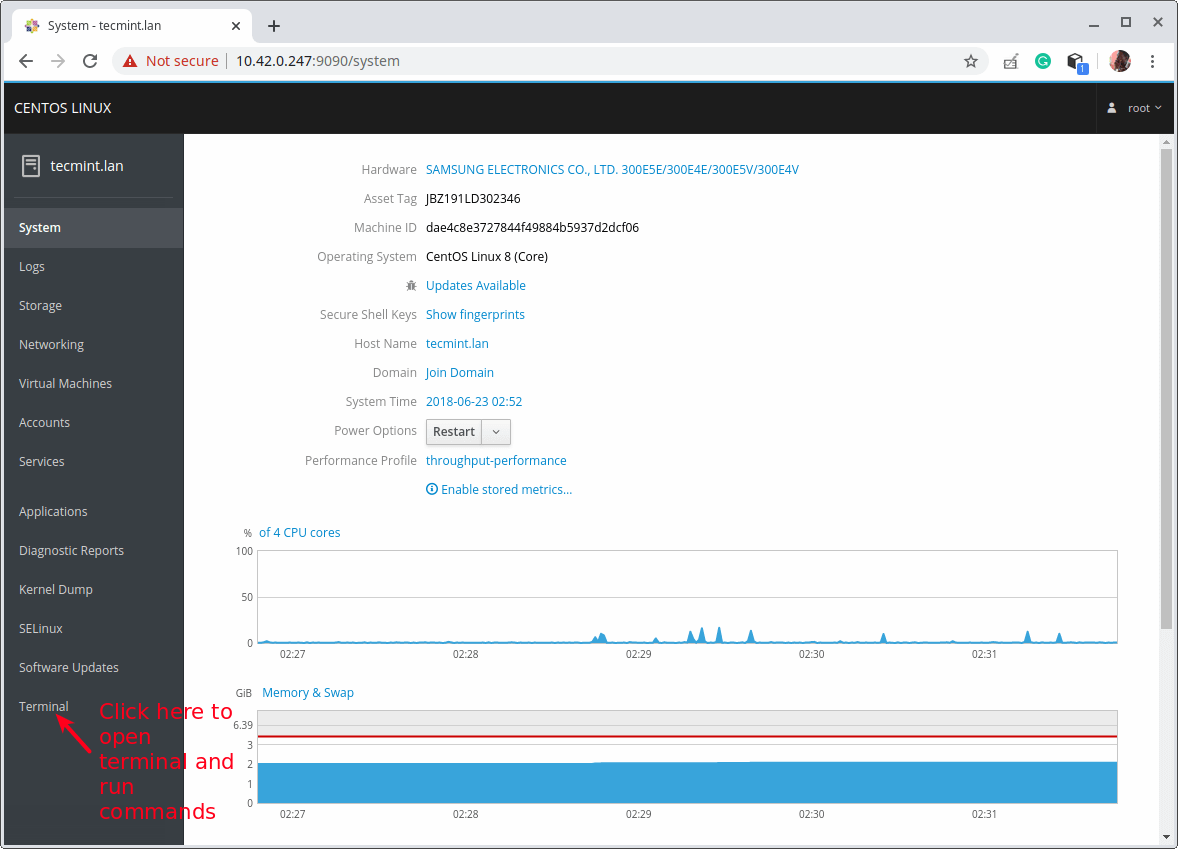
That’s all for now! In this guide, we have shown how to install KVM virtualization packages, and create and manage VMs via the cockpit web console. For more detail, see: Getting started with virtualization in RHEL 8.


I followed your article still failed :
ERROR internal error: process exited while connecting to monitor: 2022-03-06T02:08:53.985803Z qemu-kvm: -blockdev {“driver”:”file”,”filename”:”/var/lib/libvirt/images/Win10MGMT.qcow2″,”node-name”:”libvirt-2-storage”,”auto-read-only”:true,”discard”:”unmap”}: Could not open ‘/var/lib/libvirt/images/Win10MGMT.qcow2’: Permission denied Domain installation does not appear to have been successful. If it was, you can restart your domain by running: virsh –connect qemu:///system start Win10MGMT otherwise, please restart your installation.
@Vix,
Suggest you disable SELinux or try setting execute permissions on the pool..
Hello Sir,
I followed all steps KVM installed successfully but when to try to install ubuntu vm in KVM via the cockpit, vm get paused with the following log error
KVM: entry failed, hardware error 0x80000021
If you’re running a guest on an Intel machine without unrestricted mode support, the failure can be most likely due to the guest entering an invalid state for Intel VT. For example, the guest may be running in big real mode.
which is not supported on less recent Intel processors.
EAX=00009900 EBX=00000000 ECX=00000000 EDX=00000600ESI=00000000 EDI=00000000 EBP=00000000 ESP=00000000
EIP=00001010 EFL=00010002 [-------] CPL=0 II=0 A20=1 SMM=0 HLT=0
ES =9900 00099000 0000ffff 00009300
CS =9900 00099000 0000ffff 00009b00
SS =9900 00099000 0000ffff 00009300
DS =9900 00099000 0000ffff 00009300
FS =0000 00000000 0000ffff 00009300
GS =0000 00000000 0000ffff 00009300
LDT=0000 00000000 0000ffff 00008200
TR =0000 00000000 0000ffff 00008b00
GDT= 00000000 0000ffff
IDT= 00000000 0000ffff
In order to get the “Virtual Machines” menu item to appear in Cockpit, I had to install the following package:
Hope this helps!
How do you set up a bond network to a bridge for KVM and can you use nmtui?
Thanks!
BUT Why? put those “#” at the beginning of the line?
That makes copy-paste of multiple lines into a terminal nightmare!
@Alex,
The signs like
$and#are important, as these signs help users to run command as normal user($) or root(#) user..Thanks,
I have two network cards where I configured one for bridge mode and the other I left in NAT.
Could you tell me how to create an “internal network” in the virt manager just like the virtual box so that the VMS communicate between them?
I can’t seem to assign anything upward of 1CPU to any VM – any ideas how this can be done?
It is ok I have got this sorted now..
By default when creating a VM the disks created are thin provisioned or thick provisioned? if are thick provisioned how can I create disks in thin provision?
@Gabo
You can use the virt-sparsify tool which makes a virtual machine disk sparse a.k.a. thin-provisioned:
http://libguestfs.org/virt-sparsify.1.html.There’s a typo in section 2:7. I assume you don’t mean to start the `libvirtd.service‘ 3 times. :)
@Eric,
Thanks, corrected the commands in the article…