Redis is an open-source, high-performance and flexible in-memory data structure store (key-value format) – used as a database, cache and message broker. It is written in ANSI C and runs on most if not all Unix-like operating systems including Linux (recommended for deploying) without external dependencies.
It is feature-rich, supports multiple programming languages and data structures including strings, hashes, lists, sets, sorted sets with range queries, bitmaps among others.
Redis Features:
- Supports most programming languages including C, Bash, Python, PHP, Node.js, Perl, Ruby just to mention but a few.
- Has inherent replication, Lua scripting, LRU eviction, transactions as well as varying levels of on-disk persistence.
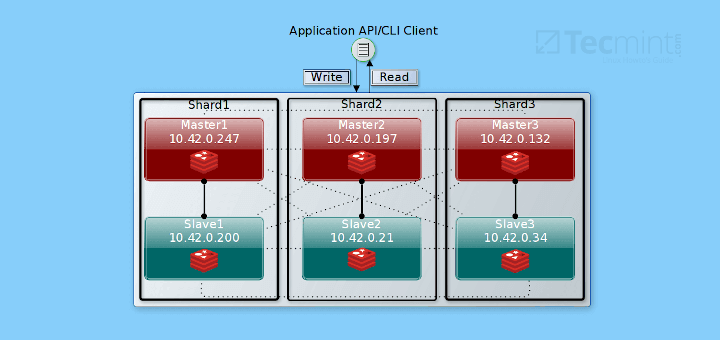
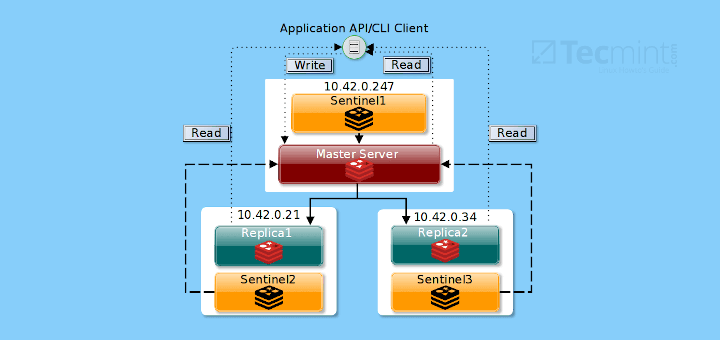
- Provides high availability through Redis Sentinel and automatic partitioning via Redis Cluster.
- Supports running atomic operations.
- It works with an in-memory dataset to attain remarkable performance.
- Supports trivial-to-setup master-slave asynchronous replication.
- Supports automatic failover.
- Enables you to save the dataset to disk infrequently for a given period of time, or by appending each command to a log.
- Allows optional disabling of persistence.
- Supports publish/subscribe messaging.
- It also supports MULTI, EXEC, DISCARD and WATCH transactions and many more.
Requirements:
- A CentOS 7 Server and RHEL 7 Server with Minimal Install
- A Ubuntu Server or Debian Server with Minimal Install
- GCC compiler and libc
In this tutorial, we will provide instructions on how to install a Redis Server from source (which is the recommended method) in Linux. We will also show how to configure, manage and secure Redis. Since Redis serves all data from memory, we strongly suggest using a high memory VPS Server with this guide.
Step 1: Install Redis Server from Source
1. First, install the required build dependencies.
--------------- On CentOS / RHEL / Fedora ---------------
# yum groupinstall "Development Tools"
# dnf groupinstall "Development Tools"

--------------- On Debian / Ubuntu ---------------
$ sudo apt install build-essential
2. Next, download and compile the latest stable Redis version using the special URL that always points to the latest stable Redis using wget command.
$ wget -c http://download.redis.io/redis-stable.tar.gz
$ tar -xvzf redis-stable.tar.gz
$ cd redis-stable
$ make
$ make test
$ sudo make install
3. After the Redis compilation the src directory inside the Redis distribution is populated with the different following executables that are part of Redis:
- redis-server – redis server.
- redis-sentinel – redis sentinel executable (monitoring and failover).
- redis-cli – a CLI utility to interact with redis.
- redis-benchmark – used to check redis performances.
- redis-check-aof and redis-check-dump – useful in the rare event of corrupted data files.
Step 2: Configure Redis Server in Linux
4. Next, you need to configure Redis for a development environment to be managed by the init system (systemd for the purpose of this tutorial). Start by creating the necessary directories for storing Redis config files and your data:
$ sudo mkdir /etc/redis
$ sudo mkdir -p /var/redis/
4. Then copy the template Redis configuration file provided, into the directory you created above.
$ sudo cp redis.conf /etc/redis/
5. Now open the configuration file and update a few settings as follows.
$ sudo vi /etc/redis/redis.conf
6. Next search for the following options, then change (or use) their default values according to your local environment needs.
port  6379				#default port is already 6379.
daemonize yes				#run as a daemon
supervised systemd			#signal systemd
pidfile /var/run/redis.pid 		#specify pid file
loglevel notice				#server verbosity level
logfile /var/log/redis.log		#log file name
dir  /var/redis/			#redis directory
Step 3: Create Redis Systemd Unit File
7. Now you need to create a systemd unit file for redis in order to control the daemon, by running the following command.
$ sudo vi /etc/systemd/system/redis.service
And add the configuration below:
[Unit]
Description=Redis In-Memory Data Store
After=network.target

[Service]
User=root
Group=root
ExecStart=/usr/local/bin/redis-server /etc/redis/redis.conf
ExecStop=/usr/local/bin/redis-cli shutdown
Restart=always
Type=forking

[Install]
WantedBy=multi-user.target
Save and close the file.
Step 4: Manage and Test Redis Server in Linux
8. Once you have performed all the necessary configurations, you can now start the Redis server, for now, enable it to auto-start at system boot; then view its status as follows.
$ sudo systemctl start redis
$ sudo systemctl enable redis
$ sudo systemctl status redis
9. Next, test if the whole redis setup is working fine. To interact with redis server, use the redis-cli command. After connecting to the server, try running a few commands.
$ redis-cli
Test connection to server using ping command:
127.0.0.1:6379> ping
Use the echo command to echo a given string:
127.0.0.1:6379> echo "Tecmint is testing Redis"
You can also set a key value using the set command like this:
127.0.0.1:6379> set mykey "Tecmint is testing Redis"
Now view the value of mykey:
127.0.0.1:6379> get mykey
10. Then close the connection with the exit command, and restart the redis server. Afterward, check if mykey is still stored on the server as shown below:
127.0.0.1:6379> exit
$ sudo systemctl restart redis
$ redis-cli
127.0.0.1:6379> get mykey
11. To delete a key, use the delete command as follows:
127.0.0.1:6379> del mykey
127.0.0.1:6379> get mykey
Step 5: Securing Redis Server in Linux
12. This section is intended for users who intend to use a redis server connected to an external network like the Internet.
Important: Exposing redis to the Internet without any security makes it extremely easy to exploit; therefore secure the redis server as follows:
- block connections to the redis port in the system firewalled
- set bind directive to loopback interface: 127.0.0.1
- set requirepass option so that clients will be required to authenticate using the AUTH command.
- setup SSL tunneling to encrypt traffic between Redis servers and Redis clients.
For more usage information, run the command below:
$ redis-cli -h
You can find more server commands and learn how to use redis within your application from the Redis Homepage: https://redis.io/
In this tutorial, we showed how to install, configure, manage as well as secure Redis in Linux. To share any thoughts, use the comment form below.

Great Article. Very useful for setting up Redis using the source code method!
Very nice article, although there is a small mistake, in the service file ‘/etc/systemd/system/redis.service‘, the following line:
should be:
It needs to be lower-cased.
@Ayon,
Thanks for notifying me, corrected in the article.
Not working for me:
3589:C 25 Aug 22:52:53.868 # oO0OoO0OoO0Oo Redis is starting oO0OoO0OoO0Oo
3589:C 25 Aug 22:52:53.868 # Redis version=4.0.1, bits=64, commit=00000000, modified=0, pid=3589, just started
3589:C 25 Aug 22:52:53.868 # Configuration loaded
3589:C 25 Aug 22:52:53.868 # systemd supervision requested, but NOTIFY_SOCKET not found
3590:M 25 Aug 22:52:53.869 * Increased maximum number of open files to 10032 (it was originally set to 1024).
Nevermind fixed by changing Type=Forking into Type=forking (lowercase f)
OMG! There is no need to compile.
For CentOS7 just use the remi repo!
[root@nc]# find-repos-of-install redis
Loaded plugins: fastestmirror
redis-4.0.1-1.el7.remi.x86_64 from repo remi
Installation:
# yum install http://rpms.remirepo.net/enterprise/remi-release-7.rpm
# yum install yum-utils
# yum-config-manager –enable remi
# yum install redis
Voila! Works like a charm :D
@Therion7777
Sure, many thanks for sharing this, so much appreciated. We will try it out.