Redis (Remote Dictionary Server) is a very popular and widely-used open source, fast, distributed and efficient in-memory key-value database/data structure server.
It offers a rich set of features that make it effective for a wide range of use cases: as a database, caching layer, message broker, or queue; applicable in web applications, chat and messaging applications, gaming, real-time data analytics and so much more.
It supports flexible data structures, master-slave asynchronous replication to scale read performance and guard against data loss, client-side sharding to scale write performance, two forms of persistence for writing in-memory data to disk in a compact format, clustering, and partitioning. It also features automatic failovers for high availability deployment via Redis Sentinel, Lua scripting, transactions, and many more.
Being a NO SQL or non-relational database, Redis offers some performance benefits over traditional database systems (such as MySQL/MariaDB, PostgreSQL, etc.), because all its data resides or is stored in memory making it easily accessible to an application, while traditional databases have to write all data to or read from disk or an external source.
Redis has become an increasingly prevalent choice for caching, which allows for the reuse of cached data (stored within an application’s main memory space) rather than always querying a database for frequently used data. So it is a fantastic companion of RDMS (Relational Database Management Systems) to ultimately improve application performance.
In this three-part Redis tutorial series, we will cover how to set up and use some of Redis’ key features which are replication, high availability using Redis Sentinel and Redis Cluster, the articles are:
This guide shows how to setup Redis Replication (with Cluster-Mode Disabled) in CentOS 8 Linux, including how to install Redis, configure the master and replicas, and test the replication.
Important: A Redis Cluster (i.e a Replication Cluster) with cluster mode disabled has a single node group (e.g a master and one or two replicas) wheres a Redis cluster with cluster mode enabled may consists of two or more node groups (e.g three masters each having slaves or two).
Prerequisites:
Test Environment Setup
Redis Master Server: 10.42.0.247
Redis Replica1/Slave1: 10.42.0.21
Redis Replica2/Slave2: 10.42.0.34
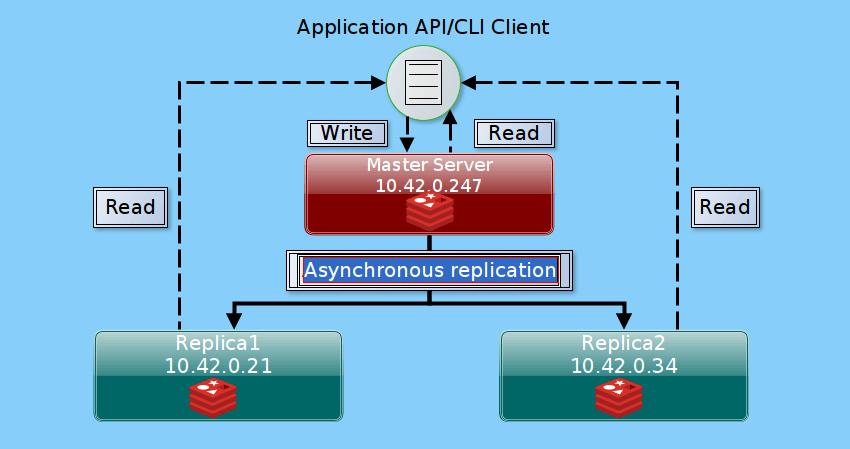
With the above setup (which has a single read/write primary/master node and 2 read-only replica nodes), we have a single node group that contains all of the cluster’s data in each node. Once a slave connects to a master, it receives an initial copy of the full database and any data that previously existed on the slave will be discarded.
Besides, a client can write only to the master but read from any node in the cluster. And as writes are performed on the master, they propagated to all connected slaves for updating the slave datasets in real-time.
Step 1: Installing Redis on CentOS 8
1. To begin with, log into all the CentOS 8 nodes via SSH, then install the Redis package on all the nodes (master and replicas) using the DNF package manager as shown.
# dnf install @redis
2. Upon completion of the Redis package installation, start the Redis service, enable it to automatically start at every system boot and check if it is up and running as follows.
# systemctl start redis
# systemctl enable redis
# systemctl status redis
3. You can also confirm that the Redis server is up and running by checking listening ports using the ss command, as follows.
# ss -ltpn | grep redis-server

Step 2: Configuring Redis Master Server
4. Redis is configured using the /etc/redis.conf configuration file, a self-documented example configuration file. First, create a backup of the original file, then open it for editing using your command-line editor of choice.
# cp /etc/redis.conf /etc/redis.conf.org
# vi /etc/redis.conf
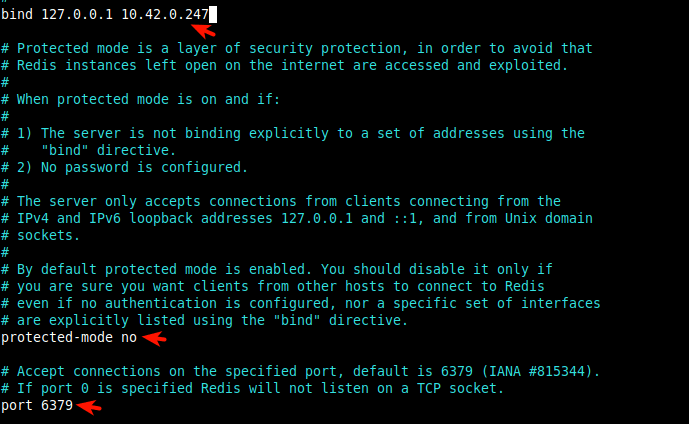
5. By default, a Redis instance is configured to listen and accept connections on the loopback interface, using the bind directive. To communicate with the replicas, the master should be configured to listen on the IPv4 loopback address and its LAN IP address i.e 10.42.0.247.
bind 127.0.0.1 10.42.0.247
6. Next, set the protected-mode parameter to no to allow communication with the replicas as shown.
protected-mode no
Also, Redis listens on port 6379 which is set using the port directive. This is the data port for communicating with application APIs or CLI clients.
port 6379
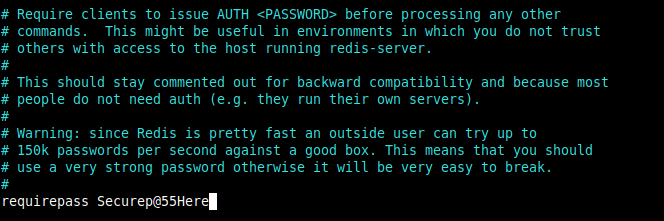
7. To optionally secure the master-replica communications, we can protect the master using the requirepass directive, so that the clients/replicas have to issue an authentication password before running any commands or starting a replication synchronization process, otherwise the master will refuse the client/replica request (remember to set a secure password).
We will use the following option for demonstration purposes, to show how it works.
requirepass Securep@55Here
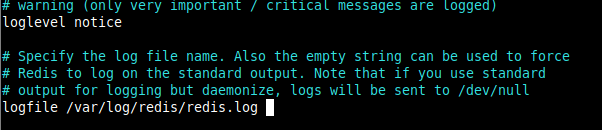
8. Also, Redis logs are stored in the /var/log/redis/redis.log file, this is set using the logfile directive and the default server verbosity level is notice, defined using the loglevel parameter.
loglevel  notice
logfile  /var/log/redis/redis.log
9. Since systemd is the default system and service manager in CentOS 8, you can configure Redis to interact with the systemd supervision tree by setting the supervised parameter to systemd.
supervised systemd

10. After making all the necessary configurations, save the file and close it. Then restart the Redis service to apply the new changes.
# systemctl daemon-reload
# systemctl restart redis
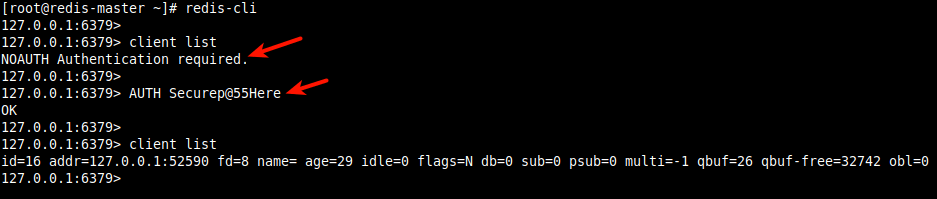
11. To access the Redis server, we need to use the redis-cli (a command-line interface to the redis-server). By default, it connects to the server on the localhost (at 127.0.0.1 port 6379). Note that because the server is secured from clients using a password, running a command before authentication should fail.
Use the auth command to supply the authentication password as shown in the following screenshot.
# redis-cli
127.0.0.1:6379> client list
127.0.0.1:6379> AUTH Securep@55Here
127.0.0.1:6379> client list
12. To connect to a replica (after configuring them as described in the next section), use the -h and -p options to specify the replica IP address/hostname and port respectively (not that port 6379 must be open in the replica’s firewall).
# redis-cli -h 10.42.0.21 -p 6379
13. Next, open the Redis server data port in the firewall to allow inbound connections to the master, and subsequently reload the firewall rules using the firewall-cmd command as shown.
# firewall-cmd --zone=public --permanent --add-port=6379/tcp
# firewall-cmd --reload
Step 3: Configuring Redis Replica/Slave Servers
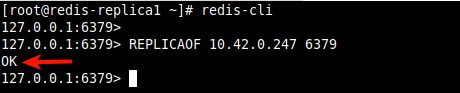
14. To quickly set a Redis instance as a replica on the fly, use the redis-cli utility and call the the REPLICAOF command as shown.
# redis-cli replicaof 10.42.0.247 6379
OR
# redis-cli
127.0.0.1:6379> REPLICAOF 10.42.0.247 6379
15. To make a replication connection permanent, you need to make the following changes in the configuration file. Start by backing up the original file, then open it for editing.
# cp /etc/redis.conf /etc/redis.conf.org
# vi /etc/redis.conf
16. To allow clients to connect to the replica to read data, add the replica IP address to the bind directive.
# replica1
bind 127.0.0.1 10.42.0.21

# replica2
bind 127.0.0.1 10.42.0.34
Setting a Redis Instance as a Replica
17. To configure a Redis instance as a replica, use the replicaof parameter and set the master node’s IP address (or hostname) and port as values.
replicaof 10.42.0.247 6379
Setting Replica to Authenticate to the Master
18. Next, since our master instance is protected using a password, we need to set the password in the replica configuration to enable it to authenticate to the master, using the masterauth parameter.
masterauth Securep@55Here
19. Additionally, when a replica loses its connection with the master, or when the replication is underway, the replica is configured to reply to client requests, possibly with “out of date” data. But for if it the first synchronization, then the data set may just be empty. This behavior is controlled by the replica-serve-stale-data parameter.
And, since Redis 2.6 by default replicas are read-only, this is controlled by the replica-read-only parameter. You can make other replica configuration adjustments to suit your application needs.
20. Once you have made all the necessary changes, restart the Redis service on all replicas.
# systemctl restart redis
21. Also, open port 6379 in the firewall to allow connections from the master and clients to the replicas, and reload the firewall rules.
# firewall-cmd --zone=public --permanenent --add-port=6379/tcp
# firewall-cmd --reload
Step 4: Check Master-replica Replication Status
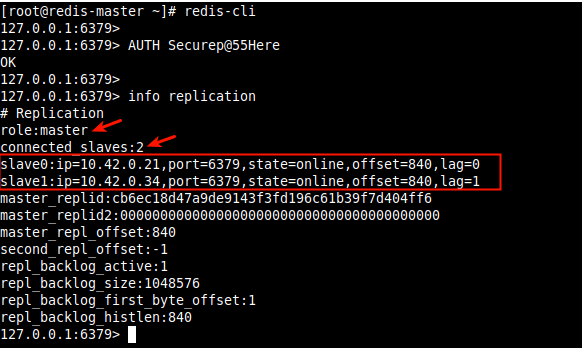
22. Once the master-replica replication configuration is complete, we can check if the set up is working fine as follows.
On the master, run the following commands.
# redis-cli
127.0.0.1:6379> AUTH Securep@55Here
127.0.0.1:6379> info replication
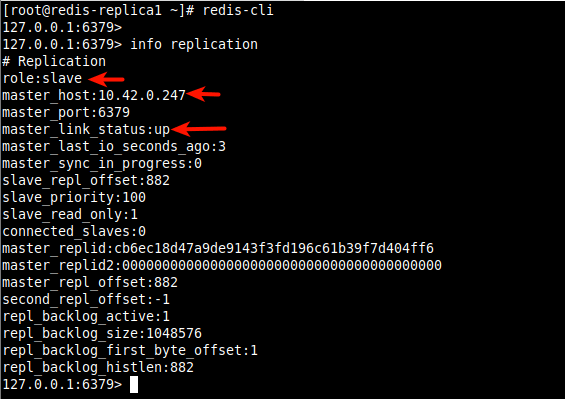
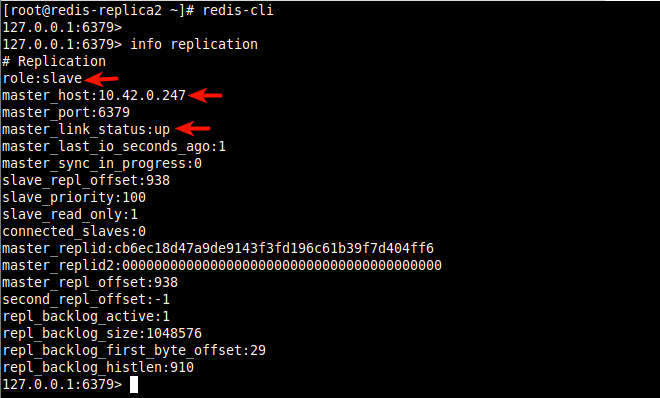
23. Also, check the replication status on the replicas/slaves as follows.
# redis-cli
127.0.0.1:6379> info replication
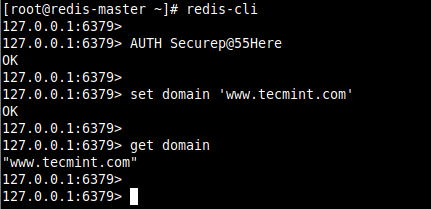
23. Now let’s test the replication by settings a key-value in the master instance and check if the data is synced to the replicas.
On the master, do this:
# redis-cli
127.0.0.1:6379> AUTH Securep@55Here
127.0.0.1:6379> set domain 'www.tecmint.com'
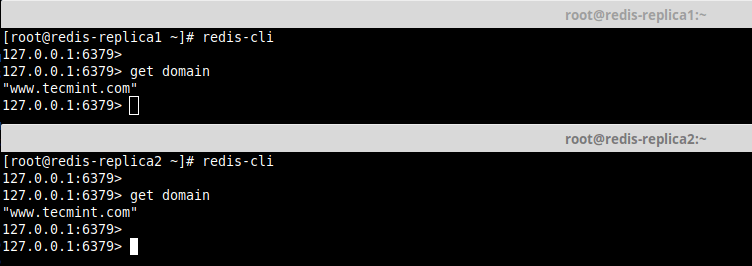
24. Then check if the data has been synced to the replicas as shown.
# redis-cli
127.0.0.1:6379> get domain
Protecting the Master Instance Against Risk of Losing Some Writes
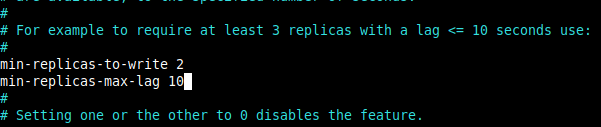
25. Redis has a feature that enables a master instance to limit the risk of losing some writes in case not enough replicas are available, to a specified number of seconds.
This means that a master can stop accepting writes if there are less than N replicas connected, having a lag less or equal than M seconds, as controlled by the min-replicas-to-write and min-replicas-max-lag options respectively.
To set them, uncomment them and set the values according to your setup requirements in /etc/redis.conf, as shown in the following screenshot. This configuration means that, from the last ping to replicas, after 10 seconds, if there are less than 2 replicas online, the master will stop accepting writes.
min-replicas-to-write 2
min-replicas-max-lag 10
You can find more options in the rest of the /etc/redis.conf configuration file and for more detail read about replication in the Redis documentation.
In the next article, we will cover how to set up Redis for high availability with Sentinel in CentOS 8. Until then, stay locked and remember to share your thoughrs and questions using our comment form below is there for you to reach us.


Excellent tutorial. If like me, you’ve cloned the replicas from the master, you might struggle on step 22 and may need to change the replica value in the redis.conf on the replica to point at the master, then restart Redis on the replica server.
Good job. A detailed tutorial.
@Asher
Thanks for the useful feedback and for your kind words of appreciation.