Redis provides high availability via Redis Sentinel distributed system. Sentinel helps to monitor Redis instances, detect failures and will do roles switches automatically thus enabling a Redis deployment to resist any kind of failures.
It features monitoring of Redis instances (master and replicas), supports notification of other services/processes or the system administrator via a script, automatic failover to promote a replica to a master when the master goes down and provides configuration for clients to discover the current master offering a particular service.
This article demonstrates how to set up Redis for high availability with Redis Sentinel in CentOS 8, including configuring sentinels, checking the setup status and testing a Sentinel failover.
Prerequisite:
Test Environment Setup
Master Server and Sentinel1: 10.42.0.247
Redis Replica1 and Sentinel2: 10.42.0.21
Redis Replica2 and Sentinel3: 10.42.0.34
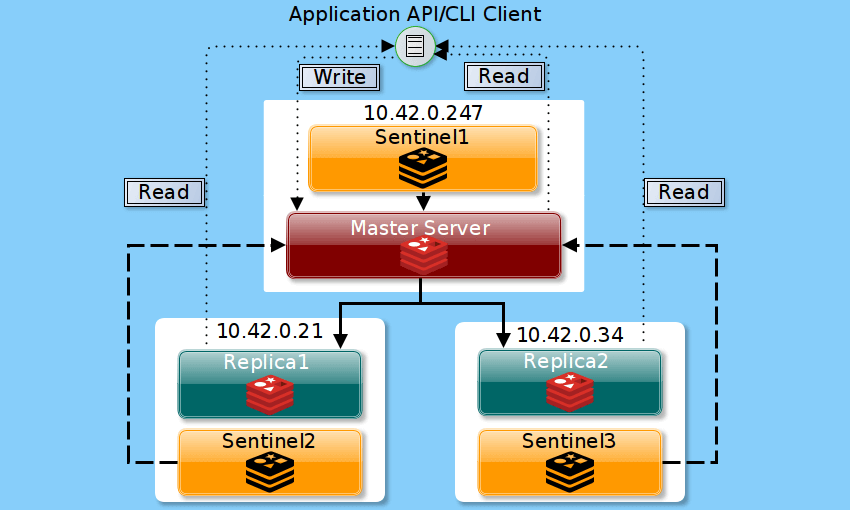
According to the Redis Sentinel documentation, one needs at least three Sentinel instances for a robust deployment. Considering our set up above, if the master fails, Sentinels2 and Sentinel3 will agree about the failure and will be able to authorize a failover, making client operations able to continue.
Step 1: Starting and Enabling Redis Sentinel Service
1. On CentOS 8, the Redis Sentinel service is installed alongside the Redis server (which we already did in the Redis Replication Setup).
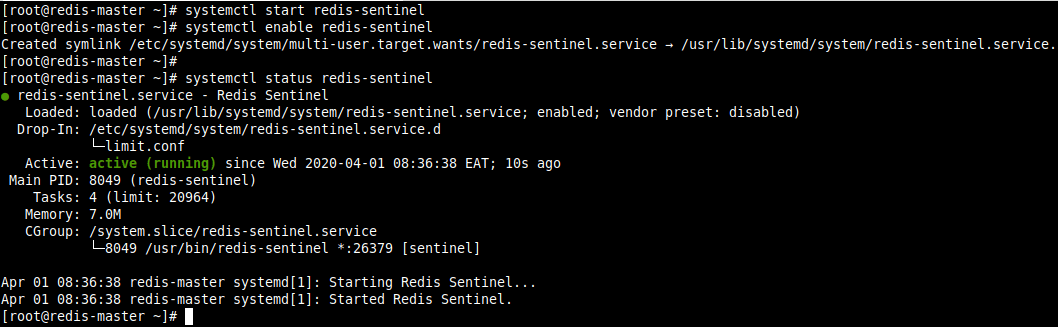
To start the Redis sentinel service and enable it to automatically start at system boot, use the following systemctl commands. Also, confirm that it is up and running by checking its status (do this on all the nodes):
# systemctl start redis-sentinel
# systemctl enable redis-sentinel
# systemctl status redis-sentinel
Step 2: Configuring Redis Sentinel on All Redis Nodes
2. In this section, we explain how to configure Sentinel on all our nodes. The Sentinel service has a similar configuration format as the Redis server. To configure it, use the /etc/redis-sentinel.conf self-documented configuration file.
First, create a backup of the original file and open it for editing.
# cp /etc/redis-sentinel.conf /etc/redis-sentinel.conf.orig
# vi /etc/redis-sentinel.conf
3. By default, Sentinel listens on port 26379, verify this on all the instances. Note that you have to leave the bind parameter commented out (or set to 0.0.0.0).
port 26379

4. Next, tell Sentinel to monitor our master, and to consider it in the “Objectively Down” state only if at least 2 quorum sentinels agree. You can replace “mymaster” with a custom name.
#On Master Server and Sentinel1
sentinel monitor mymaster 127.0.0.1 6379 2

#On Replica1 and Sentinel2
sentinel monitor mymaster 10.42.0.247 6379 2

#On Replica1 and Sentinel3
sentinel monitor mymaster 10.42.0.247 6379 2

Important: The sentinel monitor statement MUST be placed before the sentinel auth-pass statement to avoid the error “No such master with the specified name.” when restarting the sentinel service.
5. If the Redis master to monitor has a password set (in our case the master has), provide the password so that Sentinel instance can authenticate with the protected instance.
sentinel auth-pass mymaster Securep@55Here

6. Then set the number of milliseconds the master (or any attached replica or sentinel) should be unreachable to consider it in the “Subjectively Down” state.
The following configuration means that the master will be considered failing as soon as we don’t receive any reply from our pings within 5 seconds (1 second is equivalent to 1000 milliseconds).
sentinel down-after-milliseconds mymaster 5000

7. Next, set the failover timeout in milliseconds which defines many things (read the documentation of the parameter in the configuration file).
sentinel failover-timeout mymaster 180000

8. Then set the number of replicas that can be reconfigured to use the new master after a failover at the same time. Since we have two replicas, we will set one replica as the other will be promoted to the new master.
sentinel parallel-syncs mymaster 1

Note that the configuration files on Redis Replica1 and Sentinel2, and Reddis Replica1 and Sentinel2 should be identical.
9. Next, restart the Sentinel services on all nodes to apply the recent changes.
# systemctl restart redis-sentinel
10. Next, open port 26379 in the firewall on all nodes to enable the Sentinel instances to start talking, receive connections from the other Sentinel instances, using the firewall-cmd.
# firewall-cmd --zone=public --permanent --add-port=26379/tcp
# firewall-cmd --reload
11. All the replicas will be automatically discovered. Importantly, Sentinel will update the configuration automatically with additional information about replicas. You can confirm this by opening the Sentinel configuration file for each instance and look through it.
For example, when you look at the end of the master’s configuration file, you should see the known-sentinels and known-replica statements as shown in the following screenshot.

It’s should be the same case on replica1 and replica2.


Note that the Sentinel configuration is also rewritten/updated every time a replica is promoted to master status during a failover and every time a new Sentinel is discovered in the setup.
Step 3: Check the Redis Sentinel Setup Status
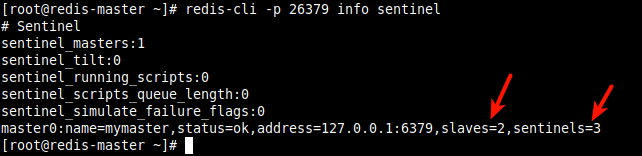
12. Now check the Sentinel status/information on the master, using the info sentinel command as follows.
# redis-cli -p 26379 info sentinel
From the output of the command as seen in the following screenshot, we have two replicas/slaves and three sentinels.
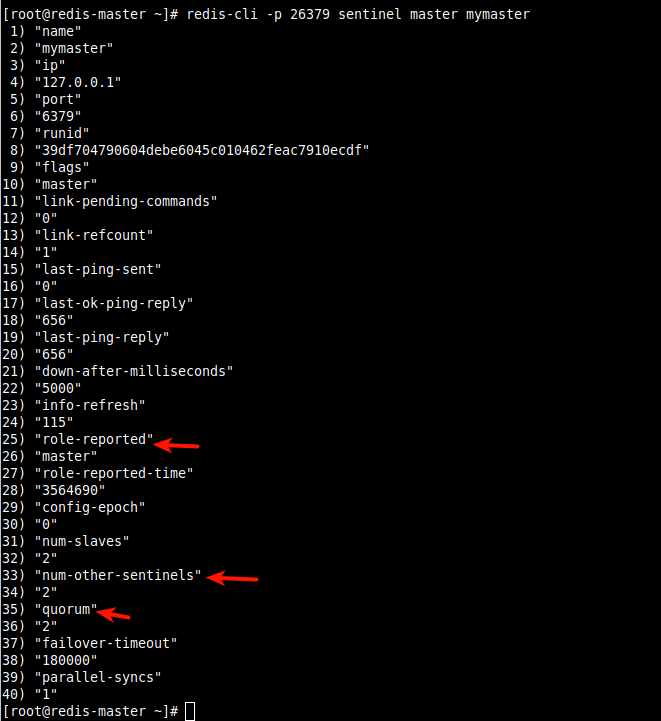
13. To shows detailed information about the master (called mymaster), use the sentinel master command.
# redis-cli -p 26379 sentinel master mymaster
14. To shows detailed information about the slaves and sentinels, use the sentinel slaves command and sentinel sentinels command respectively.
# redis-cli -p 26379 sentinel slaves mymaster
# redis-cli -p 26379 sentinel sentinels mymaster
15. Next, ask the address of the master by name from the slave instances using the sentinel get-master-addr-by-name command as follows.
The output should be the IP address and port of the current master instance:
# redis-cli -p 26379 sentinel get-master-addr-by-name mymaster

Step 4: Test the Sentinel Failover
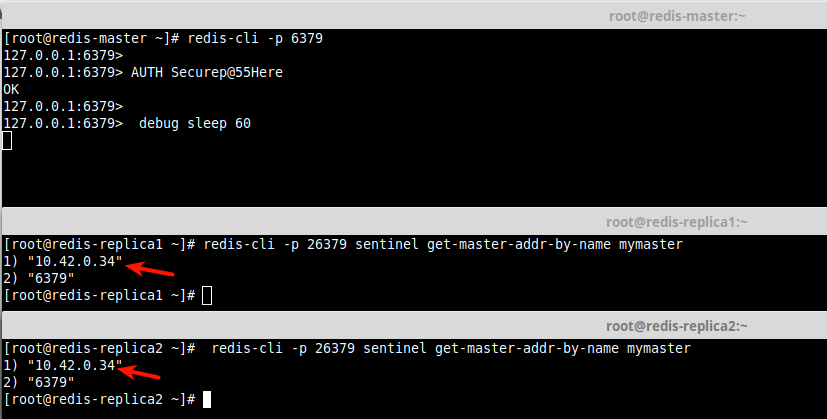
16. Finally, let’s test automatic failover in our Sentinel setup. On the Redis/Sentinel master, make the Redis master (running on port 6379) to sleep for 60 seconds. Then query the address of the current master on the replicas/slaves as follows.
# redis-cli -p 6379
127.0.0.1:6379> AUTH Securep@55Here
127.0.0.1:6379>  debug sleep 60
# redis-cli -p 26379 sentinel get-master-addr-by-name mymaster
# redis-cli -p 26379 sentinel get-master-addr-by-name mymaster
From the output for the query, the new master is now replica/slave2 with IP address 10.42.0.34 as seen in the following screenshot.
You can get more information from the Redis Sentinel documentation. But if you have any thoughts to share or queries, the feedback form below is your gateway to us.
In the next and last part of this series, we will look at how to set up a Redis Cluster in CentOS 8. It will be an independent article from the first two.


In order to use debug sleep 60 (or any other value) directive on a recent version of redis, one must enable the debug command in the redis.conf file. It needs a line like this:
This is not a dynamic setting so in order to enable it, a restart is required. It’s probably *not* a good idea to leave this setting enabled most of the time or on a production instance.
When the first slave is promoted to be the master, the 2nd slave could not connect to it.
Here is the error I’m encountering:
30751:S 07 Jul 16:32:03.415 * Connecting to MASTER 10.1.0.2:6379
30751:S 07 Jul 16:32:03.415 * MASTER SLAVE sync started
30751:S 07 Jul 16:32:03.416 * Non-blocking connect for SYNC fired the event.
30751:S 07 Jul 16:32:03.418 * Master replied to PING, replication can continue…
30751:S 07 Jul 16:32:03.418 # Unable to AUTH to MASTER: -ERR Client sent AUTH, but no password is set