Ghost is a free, open source and lightweight platform intended for blogging or online publications. It is written in Nodejs and comes with an assortment of modern publishing tools designed for easily building and running online publications.
It is feature-rich and now has a desktop app (runs on Linux, Windows and Mac OS) which provides all the functionalities and power of Ghost, simply on your computer. This implies that you can easily switch between multiple sites on the go: making it absolutely efficient.
Ghost Features:
- Fast, scalable and efficient.
- Offers a markdown based editing environment.
- Comes with a desktop app.
- Comes with beautiful handlebars templates.
- Supports for simple content management.
- Supports for multiples roles for authors, editors and administrators.
- Allows scheduling content in advance.
- Supports accelerated mobile Pages.
- Fully supports search engine optimization.
- Provides detailed structured data.
- Supports subscriptions by RSS, Email and Slack.
- Enables simple site editing and so much more.
Requirements:
- A Debian Server Minimal Install with 1GB Memory
- A Ubuntu Server Minimal Install with 1GB Memory
- Node v6 LTS – Install Latest Node.js and NPM in Debian and Ubuntu
- A Debian/Ubuntu server with Nginx installed
Important: Before you begin installing Ghost yourself, you’ll need to have a good VPS hosting, we highly recommend BlueHost.
In this article, we will explain how to install an open source Ghost (Content Management System) blogging platform on a Debian and Ubuntu system.
Step 1: Installing Nodejs on Debian and Ubuntu
1. Nodejs is not available in the default Debian and Ubuntu software repositories, therefore first add its repositories and then install as follows.
$ sudo curl -sL https://deb.nodesource.com/setup_6.x | sudo -E bash -
$ sudo apt-get install nodejs
2. Once nodejs installed, you can verify that you have the recommended version of Nodejs and npm installed using the commands.
$ node -v
$ npm -v

Step 2: Installing Ghost On Debian and Ubuntu
3. Now create a Ghost root directory which will store the application files in the /var/www/ghost, which is the recommended installation location.
$ sudo mkdir -p /var/www/ghost
4. Next, grab the latest version of Ghost from Ghost’s GitHub repository and unzip the archive file into the directory you just created above.
$ curl -L https://ghost.org/zip/ghost-latest.zip -o ghost.zip
$ sudo unzip -uo ghost.zip -d  /var/www/ghost
5. Now move to the new ghost directory, and install Ghost (production dependencies only) with the below commands.
$ sudo cd /var/www/ghost
$ sudo npm install --production
Step 3: Start and Access Default Ghost Blog
6. To start Ghost, run the following command from the /var/www/ghost directory.
$ sudo npm start --production
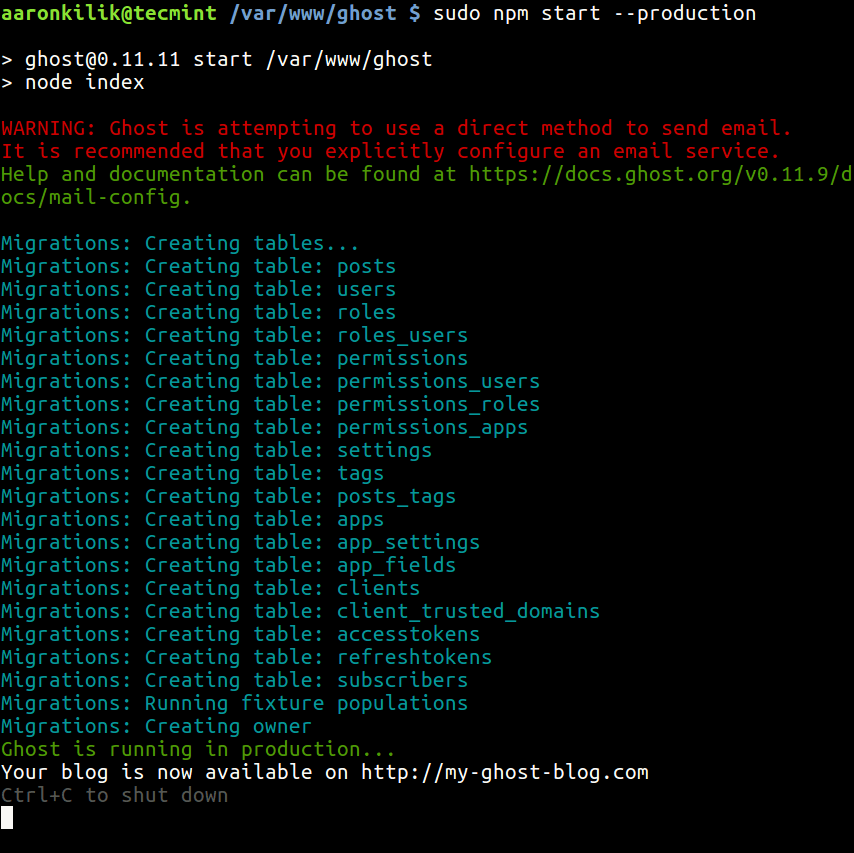
7. By default, Ghost should be listening on port 2368. To see your newly setup Ghost blog, open a web browser and type the URL below:
http://SERVER_IP:2368
OR
http://localhost:2368
Note: After launching Ghost for the first time, the file config.js will be created in the root directory of Ghost. You can use it to set environment level configuration for ghost; where you can configure options such as your site URL, database, mail settings etc.
Step 4: Install and Configure Nginx for Ghost
9. In this section, we will install and configure Nginx to server our Ghost blog on port 80, so that users can access Ghost blog without adding port :2368 at the end of the url.
First stop the Ghost service by hitting the CTRL+C keys on the terminal and then install nginx as shown.
# sudo apt install nginx
# systemctl start nginx
# systemctl enable nginx
10. Once nginx has been installed, create a new file under /etc/nginx/sites-available/ghost.
$ sudo vi /etc/nginx/sites-available/ghost
Add the following configuration and make sure to change the following highlighted lines to your_domain_or_ip_address.
server {
    listen 80;
    server_name your_domain_or_ip_address;
    location / {
    proxy_set_header HOST $host;
    proxy_set_header X-Forwarded-Proto $scheme;
    proxy_set_header X-Real-IP $remote_addr;
    proxy_set_header X-Forwarded-For $proxy_add_x_forwarded_for;
        proxy_pass         http://127.0.0.1:2368;
    }
}
Save the file and active this configuration by creating a symlink under /etc/nginx/sites-enabled directory.
$ sudo ln -s /etc/nginx/sites-available/ghost /etc/nginx/sites-enabled/ghost
11. Now open /etc/nginx.conf file. include the configuration files in the sites-enabled directory and disable the default site as shown.
$ sudo vi /etc/nginx/nginx.conf
Now add the following line inside the http block to include the configuration files in the sites-enabled directory.
http {
...
    # Load modular configuration files from the /etc/nginx/conf.d directory.
    # See http://nginx.org/en/docs/ngx_core_module.html#include
    # for more information.
    include /etc/nginx/conf.d/*.conf;
    include /etc/nginx/sites-enabled/*;
Then totally comment out the default server block found inside the http block.
...

    # Load modular configuration files from the /etc/nginx/conf.d directory.
    # See http://nginx.org/en/docs/ngx_core_module.html#include
    # for more information.
    include /etc/nginx/conf.d/*.conf;
    include /etc/nginx/sites-enabled/*;


#    server {
#       listen       80 default_server;
#       listen       [::]:80 default_server;
#       server_name  _;
#       root         /usr/share/nginx/html;
#
#       # Load configuration files for the default server block.
#       include /etc/nginx/default.d/*.conf;
#
#       location / {
#       }
#
#       error_page 404 /404.html;
#           location = /40x.html {
#       }
#
#       error_page 500 502 503 504 /50x.html;
#           location = /50x.html {
#       }
...
...
Finally, save and restart nginx web server.
$ sudo systemctl restart nginx
Once again, visit http://your_domain_or_ip_address and you’ll see your Ghost blog.
For additional information, go to the Ghost official website: https://ghost.org/
That’s all! In this article, we showed how to setup Ghost in Debian and Ubuntu. Send us your queries or any thoughts concerning this guide via the feedback form below.


Ghost isn’t free: https://ghost.org/pricing/
A little research goes a long way.
@shane
That is Ghost pro, if you need sophisticated features then you need to pay a few dollars. But is free with a handful of features. All in all, thanks for sharing your concern.
you forgot to mention on how to keep ghost server running forever in the background as service.
@Paul
Oh sure, we will update th article to include this important step. Thanks for the heads up.