How to Install Snipe-IT (IT Asset Management) on CentOS and Ubuntu

Snipe-IT is a free and open-source, cross-platform, feature-rich IT asset management system built using a PHP framework called Laravel. It is a web-based software, which enables IT, administrators, in medium to large enterprises to track physical assets, software licenses, accessories, and consumables in a single place.

Check out a live, up-to-date version of Snipe-IT Asset Management Tool: https://snipeitapp.com/demo

Snipe-IT Features:

  1. It is a cross-platform – works on Linux, Windows, and Mac OS X.
  2. It is mobile-friendly for easy asset updates.
  3. Easily Integrates with Active Directory and LDAP.
  4. Slack notification integration for check-in/checkout.
  5. Supports one-click (or cron) backups and automated backups.
  6. Supports optional two-factor authentication with Google authenticator.
  7. Supports the generation of custom reports.
  8. Supports custom status labels.
  9. Supports bulk user actions and user role management for different levels of access.
  10. Supports several languages for easy localization and so much more.

In this article, I will explain how to install an IT asset management system called Snipe-IT using a LAMP (Linux, Apache, MySQL & PHP) stack on CentOS and Debian based systems.

Step 1: Install LAMP Stack

1. First, update the system (meaning update the list of packages that needs to be upgraded and add new packages that have entered in repositories enabled on the system).

$ sudo apt update        [On Debian/Ubuntu]
$ sudo yum update        [On CentOS/RHEL] 

2. Once the system has been updated, now you can install LAMP (Linux, Apache, MySQL & PHP) stack with all needed PHP modules as shown.

Install LAMP on Debian/Ubuntu

$ sudo apt-get install software-properties-common
$ sudo add-apt-repository ppa:ondrej/php
$ sudo apt-get update
$ sudo apt install apache2 apache2-utils libapache2-mod-php mariadb-server mariadb-client php7.3 php7.3-pdo php7.3-mbstring php7.3-tokenizer php7.3-curl php7.3-mysql php7.3-ldap php7.3-zip php7.3-fileinfo php7.3-gd php7.3-dom php7.3-mcrypt php7.3-bcmath 

Install LAMP on CentOS/RHEL

3. Snipe-IT requires PHP greater than 7.x and PHP 5.x has reached the end of life, so to have PHP 7.x, you need to enable the Epel and Remi repository as shown.

$ sudo yum install epel-release
$ sudo rpm -Uvh http://rpms.remirepo.net/enterprise/remi-release-7.rpm
$ sudo yum -y install yum-utils
$ sudo yum-config-manager --enable remi-php71   [Install PHP 7.1]
$ sudo yum-config-manager --enable remi-php72   [Install PHP 7.2]
$ sudo yum-config-manager --enable remi-php73   [Install PHP 7.3]

4. Next, install PHP 7.x on CentOS 7 with the required modules needed by Snipe-IT.

$ sudo yum install httpd mariadb mariadb-server php php-openssl php-pdo php-mbstring php-tokenizer php-curl php-mysql php-ldap php-zip php-fileinfo php-gd php-dom php-mcrypt php-bcmath

5. After the LAMP stack installation completes, start the web server for the meantime, and enable it to start on the next system boot with the following command.

$ sudo systemctl start enable status apache2       [On Debian/Ubuntu]
$ sudo systemctl start enable status httpd         [On CentOS/RHEL]

6. Next, verify Apache and PHP installation and all its current configurations from a web browser, let’s create a info.php file in the Apache DocumentRoot (/var/www/html) using the following command.

$ sudo echo "<?php  phpinfo(); ?>" | sudo tee -a /var/www/html/info.php

Now open a web browser and navigate to following URLs to verify Apache and PHP configuration.

http://SERVER_IP/
http://SERVER_IP/info.php 

7. Next, you need to secure and harden your MySQL installation using the following command.

$ sudo mysql_secure_installation     

You will be asked you to set a strong root password for your MariaDB and answer Y to all of the other questions asked (self-explanatory).

8. Finally start MySQL server and enable it to start at the next system boot.

$ sudo systemctl start mariadb            
OR
$ sudo systemctl start mysql

Step 2: Create Snipe-IT Database on MySQL

9. Now log in to the MariaDB shell and create a database for Snipe-IT, a database user, and set a suitable password for the user as follows.

$ mysql -u root -p

Provide the password for the MariaDB root user.

MariaDB [(none)]> CREATE DATABASE snipeit_db;
MariaDB [(none)]> CREATE USER 'tecmint'@'localhost' IDENTIFIED BY 't&cmint@190root';
MariaDB [(none)]> GRANT ALL PRIVILEGES ON snipeit_db.* TO 'tecmint'@'localhost';
MariaDB [(none)]> FLUSH PRIVILEGES;
MariaDB [(none)]> exit

Step 3: Install Composer – PHP Manager

10. Now you need to install Composer – a dependency manager for PHP, with the commands below.

$ sudo curl -sS https://getcomposer.org/installer | php
$ sudo mv composer.phar /usr/local/bin/composer

Step 4: Install Snipe-IT Asset Management

11. First, install Git to fetch and clone the latest version of Snipe-IT under Apache web-root directory.

$ sudo apt -y install git      [On Debian/Ubuntu]
$ sudo yum -y install git      [On CentOS/RHEL]

$ cd  /var/www/
$ sudo git clone https://github.com/snipe/snipe-it.git

12. Now go into the snipe-it directory and rename the .env.example file to .env.

$ cd snipe-it
$ ls
$ sudo mv .env.example .env

Step 5: Configure Snipe-IT Asset Management

13. Next, configure the snipe-it environment, here you’ll provide the database connection settings and many more.

First, open the .env file.

$ sudo vi .env

Then Find and change the following variables according to instructions given.

APP_TIMEZONE=Africa/Kampala                                   #Change it according to your country
APP_URL=http://10.42.0.1/setup                                #set your domain name or IP address
APP_KEY=base64:BrS7khCxSY7282C1uvoqiotUq1e8+TEt/IQqlh9V+6M=   #set your app key
DB_HOST=localhost                                             #set it to localhost
DB_DATABASE=snipeit_db                                        #set the database name
DB_USERNAME=tecmint                                           #set the database username
DB_PASSWORD=password                                          #set the database user password

Save and close the file.

14. Now you need to set the appropriate permissions on certain directories as follows.

$ sudo chmod -R 755 storage 
$ sudo chmod -R 755 public/uploads
$ sudo chown -R www-data:www-data storage public/uploads   [On Debian/Ubuntu]
sudo chown -R apache:apache storage public/uploads         [On CentOS/RHEL]

15. Next, install all the dependencies required by PHP using the Composer dependency manager as follows.

$ sudo composer install --no-dev --prefer-source

16. Now you can generate the “APP_KEY” value with the following command (this will be set automatically in the .env file).

$ sudo php artisan key:generate

17. Now, you need to create a virtual host file on the webserver for Snipe-IT.

$ sudo vi /etc/apache2/sites-available/snipeit.example.com.conf     [On Debian/Ubuntu]
$ sudo vi /etc/httpd/conf.d/snipeit.example.com.conf                [On CentOS/RHEL]

Then add/modify the line below in your Apache config file (use your server IP address here).

<VirtualHost 10.42.0.1:80>
    ServerName snipeit.tecmint.lan
    DocumentRoot /var/www/snipe-it/public
    <Directory /var/www/snipe-it/public>
        Options Indexes FollowSymLinks MultiViews
        AllowOverride All
        Order allow,deny
        allow from all
    </Directory>
</VirtualHost>

Save and close the file.

18. On Debian/Ubuntu, you need to enable virtual host, mod_rewrite, and mcrypt using the following commands.

$ sudo a2ensite snipeit.conf
$ sudo a2enmod rewrite
$ sudo php5enmod mcrypt

19. Lastly, restart the Apache webserver to take new changes into effect.

$ sudo systemctl restart apache2       [On Debian/Ubuntu]
$ sudo systemctl restart httpd         [On CentOS/RHEL]

Step 6: Snipe-IT Web Installation

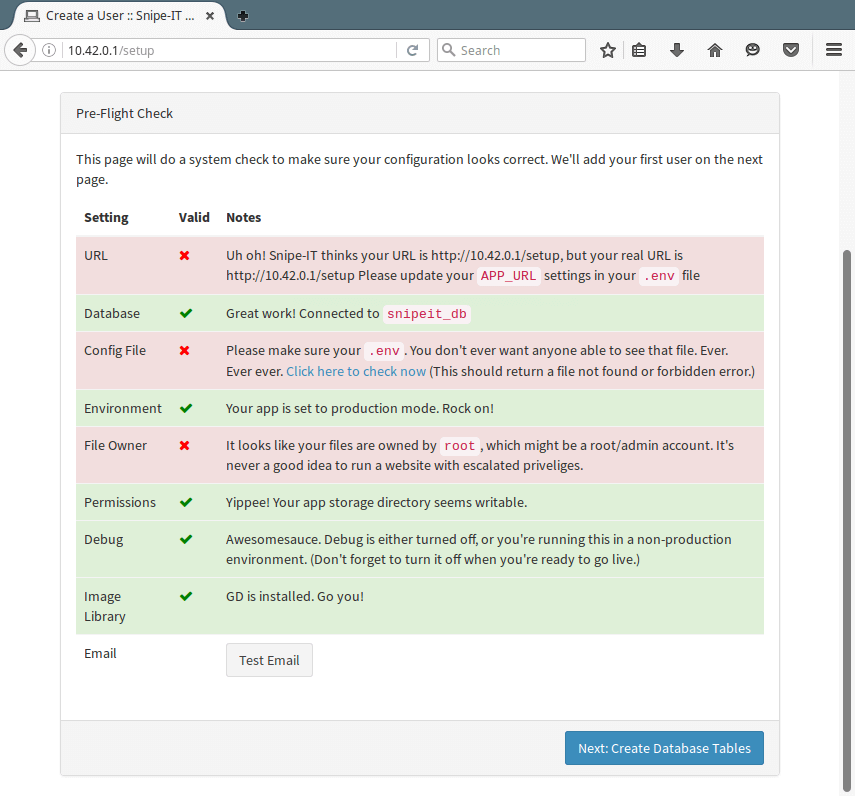
20. Now open your web browser and enter the URL: http://SERVER_IP to view the Snipe-IT web installation interface.

First, you will see the Pre-Flight Check page below, click Next: Create Database Tables.

Snipe-IT Pre Flight Check

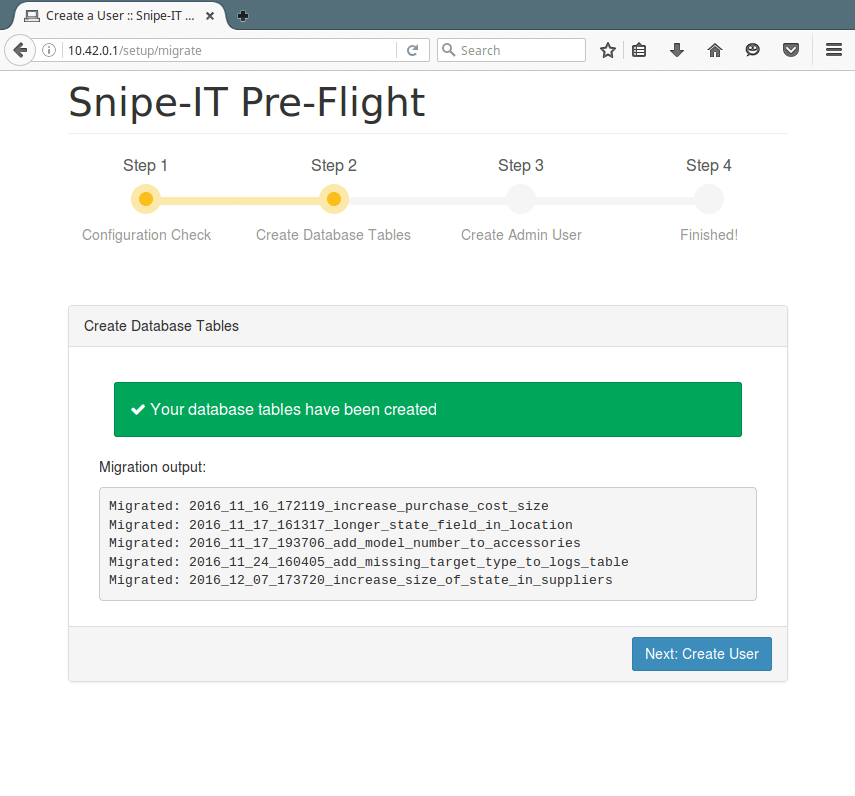
21. You will now see all the tables created, click Next: Create User.

Create Snipe-IT User

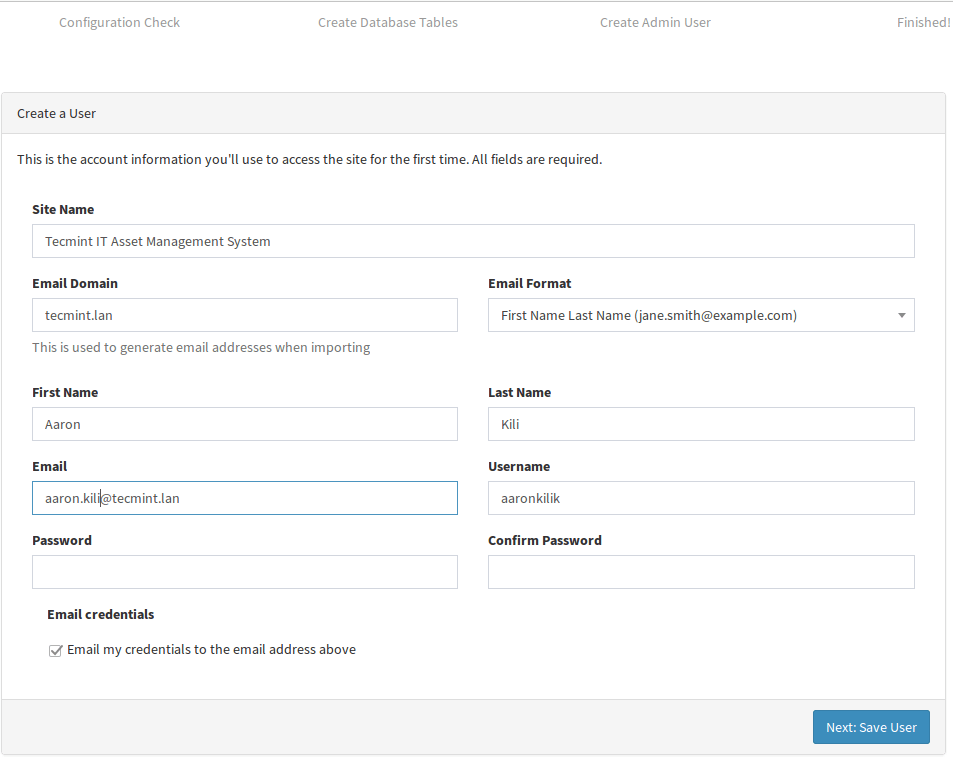
22. Here, provide all the admin user information and click Next: Save User.

Snipe-IT User Information

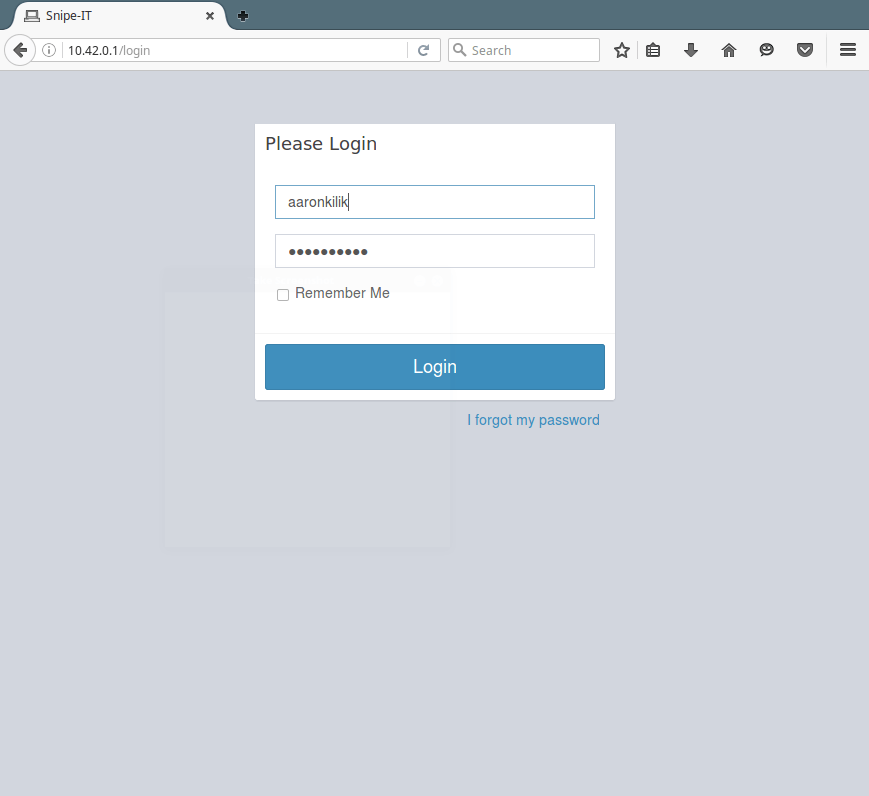
23. Finally, open the login page using the URL http://SERVER_IP/login as shown below and login to view the Snipe-IT dashboard.

Snipe-IT Login
Snipe-IT Login
Snipe-IT Dashboard
Snipe-IT Dashboard

Snipe-IT Homepage: https://snipeitapp.com/

In this article, we discussed how to setup Snipe-IT with LAMP (Linux Apache MySQL PHP) stack on CentOS and Debian based systems. If any issues, do share with us using our comment form below.

Aaron Kili
Aaron Kili is a Linux and F.O.S.S enthusiast, an upcoming Linux SysAdmin, web developer, and currently a content creator for TecMint who loves working with computers and strongly believes in sharing knowledge.

Each tutorial at TecMint is created by a team of experienced Linux system administrators so that it meets our high-quality standards.

Join the TecMint Weekly Newsletter (More Than 156,129 Linux Enthusiasts Have Subscribed)
Was this article helpful? Please add a comment or buy me a coffee to show your appreciation.

57 thoughts on “How to Install Snipe-IT (IT Asset Management) on CentOS and Ubuntu”

  1. Hi,

    I can’t open the url/homepage. is something wrong with my configuration? i’m installed on redhat 7 in remote host

    location /var/www/html/snipe-it
    
    .env 
       APP_URL=http://10.7.77.90/setup
    

    snipeit.example.com.conf

        ServerName snipeit.example.com
        DocumentRoot /var/www/html/snipe-it/public
        
            Options Indexes FollowSymLinks MultiViews
            AllowOverride All
            Require all granted
            Order allow,deny
            allow from all
        

    Please help, thank you

    Reply
  2. There is a syntax error in the command sudo composer install --no-dev -prefer-source. The correct command is sudo composer install --no-dev --prefer-source. There may also be a missing dependency of php-bcmath package. Need to install using yum install php-bcmath. It is a great post I hope it will help.

    Reply
  3. Dear Team,

    I am getting an error while doing the below steps.

    Next, we will install all the dependencies required by PHP using Composer as below:

    # composer install --no-dev --prefer-source
    

    Now, generate the “APP_KEY” value with the following command:

    # php artisan key:generate
    
    Reply
    • Hi,

      try using /usr/local/bin/composer install --no-dev --prefer-source instead of composer only command.

      Then you’ll bump into missing php-bcmath module. So you better install it before with:

      $ sudo yum install php-bcmath
      
      Reply
  4. I had several failed attempts at getting snipe to working to test for work, so, frustrated, went to google to find “alternatives” instructions/tutorials, came upon yours and started reading, and it looked good for noobs, I said it’s perfect! Until the “$ sudo vi .env” part when I thought it must have been the force of habit, noobs cannot deal with vi, I overlooked this and kept reading, came upon the “Then add/modify the line below in your Apache config file” and then it hit me, this is not for noobs, cause you’re leaving out key information, which might be obvious for programmers, but certainly not for noobs like me…

    I don’t mean this as a complain, l will try tour instructions tomorrow, I just have to get in my head the idea that snipe it is not a mature product yet since you need to deal with so many things manually, there’s no VM appliance yet (like turnkey or bitnami)…

    I write this in the hopes that people wanting to try this get the opinion of a noob, I have been working on IT for a very long time, but I’m no programmer and this is not easy for me.

    Reply
    • @Scar,

      I understand your feelings, but Vi editor is the most used text editor in the command-line. If you want something easy to edit, go for a nano editor.

      $ sudo nano .env
      
      Reply
  5. Question, why do all of this Snipe-IT provides a simple install script here?

    You can install it using the following commands:

    # wget https://raw.githubusercontent.com/snipe/snipe-it/master/snipeit.sh
    # chmod +x snipeit.sh
    # bash .\snipeit.sh
    

    Simple as that.

    Reply
  6. The latest version of Snipe-it needs php 7.1 at least (>=7.1.2) – so Centos users will need to update, also on step 15 please be aware that bcmath was not installed in php, [sudo yum install php-bcmath] so i had to install that before composer would run properly

    Reply
  7. Hi
    Installations successfully completed save user and create it’s show user already registered. trying multiple different users but again shows registered page only it’s not showing login page

    Reply
  8. I got the error PHP Parse error: syntax error, unexpected ‘function’ (T_FUNCTION), expecting identifier (T_STRING) or \\ (T_NS_SEPARATOR) in /var/www/snipe-it/vendor/zendframework/zend-diactoros/src/functions/marshal_headers_from_sapi.php on line 10 while generating the Key.

    And one more doubt, if i enter the IP in browser am getting the apache page. How can ti get the Snipe IT page or if i generate the key then it will work?

    Please help me in This.

    Reply
  9. You’re leaving people open to attack by having them add “Indexes” to their web server config in directory options. You should really change it to "-Indexes".

    Reply
  10. Hi, I have a problem.

    I created a new user with some deny permission, but i can’t login again with administrator or my new user ; error username and password wrong

    can you help me?

    Reply
  11. I can’t generate the key. I get a PHP Fatal Error. I would post the whole error message but I’m getting blocked when I try to do it.

    Reply
  12. I ran into in error when I got to Step 15. The composer command could not be found. I had to move the composer executable from /usr/local/bin/composer to /usr/bin/composer. I believe there is an error in step 3 for CentOS 7.

    Also, when I tried to verify the Apache and PHP installation it didn’t work. I had to create an exception in the firewall before I could navigate to the URL. I’m just posting this in case someone else is trying to do this on CentOS 7 and runs into the same issues.

    Reply
  13. Hi, I get an error when trying to execute the following command:

    $ sudo rpm -Uvh http://rpms.remirepo.net/enterprise/remi-release-7.rpm
    
    The error is:
    Retrieving http://rpms.remirepo.net/enterprise/remi-release-7.rpm
    warning: /var/tmp/rpm-tmp.bUyFtE: Header V4 DSA/SHA1 Signature, key ID 00f97f56: NOKEY
    error: Failed dependencies:
            epel-release = 7 is needed by remi-release-7.5-2.el7.remi.noarch
    

    I am new to this so any help is appreciated.

    Reply
    • @Troy,

      First install EPEL repository and then install Remi as shown.

      $ sudo yum install epel-release
      $ sudo rpm -Uvh http://rpms.remirepo.net/enterprise/remi-release-7.rpm
      
      Reply
  14. Hi

    when I try to execute the composer command on a CentOS7.4, but I receive the below warn and error messages. I’m expert on php and composer too. Can someone suggest me a solution?

    Do not run Composer as root/super user! See https://getcomposer.org/root for details

      [Symfony\Component\Console\Exception\RuntimeException]
      The "-▒" option does not exist.
    
    Reply
  15. When running the composer install –prefer-source –no-dev I get the following:

    composer install –prefer-source –no-dev
    Cannot create cache directory /home/ladmin/.composer/cache/repo/https—packagist.org/, or directory is not writable. Proceeding without cache
    Cannot create cache directory /home/ladmin/.composer/cache/files/, or directory is not writable. Proceeding without cache
    Invalid argument –prefer-source –no-dev. Use “composer require –prefer-source –no-dev” instead to add packages to your composer.json.

    Any clues?

    Reply
    • @DZan

      Pass the arguments in the appropriate way:
      $composer install – -prefer-source – -no-dev

      Also ensure that the required directory is writable, check out the permissions on it.

      Reply
  16. Step 15 is not working for me, getting below error – please help

    composer install –no-dev –prefer-source
    Invalid argument –prefer-source. Use “composer require –prefer-source” instead to add packages to your composer.json.

    Reply
  17. I’m using Ubuntu when I finished all the configuration and then I went to the web page with my IP address it gave me:
    “Whoops, looks like something went wrong.”

    Can you help me please.

    Reply
    • @Siraj,

      Have you followed installation instructions correctly? could you share the correct error message that webpage displayed?

      Reply
  18. Thank you so much for this detailed tutorial, I’m using CentOS 7 and I was having problem executing this command “sudo composer install –no-dev –prefer-source” it says “no composer found”
    after that I changed /usr/local/bin/composer to /usr/bin/composer and it worked.

    Run below command :

    $ curl -sS https://getcomposer.org/installer | php 
    $ sudo mv composer.phar /usr/bin/composer
    
    Reply
  19. You really should consider removing CentOS as an option for installation until you fix the PHP portion of this HOWTO.

    Reply
  20. This will not really work on CentOS as you presented.

    The app requires PHP 5.5>, but CentOS by default installs 5.4, this guide needs to include information on how to install PHP 5.5> on CentOS instead.

    Reply
    • @Bart

      Thanks for the heads up, we will include information on how to install PHP 5.5> on CentOS. We will possibly create a dedicated article for this including installation of all currently supported versions of PHP(i.e 5.6, 7.0 and 7.1) and put a link to it.

      Reply
    • @Bart,

      Oops sorry for typo, corrected in the writeup – yes it should be.

      $ sudo git clone https://github.com/snipe/snipe-it.git
      
      Reply

Got something to say? Join the discussion.

Thank you for taking the time to share your thoughts with us. We appreciate your decision to leave a comment and value your contribution to the discussion. It's important to note that we moderate all comments in accordance with our comment policy to ensure a respectful and constructive conversation.

Rest assured that your email address will remain private and will not be published or shared with anyone. We prioritize the privacy and security of our users.