Today, over 36% of the web runs on the WordPress platform, as it is one of the most widely used open-source content management systems for creating a website or blog using its powerful features, beautiful designs, and above all, the freedom to build anything you want.
Read Also: How to Install WordPress with Apache in Ubuntu 20.04
In this article, you will learn how to install WordPress with Nginx webserver in Ubuntu 20.04. To install WordPress, you must have LEMP stack installed on your Ubuntu 20.04 server, otherwise, see our guide:
Installing WordPress in Ubuntu 20.04
1. Once you have LEMP stack in place, move further to download and set up WordPress from its official site using the following wget command.
$ wget -c http://wordpress.org/latest.tar.gz
2. When the package has finished downloading, extract the archived file using the tar command as shown.
$ tar -xzvf latest.tar.gz
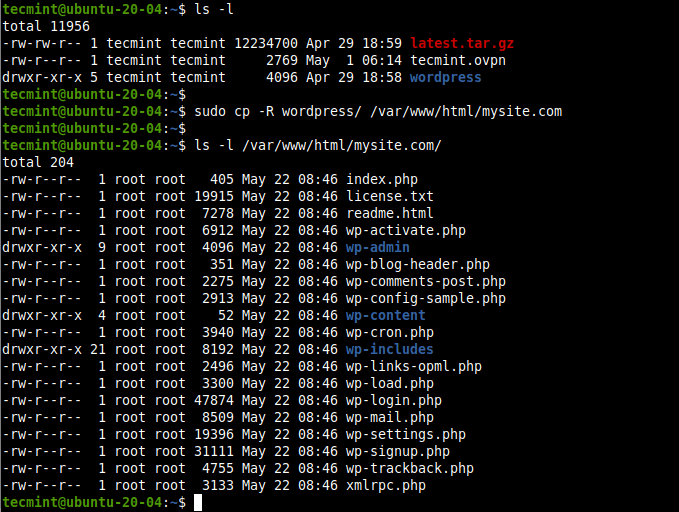
3. Now copy the content of the wordpress folder into your website’s folder (e.g mysite.com) which should be stored under the webserver’s web document root (/var/www/html/), as shown.
Note that when using the cp command, the mysite.com directory doesn’t have to exist before, it will be automatically created.
$ ls -l
$ sudo cp -R wordpress/ /var/www/html/mysite.com
$ sudo ls -l /var/www/html/mysite.com/
4. Next, set correct permissions on the website directory /var/www/html/mysite.com. The webserver user and group www-data should own it with read, write, and execute permissions.
$ sudo chown -R www-data:www-data /var/www/html/mysite.com
$ sudo chmod -R 775 /var/www/html/mysite.com
Creating a WordPress Database for Website
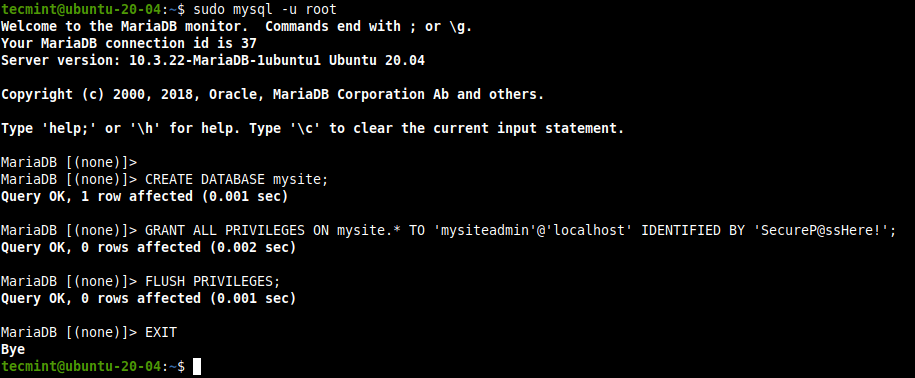
5. WordPress requires a database for website data storage. To create one for your site, log into the MariaDB shell using the mysql command using the -u option to provide the username and -p for the password and also use sudo if you are accessing as the root database user.
$ sudo mysql -u root -p
OR
$ sudo mysql -u root		#this also works for root database user
6. Once you have accessed the database shell, issue the following commands to create your website’s database, database user and a password as shown (do not forget to use your values instead of “mysite”, “mysiteadmin” and “SecureP@ssHere!”).
MariaDB [(none)]> CREATE DATABASE mysite;
MariaDB [(none)]> GRANT ALL PRIVILEGES ON mysite.* TO 'mysiteadmin'@'localhost' IDENTIFIED BY  'SecureP@ssHere!';
MariaDB [(none)]> FLUSH PRIVILEGES;
MariaDB [(none)]> EXIT;
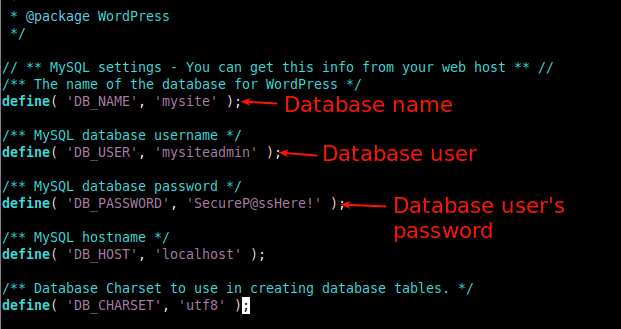
7. At this point, you need to create a wp-config.php file for your new WordPress installation, where you will define the database connection and some other parameters as well. Move into the website’s document root /var/www/html/mysite.com and create a wp-config.php file from the sample file provided by default.
$ cd /var/www/html/mysite.com
$ sudo mv wp-config-sample.php wp-config.php
8. After creating a wp-config.php file, open it for editing.
$ sudo vim wp-config.php
Now modify the database connection settings (the name of the database for WordPress, MariaDB database username, and the user’s password) as highlighted in the following screenshot, so that your new WordPress site will connect to the database you created for it.
Creating an NGINX Virtual Server Block (VirtualHost) for WordPress Website
9. For NGINX to serve your website to clients using your domain name (e.g mysite.com), you need to configure a virtual server block (analogous to virtual host under Apache) for your site in the NGINX configuration.
Create a file called mysite.com.conf under the /etc/nginx/conf.d/ directory as shown.
$ sudo vim /etc/nginx/conf.d/mysite.com.conf
Copy and paste the following configuration in the file. Remember to replace the mysite.com and www.mysite.com with your domain name.
server {
        listen 80;
        listen [::]:80;
        root /var/www/html/mysite.com;
        index  index.php index.html index.htm;
        server_name mysite.com www.mysite.com;

        error_log /var/log/nginx/mysite.com_error.log;
        access_log /var/log/nginx/mysite.com_access.log;

        client_max_body_size 100M;
        location / {
                try_files $uri $uri/ /index.php?$args;
        }
        location ~ \.php$ {
                include snippets/fastcgi-php.conf;
                fastcgi_pass unix:/run/php/php7.4-fpm.sock;
                fastcgi_param   SCRIPT_FILENAME $document_root$fastcgi_script_name;
        }
}
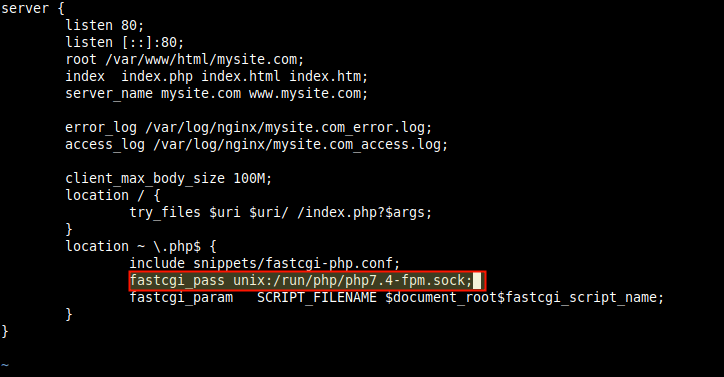
Note: In the above configuration, the value of fastcgi_pass parameter should point to the socket PHP-FPM is listening on, as defined by the value of the listen parameter in the /etc/php/7.4/fpm/pool.d/www.conf pool configuration file. The default is a UNIX socket /run/php/php7.4-fpm.sock.
10. Importantly, NGINX normally routes all requests to the default server. Therefore, remove the default server block file to enable your new site and other sites you intend to set up on the same server to load well.
$ sudo rm /etc/nginx/sites-enabled/default
$ sudo rm /etc/nginx/sites-available/default
11. Next, check the NGINX configuration syntax for any errors before you can restart the Nginx service to apply the above changes.
$ sudo nginx -t
$ sudo systemctl restart nginx

Completing the WordPress Installation via the Web Installer
12. Next, you need to complete the WordPress installation using the web installer. Open a web browser and use your domain name to navigate:
http://mysite.com/
OR
http://SERVER_IP/
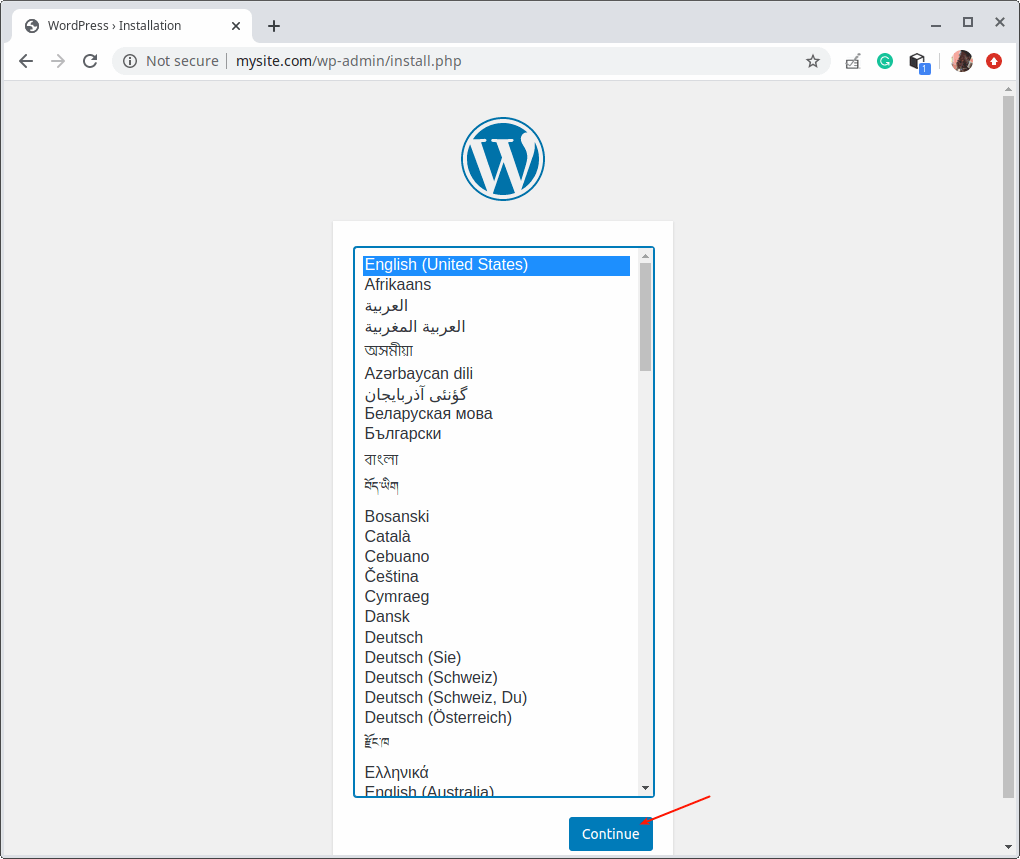
When the web installer loads, choose the language you prefer for the installation process and click Continue.
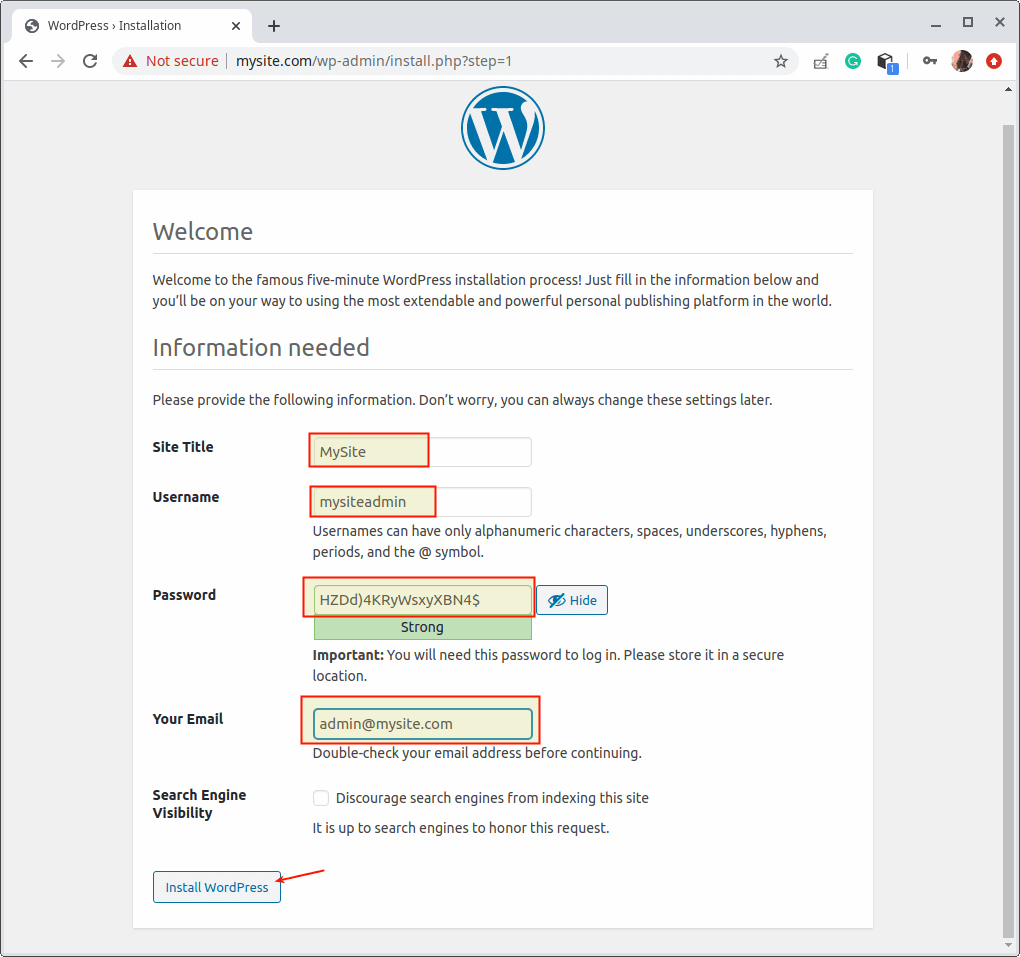
13. Then fill in the required information about your new website. That is the site title, administrative username, the user’s password, and email address. Then click Install WordPress. Note that you can always edit this information later on.
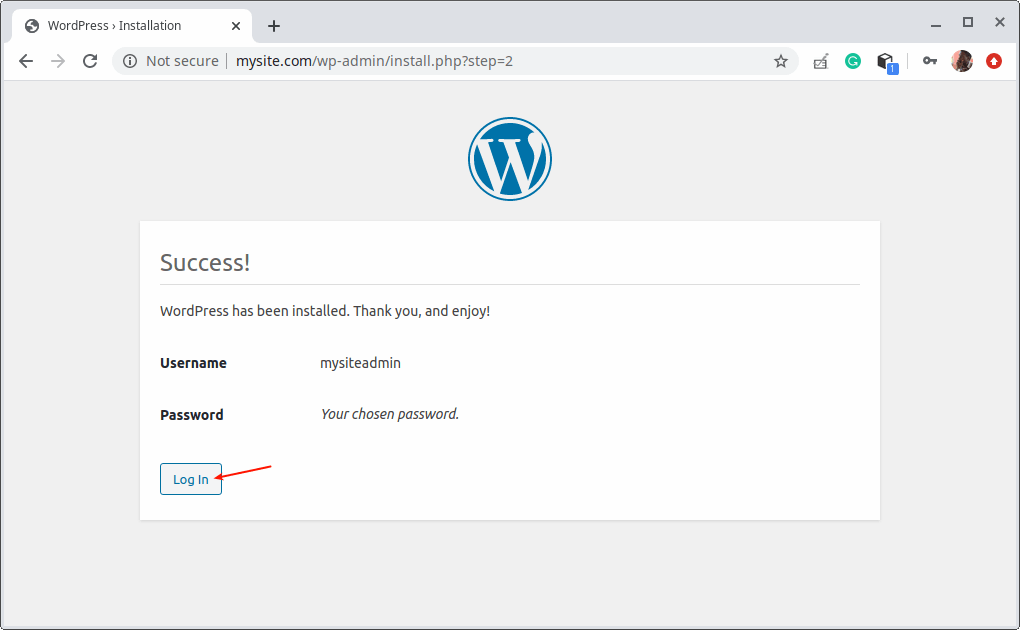
14. After WordPress is successfully installed, proceed to access the website administrator’s dashboard by clicking on the login button as highlighted in the following screen.
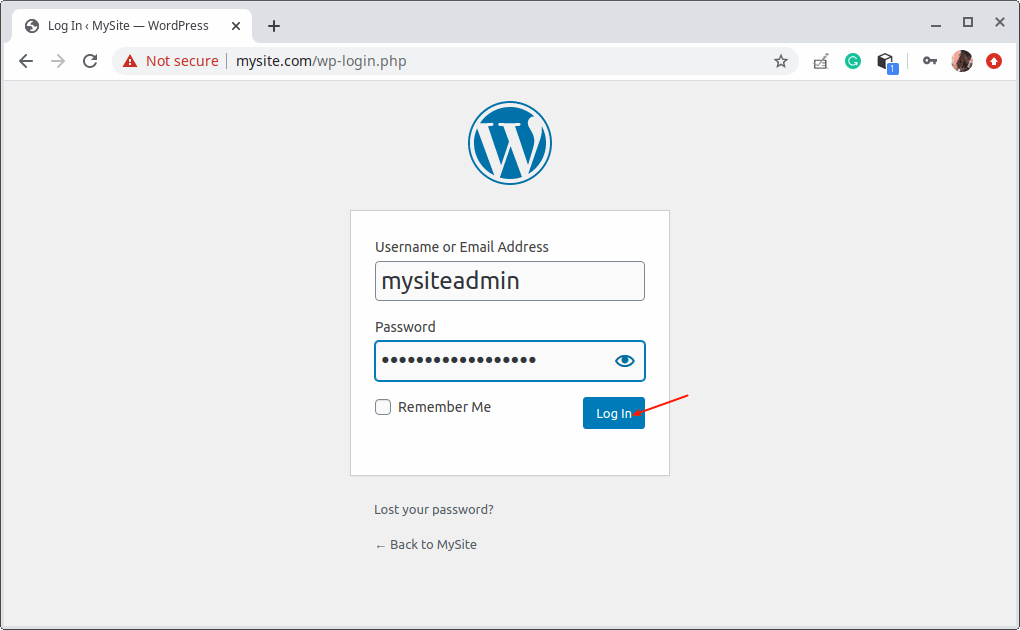
15. At the website admin’s login page, provide your username and password created above and click login, to access your site’s admin dashboard.
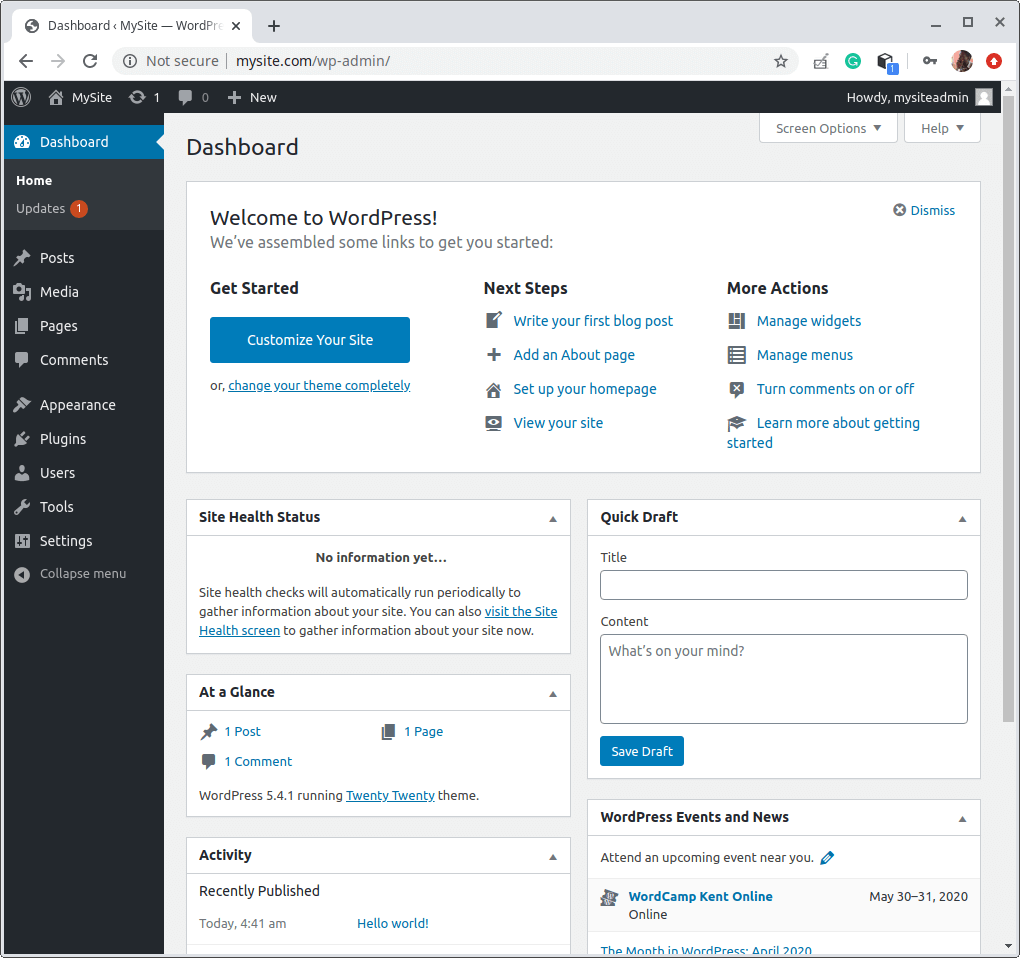
Congratulations! You have successfully installed the latest version of WordPress with NGINX in Ubuntu 20.04, to start building your new website or blog.
To run a secure site, you need to enable HTTPS by installing an SSL/TLS certificate for encrypted communication with clients. In a production environment, it is recommended to use Let’s Encrypt certificate is free automated, open, and trusted by most if not all modern web browsers. Alternatively, you can buy one from a commercial certificate authority (CA).


I configured everything until the launch on the browser but when I type the ip-server it gives me a 502 bad gateway error.
Copy and paste commands are so easy!
Thank you so much for this useful artcle.
Hello, thanks for the great article!
It went almost fine until the last step for me. I am configuring everything with the “final” domain in mind, but I would like to keep it as a staging environment for a few days to have everything set up. Ping works fine with the server’s IP but I have an “unable to connect/problem loading page”, even with the hostname of the server (trying IP and hostname provided from provider).
The only thing I did wrong was that I forgot to put the site’s name at mysite.com.conf and used !mv to rename it in vim afterward, and nginx returned successfully. Any ideas for that?
Also, it would be great to include the secure configuration (https) and the installation steps for ssl cert (letsencrypt maybe?)
@George,
The domain is working with IP address? Have you added DNS
Arecord for your domain in your DNS control panel?@Ravi yes it works with IP address and it works fine ;) I just missed a couple of underscores _ while copying :D
I have a strange issue. My setup went correctly, but my site note opening up well from the Internet, but on my local network it opens up okay. Not sure what to do to resolve this.
@Emmanuel,
You need to create a DNS
Arecord for your domain on the DNS domain hosting provider panel and point the domain to your IP address to resolve this…Thanks for getting back to me. I created a CNAME DNS record as I’m using the ddns address of my mikrotik router. But cannot figure out why the site doesn’t open up well
@Emmanuel,
Create
Arecord and point to the server IP address where WordPress installed…You are a super star. Thanks for pointing me in the right direction.
@Emmanuel,
Thanks :)
After removing the default sites from nginx with:
I was unable to get to phpmyadmin!
Doh! no backup made before they were deleted.
@Jobe,
You can download the default Nginx configuration from here – https://gist.github.com/nishantmodak/d08aae033775cb1a0f8a
Step 13, 3rd line also needs a sudo to work:
@Pep,
Thanks, corrected the command in the article…
@victor101010001010
Have you taken a look at the NGINX error log file (/var/log/nginx/error.log), I believe it has entries relating to this issue you are facing.
Hi, I have followed your instructions to the letter but at the end when I have to type
http://mysite.comORhttp://SERVER_IP/the web installer doesn’t load on my localhost site and the page times out.Any help would be appreciated
Hi, I followed every step until 11. Then at 12, I get an error message: Error establishing a database connection.
How can I search for a solution?
@Felipe,
Please create the wordpress database with right user privileges as shown in step #6 and enter the correct database details in the
wp-config.phpfile as shown at step #8.Just a note. You don’t need Flush privileges if you use the GRANT commands. You only need to flush privileges if you update the privileges tables directly!
@Michael
Many thanks for sharing this.