In the previous two articles of this Postfix series you learned how to set up and manage the email server database through phpMyAdmin, and how to configure Postfix and Dovecot to handle incoming and outgoing mail. In addition, we explained how to set up a mail client, such as Thunderbird, for the virtual accounts we created previously.
- Setup Postfix Mail Server and Dovecot with MariaDB – Part 1
- How to Configure Postfix and Dovecot with Virtual Domain Users – Part 2
- Install and Configure RoundCube Webmail Client with Virtual Users in Postfix – Part 4
- Use Sagator, an Antivirus/Antispam Gateway to Protect Your Mail Server – Part 5
Since no email server setup can be complete without taking precautions against viruses and spam, we are going to cover that topic in the current article.

Please keep in mind that even when *nix-like operating systems are usually considered to be virus-free, chances are clients using other operating systems will also connect to your email server.
For that reason, you need to provide them with the confidence that you have taken the necessary measures to protect them to the extent possible from such threats.
Configuring SpamAssassin for Postfix
In the process of receiving email, spamassassin will stand between the outside world and the email services running on your server itself. If it finds, according to its definition rules and configuration, that an incoming message is spam, it will rewrite the subject line to clearly identify it as such. Let’s see how.
The main configuration file is /etc/mail/spamassassin/local.cf, and we should make sure the following options are available (add them if they are not present or uncomment if necessary):
report_safe 0
required_score 8.0
rewrite_header Subject [SPAM]
- When report_safe is set to 0 (recommended value), incoming spam is only modified by modifying the email headers as per rewrite_header. If it is set to 1, the message will be deleted.
- To set the aggressivity of the spam filter, required_score must be followed by an integer or decimal number. The lesser the number, the more sensitive the filter becomes. Setting required_score to a value somewhere between 8.0 and 10.0 is recommended for a large system serving many (~100s) email accounts.
Once you’ve saved those changes, enable and start the spam filter service, and then update the spam rules:
# systemctl enable spamassassin
# systemctl start spamassassin
# sa-update
For more configuration options, you may want to refer to the documentation by running perldoc Mail::SpamAssassin::Conf in the command line.
Integrating Postfix and SpamAssassin
In order to efficiently integrate Postfix and spamassassin, we will need to create a dedicated user and group to run the spam filter daemon:
# useradd spamd -s /bin/false -d /var/log/spamassassin
Next, add the following line at the bottom of /etc/postfix/master.cf:
spamassassin unix - n n - - pipe flags=R user=spamd argv=/usr/bin/spamc -e /usr/sbin/sendmail -oi -f ${sender} ${recipient}
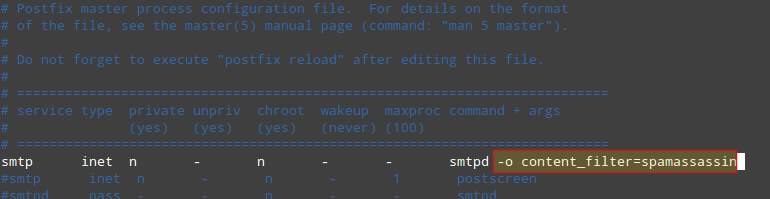
And indicate (at the top) that spamassassin will serve as content_filter:
-o content_filter=spamassassin
Finally, restart Postfix to apply changes:
# systemctl restart postfix
To verify that SpamAssassin is working properly and detecting incoming spam, a test known as GTUBE (Generic Test for Unsolicited Bulk Email) is provided.
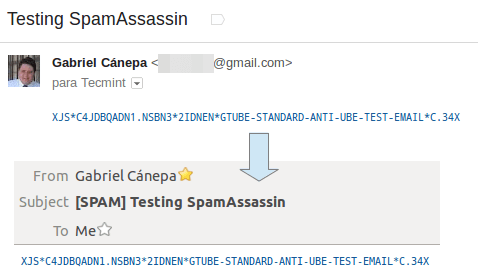
To perform this test, send an email from a domain outside your network (such as Yahoo!, Hotmail, or Gmail) to an account residing in your email server. Set the Subject line to whatever you want and include the following text in the message body:
XJS*C4JDBQADN1.NSBN3*2IDNEN*GTUBE-STANDARD-ANTI-UBE-TEST-EMAIL*C.34X
For example, sending the above text in a message body from my Gmail account produces the following result:
And shows the corresponding notice in the logs:
# journalctl | grep spam
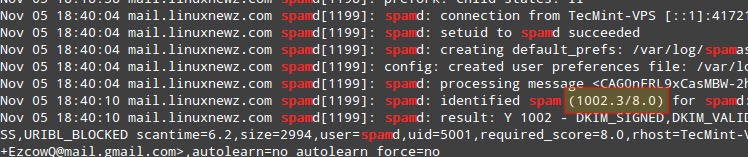
As you can see in the image above, this email message got a spam score of 1002.3. Additionally, you can test spamassassin right from the command line:
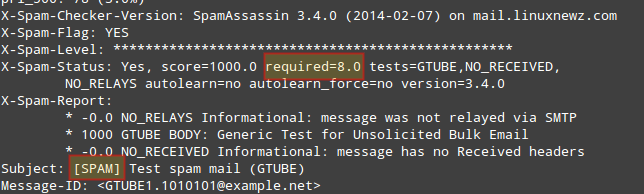
# spamassassin -D < /usr/share/doc/spamassassin-3.4.0/sample-spam.txt
The above command will produce some really verbose output that should include the following:
If these tests are not successful, you may want to refer to the spamassassin integrations guide.
Starting ClamAV and Update Virus Definitions
To begin, we will need to edit /etc/clamd.d/scan.conf. Uncomment the following line:
LocalSocket /var/run/clamd.scan/clamd.sock
and comment out or delete the line:
Example
Then enable and start the clamav scanner daemon:
# systemctl enable [email protected]
# systemctl start [email protected]
and don’t forget to set the antivirus_can_scan_system SELinux boolean to 1:
# setsebool -P antivirus_can_scan_system 1
At this point it is worth and well to check on the service’s status:
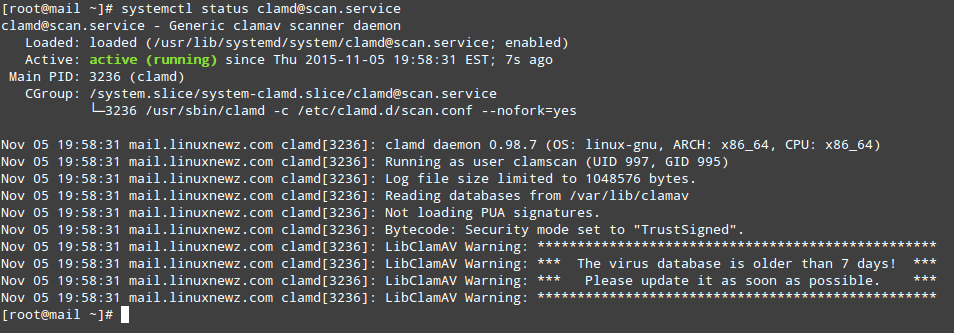
As you can see in the image above, our virus signatures are older than 7 days. To update them we will use a tool called freshclam that was installed as part of the clamav-update package.
The easiest way to update the virus definitions is through a cron job that executes as often as desired (once a day for example, at 1 am server time as indicated in the following example is considered enough):
00 01 * * * root /usr/share/clamav/freshclam-sleep
You can also update the virus definitions manually, but before you’ll also have to remove or comment out the following line in /etc/freshclam.conf.
Example
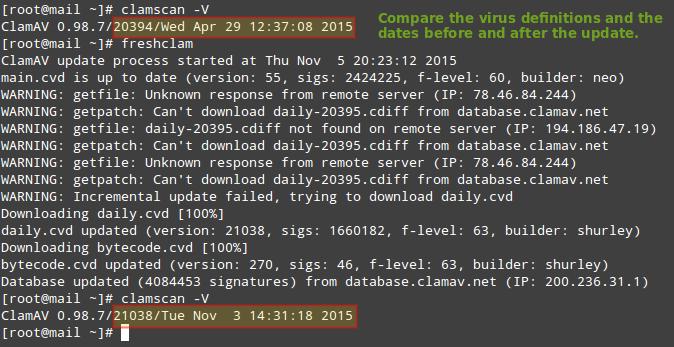
Now you should be able to run:
# freshclam
which will update the virus definitions as desired:
Testing ClamAV for Virus in Emails
To verify ClamAV is working properly, let’s download a test virus (which we can get from http://www.eicar.org/download/eicar.com) to the Maildir of [email protected] (which is located in /home/vmail/linuxnewz.com/tecmint/Maildir) to simulate an infected file received as a mail attachment:
# cd /home/vmail/linuxnewz.com/tecmint/Maildir
# wget http://www.eicar.org/download/eicar.com
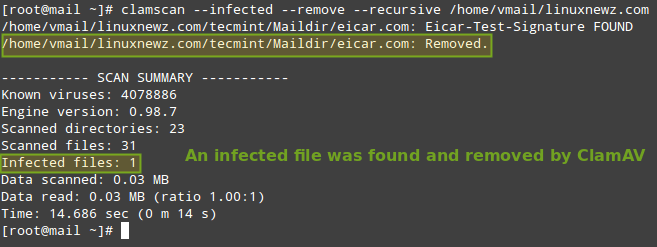
And then scan the /home/vmail/linuxnewz.com directory recursively:
# clamscan --infected --remove --recursive /home/vmail/linuxnewz.com
Now, feel free to set up this scan to run through a cronjob. Create a file named /etc/cron.daily/dailyclamscan, insert the following lines:
#!/bin/bash
SCAN_DIR="/home/vmail/linuxnewz.com"
LOG_FILE="/var/log/clamav/dailyclamscan.log"
touch $LOG_FILE
/usr/bin/clamscan --infected --remove --recursive $SCAN_DIR >> $LOG_FILE
and grant execute permissions:
# chmod +x /etc/cron.daily/dailyclamscan
The above cronjob will scan the mail server directory recursively and leave a log of its operation in /var/log/clamav/dailyclamscan.log (make sure the /var/log/clamav directory exists).
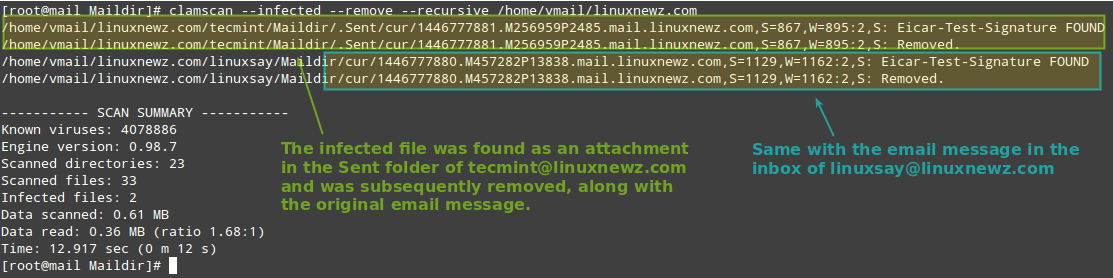
Let’s see what happens when we send the eicar.com file from [email protected] to [email protected]:
Summary
If you followed the steps outlined in this tutorial and in the previous two articles of this series, you now have a working Postfix email server with spam and antivirus protection.
DISCLAIMER: Please note that server security is a vast subject and cannot be adequately covered in a short series like this.
For that reason, I highly encourage you to become familiar with the tools used in this series and their man pages. Although I have done my best to cover the essential concepts associated with this topic, do not assume that after going through this series you are fully qualified to set up and maintain a email server in a production environment.
This series is intended as a starting point and not as an exhaustive guide to mail server administration in Linux.
You will probably think of other ideas that can enrich this series. If so, feel free to drop us a note using the comment form below. Questions and other suggestions are appreciated as well – we look forward to hearing from you!


Gabriel,
I’ve used this setup for several years on CentOS 7 and it works great. I am using a similar setup on CentOS 9 Stream. I wanted to ask if you have any references for me. I am getting a generic “mail server configuration error”. I would like to get this resolved and move to the new server.
Any help would be appreciated. You can email me directly if you prefer.
Thanks in advance.
@Eric,
Let me update the article for CentOS Stream 9…
Thanks,
I don’t think I have a major issue but the devils in the details.
Hi,
Followed your step for SpamAssassin for postfix. It is working perfectly for two of my mail servers but one mail server (with the same config) not marking spam mail. I am puzzled. How to debug this? Where is the problem?
Thanks in advance
Nirjhar, Dhaka, Bangladesh
Hello,
I have a working system except for Spamassassin. All the tests you mention work except sending from an outside domain to my server. Here’s my master.cf… How would I move messages to JUNK when it is working… Bruce
# Postfix master process configuration file. For details on the format
# of the file, see the master(5) manual page (command: “man 5 master”).
#
# Do not forget to execute “postfix reload” after editing this file.
#
# ==========================================================================
# service type private unpriv chroot wakeup maxproc command + args
# (yes) (yes) (yes) (never) (100)
# ==========================================================================
smtp inet n – n – – smtpd -o content_filter=spamassassin
#smtp inet n – n – 1 postscreen
#smtpd pass – – n – – smtpd
#dnsblog unix – – n – 0 dnsblog
#tlsproxy unix – – n – 0 tlsproxy
submission inet n – n – – smtpd
-o syslog_name=postfix/submission
-o smtpd_tls_security_level=encrypt
-o smtpd_sasl_auth_enable=yes
-o smtpd_reject_unlisted_recipient=no
# -o smtpd_client_restrictions=$mua_client_restrictions
# -o smtpd_helo_restrictions=$mua_helo_restrictions
# -o smtpd_sender_restrictions=$mua_sender_restrictions
-o smtpd_recipient_restrictions=permit_sasl_authenticated,reject
-o milter_macro_daemon_name=ORIGINATING
smtps inet n – n – – smtpd
-o syslog_name=postfix/smtps
-o smtpd_tls_wrappermode=yes
-o smtpd_sasl_auth_enable=yes
-o smtpd_reject_unlisted_recipient=no
# -o smtpd_client_restrictions=$mua_client_restrictions
# -o smtpd_helo_restrictions=$mua_helo_restrictions
# -o smtpd_sender_restrictions=$mua_sender_restrictions
# -o smtpd_recipient_restrictions=permit_sasl_authenticated,reject
# -o milter_macro_daemon_name=ORIGINATING
#628 inet n – n – – qmqpd
pickup unix n – n 60 1 pickup
cleanup unix n – n – 0 cleanup
qmgr unix n – n 300 1 qmgr
#qmgr unix n – n 300 1 oqmgr
tlsmgr unix – – n 1000? 1 tlsmgr
rewrite unix – – n – – trivial-rewrite
bounce unix – – n – 0 bounce
defer unix – – n – 0 bounce
trace unix – – n – 0 bounce
verify unix – – n – 1 verify
flush unix n – n 1000? 0 flush
proxymap unix – – n – – proxymap
proxywrite unix – – n – 1 proxymap
smtp unix – – n – – smtp
relay unix – – n – – smtp
# -o smtp_helo_timeout=5 -o smtp_connect_timeout=5
showq unix n – n – – showq
error unix – – n – – error
retry unix – – n – – error
discard unix – – n – – discard
local unix – n n – – local
virtual unix – n n – – virtual
lmtp unix – – n – – lmtp
anvil unix – – n – 1 anvil
scache unix – – n – 1 scache
dovecot unix – n n – – pipe
flags=DRhu user=vmail:vmail argv=/usr/libexec/dovecot/deliver -f ${sender} -d ${recipient}
spamassassin unix – n n – – pipe flags=R user=spamd argv=/usr/bin/spamc -f -e /usr/sbin/sendmail -oi -f ${sender} ${recipient}
Got it! had to enable the content_filter on 587 (submission)…
Bruce,
Thank you for taking the time to report back on the solution you found!
I am using Debian and when I try to use the systemctl enable [email protected] and the start one, shows me an error saying no such file or directory, are these commands just for Ubuntu? Or they should be working on Debian too? Thanks.
Hi Sergio,
Which version of Debian are you using? Please note that systemctl is part of the systemd suite, which is available starting with Debian 8 Jessie.
If you are sure you’re using Jessie, you can check how these services are called by doing
systemctl | grep clam
Hope it helps.
Is there a way to make all the spam automatically go to the users junk-mail folder?
On workaround.org that function is implemented, but the guides isn’t identically so I don’t think I can use the configuration from that site.
Some script that delete everything from all junk-folders that are older than 1 month or so would also be nice.
Spamassassin went fine but I’m having trouble with clamav. I tried removing all (they were installed in Part 1 of this guide), including config files and backups, then installing from scratch and following these instructions precisely. Got the same results and my Google-fu is failing me. CentOS 7.2.1511 and ClamAV 0.99.1
Everything went according to the script but the service won’t start. The output of the status query is:
[root@mx /]# systemctl -l status [email protected]
[email protected] – Generic clamav scanner daemon
Loaded: loaded (/usr/lib/systemd/system/[email protected]; enabled; vendor preset: disabled)
Active: failed (Result: start-limit) since Wed 2016-06-01 15:32:40 EDT; 4min 19s ago
Process: 2528 ExecStart=/usr/sbin/clamd -c /etc/clamd.d/%i.conf –nofork=yes (code=exited, status=1/FAILURE)
Main PID: 2528 (code=exited, status=1/FAILURE)
Jun 01 15:32:40 mx systemd[1]: [email protected]: main process exited, code=exited, status=1/FAILURE
Jun 01 15:32:40 mx systemd[1]: Unit [email protected] entered failed state.
Jun 01 15:32:40 mx systemd[1]: [email protected] failed.
Jun 01 15:32:40 mx systemd[1]: [email protected] holdoff time over, scheduling restart.
Jun 01 15:32:40 mx systemd[1]: start request repeated too quickly for [email protected]
Jun 01 15:32:40 mx systemd[1]: Failed to start Generic clamav scanner daemon.
Jun 01 15:32:40 mx systemd[1]: Unit [email protected] entered failed state.
Jun 01 15:32:40 mx systemd[1]: [email protected] failed.
[root@mx /]#
Any ideas what I might be missing?
additional info: In case this was a problem with me trying to manually start the service I rebooted the server and checked the service status after it came back up. Same output.
@Harmon20, we’re almost there, brother :). Hang in there.
Can you paste the output of journalctl -xn RIGHT AFTER attempting to manually start clamd? We are mostly interested in lines containing the word ERROR in them.
if the clamav scan only runs once a day, won’t that mean that new messages that are infected will be available for download for up to 1 day? so therefore, many of them will get through to mail clients?
@ura,
What runs once a day is the cron job that will update the virus definitions. On the other hand, the antivirus service itself should be running as a daemon at all times. That is what will protect your new messages.
Of course, it is possible -though highly unlikely- that a message (infected with a virus released in the recent past, whose signature has not yet been identified by major antivirus engines) finds its way to your mailbox. With virus and antivirus you can be as paranoid as with backups. A solid knowledge of the threats your environment faces will give you the last word as to how paranoid you need to be about it.
Hello Gabriel,
First of all, let me thank you for the great series of articles. I’m following along, and so far so good :)
regarding the above question, I thing @ura souls was referring to this part:
“The above cronjob will scan the mail server directory recursively and leave a log of its operation in /var/log/clamav/dailyclamscan.log”
I understood as he did. Also, I find that updating is by default, but what needs to be done is to remove this four lines:
### !!!!! REMOVE ME !!!!!!
### REMOVE ME: By default, the freshclam update is disabled to avoid
### REMOVE ME: network access without prior activation
FRESHCLAM_DELAY=disabled-warn # REMOVE ME
from vi /etc/sysconfig/freshclam.
If you can comment this, it would be really helpful.
All the best