VirtualBox Guest Additions are a collection of device drivers and system applications designed to achieve closer integration between the host and guest operating systems. They help to enhance the overall interactive performance and usability of guest systems.
Read Also: How to Install VirtualBox Guest Additions in CentOS
The VirtualBox Guest Additions offer the following features:’
- Easy mouse pointer integration.
- Easy way to share folders between the host and the guest.
- Drag and drop feature allows copying or opening files, copy clipboard formats from the host to the guest or from the guest to the host.
- Share clipboard (for copy and paste) of the guest operating system with your host operating system.
- Better video support provides accelerated video performance.
- Better Time synchronization between guest and host.
- Standard host/guest communication channels.
- Seamless Windows features allows you to run windows of your guest operating system seamlessly next to the windows of your host.
The VirtualBox Guest Additions should be installed inside a virtual machine after the guest operating system has been installed.
In this article, we will explain how to install VirtualBox Guest Additions on Ubuntu and Debian based distributions such Linux Mint.
How to Install VirtualBox Guest Additions in Ubuntu
1. First start by updating your Ubuntu guest operating system software packages using following command.
$ sudo apt update
$ sudo apt upgrade
2. Once upgrade completes, reboot your Ubuntu guest operating system to effect the recent upgrades and install required packages as follows.
$ sudo apt install build-essential dkms linux-headers-$(uname -r)
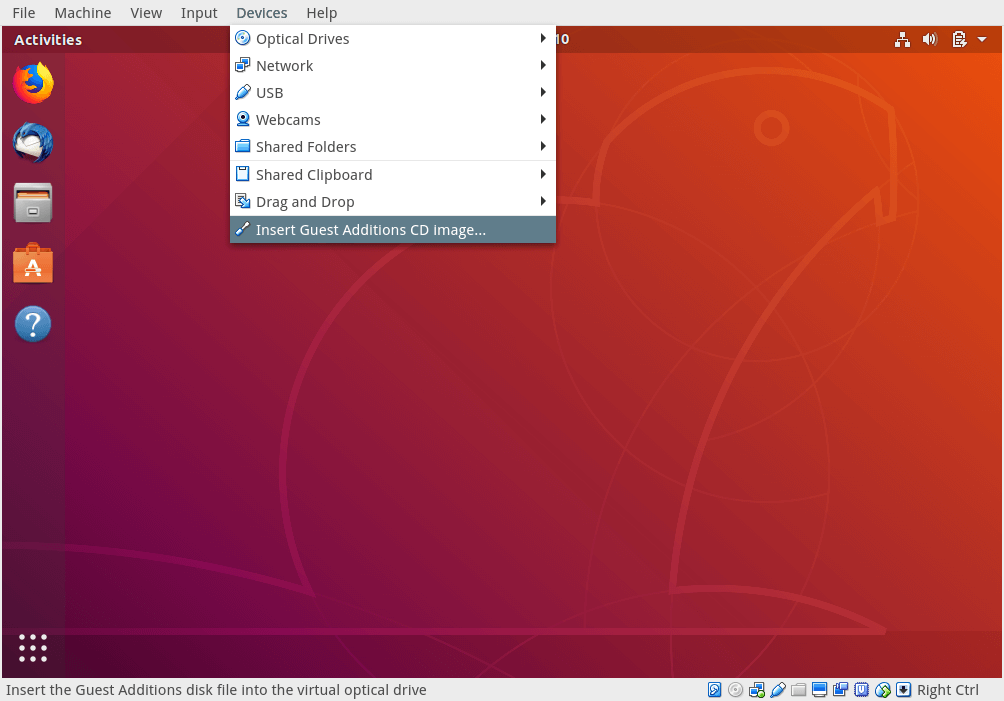
3. Next, from the Virtual Machine menu bar, go to Devices => click on Insert Guest Additions CD image as shown in the screenshot. This helps to mount the Guest Additions ISO file inside your virtual machine.
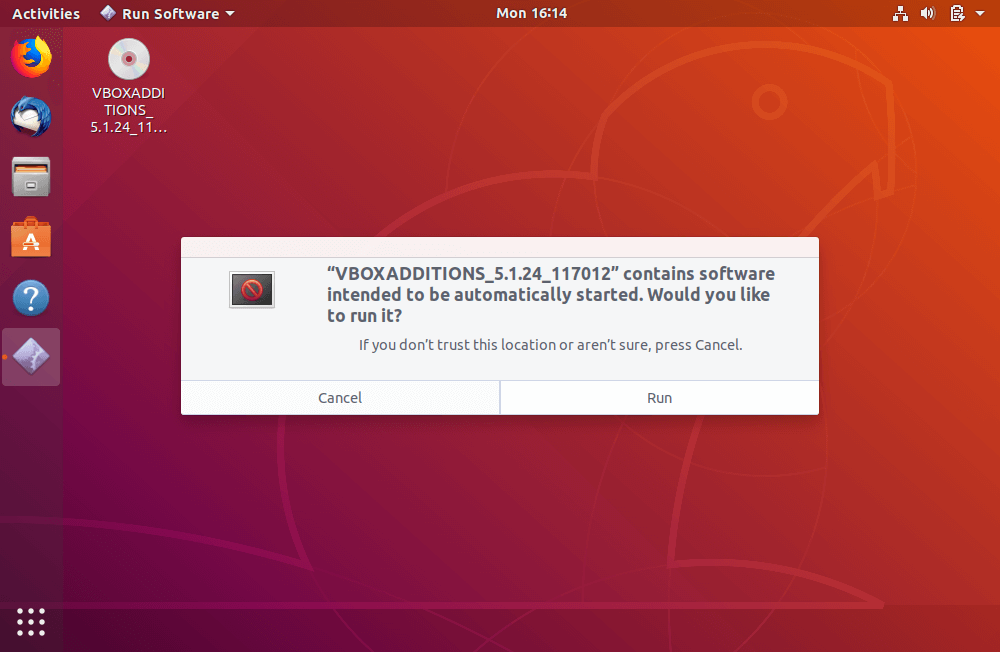
4. Next, you will get a dialog window, prompting you to Run the installer to launch it.
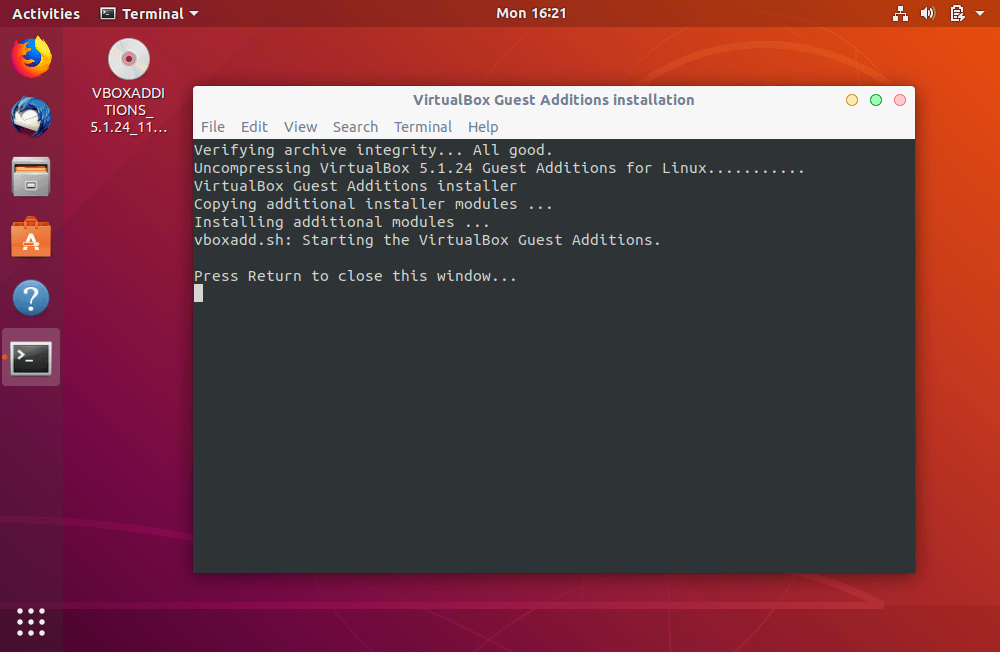
5. A terminal window will be opened from which the actual installation of VirtualBox Guest Additions will be performed. Once the installation is complete, press [Enter] to close the installer terminal window. Then power off your Ubuntu guest OS to change some settings from VirtualBox manager as explained in the next step.
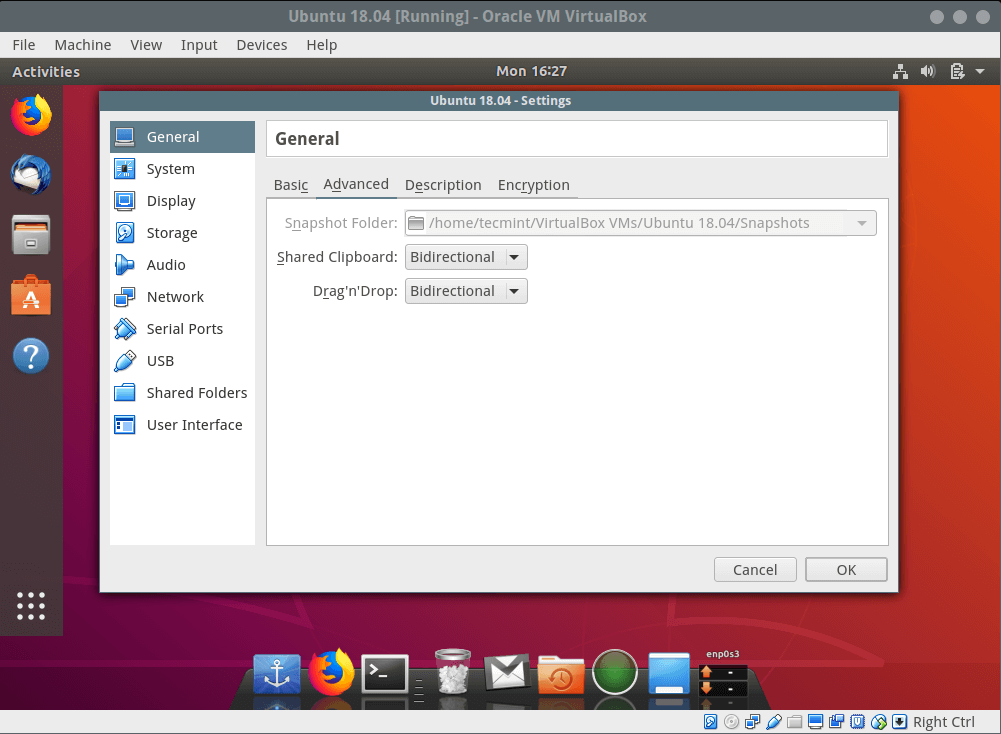
6. Now to enable Shared Clipboard and Drag’n’Drop functionality between Guest and Host Machine. Go to General => Advanced and enable the two options (Shared Clipboard and Drag’n’Drop) as you wish, from the drop down options. Then click OK to save the settings and boot your system, login and test if everything is working fine.
Congratulations! You have successfully installed VirtualBox Guest Additions on Ubuntu and Debian based distributions such Linux Mint.
Read Also: How to Enable USB in VirtualBox
If you face any problems during installation, use the feedback form below to ask any questions or share your thoughts about this article.




Can’t get past step 4. Clicking on “Insert Guest Additions CD” does nothing.
@Steven,
Instead of clicking “Insert Guest Additions“, try manually mounting the Guest Additions CD. You can do this by going to the VirtualBox menu: Devices > Insert Guest Additions CD Image. Then, check if the CD appears in your guest OS.
Once the CD is inserted, you should see it in your file manager. Open a terminal in the guest OS and navigate to the CD drive and then run the installer with:
I do not need pages upon pages about what VirtualBox is and what the Guest Additions are. I do not need the features. I would not be HERE if I did. NO ONE wants to read about how much you think you know!!! GET TO THE POINT!!! Tell me JUST how to install the software. Your ego is incredible!
Precisely what I was searching for, thank you for posting the useful article on installing VirtualBox guest additions on my Ubuntu system.
Hello, sir is this working on a minimal install of ubuntu? I tried the installation also on Centos 8 with minimal installation and it’s not working. Thank you!
Doesn’t work, after that command, it doesn’t launch to choose run ubuntu 21.04 full update and upgrade.
The only helpful article on the web. Thanks.
Is there a way to install this on a Linux guest that has no UI? i.e., just from the command line?
@Kevin,
yes, just run the following commands to mount the Guest addition and run the installer from CLI.
Hello,
It is okay if I create a fixed size for Ubuntu? other website ways you need to have the fixed size to boot it faster.
My problem is I can’t boot up my Ubuntu 18.04 LTS version.
SO THANKS IF SOMEONE HELPS ME :)
-PRINCE
I am usually running Win 10 Pro Edition…
I’m running ubuntu VirtualBox on a mac os x (Mojave) everything works fine but I can’t paste the content into the machine and I can’t copy from it and vice versa. I’ve installed and uninstalled guest additions like 5x and all my settings are set to bidirectional. I’m 10 seconds from giving up entirely because I can’t do this. PLEASE help.
-Steve
@doc-please delete my first comment I wasn’t thinking and accidentally signed it with my son’s name while I was talking to him
I’m using Ubuntu 20.04 and Guest Additions with VirtualBox 6.0 on Windows 10. I can change the Ubuntu resolution (to any of around 12 or so options) and it looks great.
However, it doesn’t stay set from session to session. I’ve tried various recommendations I’ve found online, but none work. What are the top 5 or so things to (re)check and/or try? I’m hoping it’s just a checkbox or something simple like that.
I had the same issue, Ubuntu 20.04, Guest Additions with VBox 6.0 on Win 10.
Thanks for your help. I got all set to start using my Ubuntu 20.04 ID_Like=Debian.
Thank you, Sir! With your help, I was able to have a full screen on virtual box Linux Ubuntu on Windows 10.
@Ignatius
You are most welcome, we are glad that this article helped you. Thanks for the feedback.
I think it would be a good idea to write the command correctly:
$ sudo apt install build-essential dkms linux-headers - $ (uname -r) INCORRECT SYNTAX

$ sudo apt install build-essential dkms linux-headers-$(uname -r) CORRECT SYNTAX
@Carlos
True, let’s review the article and correct it.
When I try to click insert guest additions cd image, it says Unable to insert the virtual optical disk
C:\Program Files\Oracle\VirtualBox\VBoxGuestAdditions.isointo the machine Ubuntu 2020.Could not mount the media/drive ‘C:\Program Files\Oracle\VirtualBox/VBoxGuestAdditions.iso’ (VERR_PDM_MEDIA_LOCKED).
If you check your VirtualBox settings, under storage. There is already a VirtualBox guest additions ISO listed there, so the Device-> Insert will fail with that lock message. To solve this, ignore the Device-> Insert, and open your File Manager instead, then run the VirtualBox shell that installs the guest addition. Another option is to remove the ISO from the settings and start your ubuntu, then use the Device-> Insert.
@Doc
Wonderful! Many thanks for sharing.
Aaron, Many thanks. Everything works like a charm. I’ve read a lot of manuals and instructions, after 42 years as a Electronics Engineer, etc.
There’s nothing I appreciate more than reading well written “cut-thru-the-chase” instructions THAT WORK. You are a credit to the I.T. profession, keep up the good work!
How about Ubuntu server? when I click insert guess addition CD it show nothing..
Hey, Iskandar!
There are no media automount in the ubuntu server. That’s why anything happens.
Proceed as follows:
Once you’ve access to your server, via ssh or vbox window, type (no quotes):
of course, after installing all the stuff explained above.
My bad!
If you are using VirtualBox console window, you must do:
Step 6, took me a long time to do. It was unclear that I was changing the settings in the Virtualbox and not in Ubuntu. The caption clarified where I should be looking, while the image of Ubuntu seemed to suggest I need to look in the Ubuntu settings somewhere…
Works 100% thanks for share
Rather than a prompt to run the installer, it opened a folder with the contents of the disc. Which file do I need to run, and how?
Never mind. The video memory was set too low and it could not boot. Interesting that it was booting before I installed Guest additions. Fixed now. Thank you for the excellent post!
@Alla
Many thank for sharing the solution.
Hi,
After following the steps here my Ubuntu 18.04.2 LTS is not booting. I get an empty purple screen, and applications do not show up. I removed the Guest additions from the settings->storage->Controller:IDE and mounted the Ubuntu 18.04.2 ISO image instead, but it did not help. Any ideas how to fix this?
Thank you for this. I don’t understand why the virtualbox team doesn’t provide these kind of information in their guest additions cds…
though, the install of Linux headers using
linux-headers-$(uname -r)didn’t worked for me. That was OK though, because i apparently had them installed already.@Max
Welcome, thanks for sharing your thoughts with us.
Hi, thanks for this instruction! Just wondering if there is anyway to uninstall this guest additions. My computer suddenly lost power in the middle of the installation and I think it is now installed incorrectly on my VM and I would like to try again.
Thanks
@Andiee,
Nothing to worry, just re-install the Virtualbox Guest additions, it will fix it if any errors..
Thank you for this detailed post.
@Anon
Welcome, many thanks for the feedback. And don’t forget to share.
Thanks for this, now the resolution fits my monitor :)
Hi,
After doing this I can see the shared folder, but when running:
I am using Ubuntu guest VM.
Thanks!
Great job on the post, Aaron! This helped perfectly what I was trying to get done. Your articles are great!
@Harlin
Thanks for the feedback, especially for the kind words of appreciation. Am truly humbled.
Hey there! MUCH appreciated. The one thing I noticed with Xubuntu 18.04 is that I was not auto prompted to install any software.
Just had to use the terminal to:
@Eirkir
Many thanks for sharing this.
Thank You this worked flawlessly
@Yousef
Good to know, thanks for the feedback.
Hey Champs!!, whoever is having problem in their VM bootup process, please uncheck the button for “Enable 3D acceleration” under display setting!!
Then it works like champ.
Bye there!!!
This was key! THanks!
After inserting Guest Additions CD Image, no popup came and a new icon came. On clicking it, its internal folders and files are visible and i cannot run any of them.
@Yash
There should be a file that you can run to launch the installer. Look carefully!
I have the same issue. Can you please tell me what the file name is?
@MiaM7
Try to run(VBox_GAs_6.0.0 could be different so look carefully):
$ sudo sh /media/%username%/VBox_GAs_6.0.0/VBoxLinuxAdditions.run
@Yash you can also try this.
Thank you so much for this tutorial.
@Ismail
Welcome, many thanks too, for the useful feedback.
Hello I tried to perform this and went clicking on Device tab “Insert Guest” I get the message “Unable to insert the virtual optical disc”
I am using Ubuntu server
Thanks
@albig
Try to run the following command from the terminal.
Then restart virtual machine and try once more.
After trying several other commands this one worked. This one worked!
$(uname-r)should have a space:$(uname -r)@Fred
Many thank for mentioning this, we will correct it in the write up.