RAID 10 is a combine of RAID 0 and RAID 1 to form a RAID 10. To setup Raid 10, we need at least 4 number of disks. In our earlier articles, we’ve seen how to setup a RAID 0 and RAID 1 with minimum 2 number of disks.
Here we will use both RAID 0 and RAID 1 to perform a Raid 10 setup with minimum of 4 drives. Assume, that we’ve some data saved to logical volume, which is created with RAID 10. Just for an example, if we are saving a data “apple” this will be saved under all 4 disk by this following method.
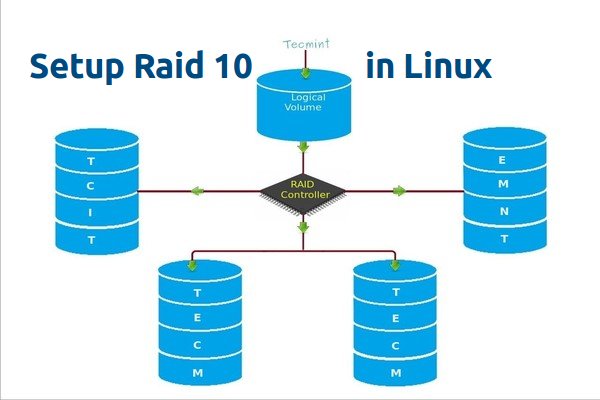
Using RAID 0 it will save as “A” in first disk and “p” in the second disk, then again “p” in first disk and “l” in second disk. Then “e” in first disk, like this it will continue the Round robin process to save the data. From this we come to know that RAID 0 will write the half of the data to first disk and other half of the data to second disk.
In RAID 1 method, same data will be written to other 2 disks as follows. “A” will write to both first and second disks, “P” will write to both disk, Again other “P” will write to both the disks. Thus using RAID 1 it will write to both the disks. This will continue in round robin process.
Now you all came to know that how RAID 10 works by combining of both RAID 0 and RAID 1. If we have 4 number of 20 GB size disks, it will be 80 GB in total, but we will get only 40 GB of Storage capacity, the half of total capacity will be lost for building RAID 10.
Pros and Cons of RAID 5
- Gives better performance.
- We will loose two of the disk capacity in RAID 10.
- Reading and writing will be very good, because it will write and read to all those 4 disk at the same time.
- It can be used for Database solutions, which needs a high I/O disk writes.
Requirements
In RAID 10, we need minimum of 4 disks, the first 2 disks for RAID 0 and other 2 Disks for RAID 1. Like I said before, RAID 10 is just a Combine of RAID 0 & 1. If we need to extended the RAID group, we must increase the disk by minimum 4 disks.
My Server Setup
Operating System :	CentOS 6.5 Final
IP Address	 	:	192.168.0.229
Hostname	 	:	rd10.tecmintlocal.com
Disk 1 [20GB]	 	:	/dev/sdd
Disk 2 [20GB]	 	:	/dev/sdc
Disk 3 [20GB]	 	:	/dev/sdd
Disk 4 [20GB]	 	:	/dev/sde
There are two ways to setup RAID 10, but here I’m going to show you both methods, but I prefer you to follow the first method, which makes the work lot easier for setting up a RAID 10.
Method 1: Setting Up Raid 10
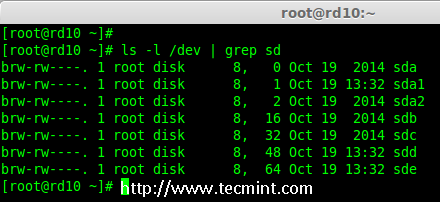
1. First, verify that all the 4 added disks are detected or not using the following command.
# ls -l /dev | grep sd
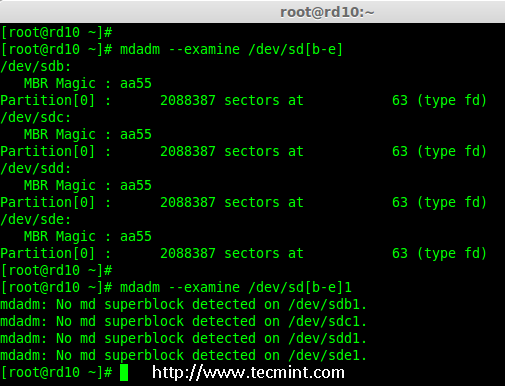
2. Once the four disks are detected, it’s time to check for the drives whether there is already any raid existed before creating a new one.
# mdadm -E /dev/sd[b-e]
# mdadm --examine /dev/sdb /dev/sdc /dev/sdd /dev/sde
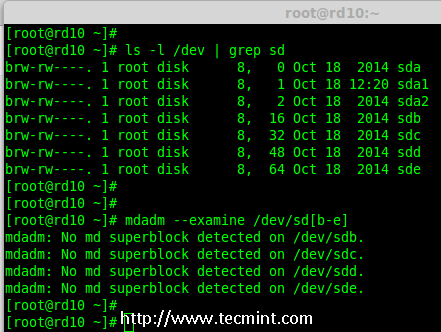
Note: In the above output, you see there isn’t any super-block detected yet, that means there is no RAID defined in all 4 drives.
Step 1: Drive Partitioning for RAID
3. Now create a new partition on all 4 disks (/dev/sdb, /dev/sdc, /dev/sdd and /dev/sde) using the ‘fdisk’ tool.
# fdisk /dev/sdb
# fdisk /dev/sdc
# fdisk /dev/sdd
# fdisk /dev/sde
Create /dev/sdb Partition
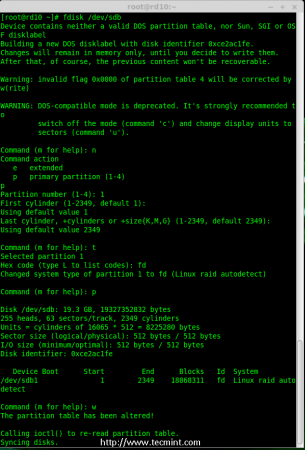
Let me show you how to partition one of the disk (/dev/sdb) using fdisk, this steps will be the same for all the other disks too.
# fdisk /dev/sdb
Please use the below steps for creating a new partition on /dev/sdb drive.
- Press ‘n‘ for creating new partition.
- Then choose ‘P‘ for Primary partition.
- Then choose ‘1‘ to be the first partition.
- Next press ‘p‘ to print the created partition.
- Change the Type, If we need to know the every available types Press ‘L‘.
- Here, we are selecting ‘fd‘ as my type is RAID.
- Next press ‘p‘ to print the defined partition.
- Then again use ‘p‘ to print the changes what we have made.
- Use ‘w‘ to write the changes.
Note: Please use the above same instructions for creating partitions on other disks (sdc, sdd sdd sde).
4. After creating all 4 partitions, again you need to examine the drives for any already existing raid using the following command.
# mdadm -E /dev/sd[b-e]
# mdadm -E /dev/sd[b-e]1

OR

# mdadm --examine /dev/sdb /dev/sdc /dev/sdd /dev/sde
# mdadm --examine /dev/sdb1 /dev/sdc1 /dev/sdd1 /dev/sde1
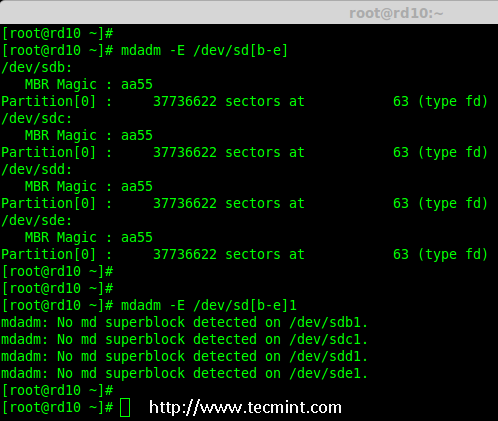
Note: The above outputs shows that there isn’t any super-block detected on all four newly created partitions, that means we can move forward to create RAID 10 on these drives.
Step 2: Creating ‘md’ RAID Device
5. Now it’s time to create a ‘md’ (i.e. /dev/md0) device, using ‘mdadm’ raid management tool. Before, creating device, your system must have ‘mdadm’ tool installed, if not install it first.
# yum install mdadm		[on RedHat systems]
# apt-get install mdadm 	[on Debain systems]
Once ‘mdadm’ tool installed, you can now create a ‘md’ raid device using the following command.
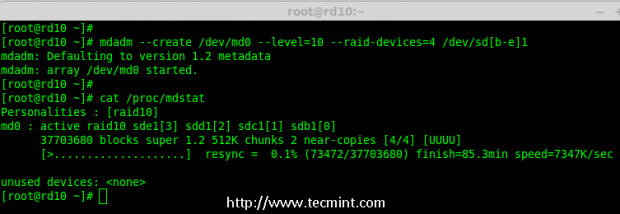
# mdadm --create /dev/md0 --level=10 --raid-devices=4 /dev/sd[b-e]1
6. Next verify the newly created raid device using the ‘cat’ command.
# cat /proc/mdstat
7. Next, examine all the 4 drives using the below command. The output of the below command will be long as it displays the information of all 4 disks.
# mdadm --examine /dev/sd[b-e]1
8. Next, check the details of Raid Array with the help of following command.
# mdadm --detail /dev/md0
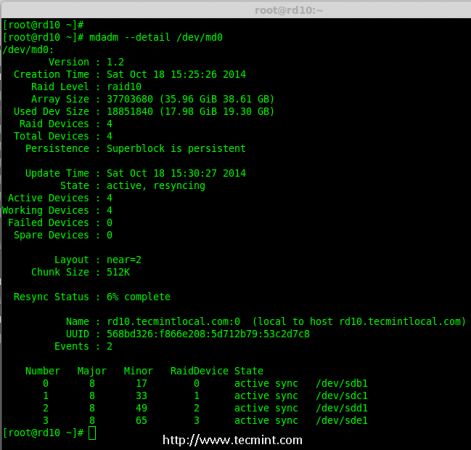
Note: You see in the above results, that the status of Raid was active and re-syncing.
Step 3: Creating Filesystem
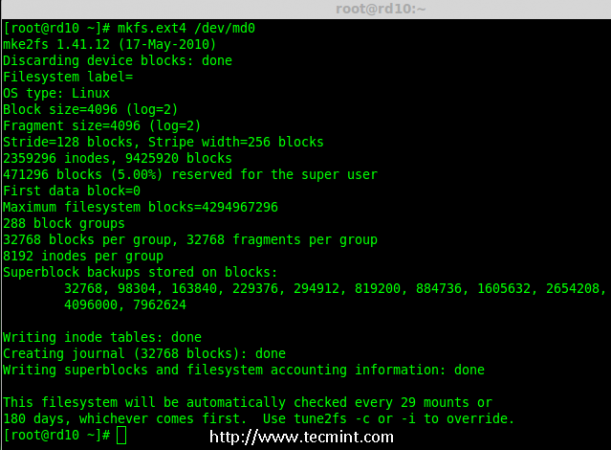
9. Create a file system using ext4 for ‘md0’ and mount it under ‘/mnt/raid10‘. Here, I’ve used ext4, but you can use any filesystem type if you want.
# mkfs.ext4 /dev/md0
10. After creating filesystem, mount the created file-system under ‘/mnt/raid10‘ and list the contents of the mount point using ‘ls -l’ command.
# mkdir /mnt/raid10
# mount /dev/md0 /mnt/raid10/
# ls -l /mnt/raid10/
Next, add some files under mount point and append some text in any one of the file and check the content.
# touch /mnt/raid10/raid10_files.txt
# ls -l /mnt/raid10/
# echo "raid 10 setup with 4 disks" > /mnt/raid10/raid10_files.txt
# cat /mnt/raid10/raid10_files.txt

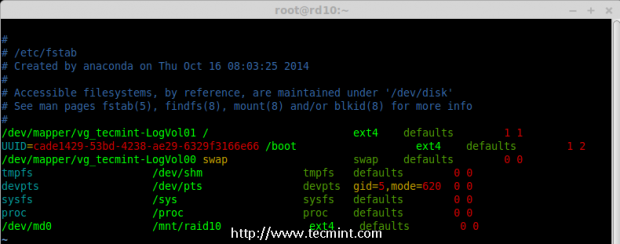
11. For automounting, open the ‘/etc/fstab‘ file and append the below entry in fstab, may be mount point will differ according to your environment. Save and quit using wq!.
# vim /etc/fstab

/dev/md0                /mnt/raid10              ext4    defaults        0 0
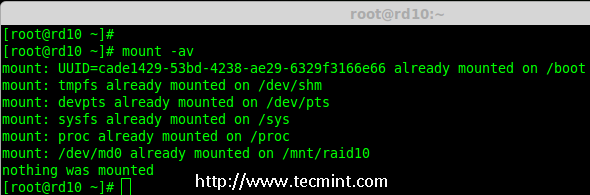
12. Next, verify the ‘/etc/fstab‘ file for any errors before restarting the system using ‘mount -a‘ command.
# mount -av
Step 4: Save RAID Configuration
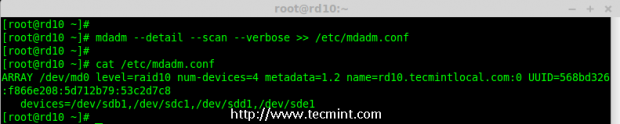
13. By default RAID don’t have a config file, so we need to save it manually after making all the above steps, to preserve these settings during system boot.
# mdadm --detail --scan --verbose >> /etc/mdadm.conf
That’s it, we have created RAID 10 using method 1, this method is the easier one. Now let’s move forward to setup RAID 10 using method 2.
Method 2: Creating RAID 10
1. In method 2, we have to define 2 sets of RAID 1 and then we need to define a RAID 0 using those created RAID 1 sets. Here, what we will do is to first create 2 mirrors (RAID1) and then striping over RAID0.
First, list the disks which are all available for creating RAID 10.
# ls -l /dev | grep sd
2. Partition the all 4 disks using ‘fdisk’ command. For partitioning, you can follow #step 3 above.
# fdisk /dev/sdb
# fdisk /dev/sdc
# fdisk /dev/sdd
# fdisk /dev/sde
3. After partitioning all 4 disks, now examine the disks for any existing raid blocks.
# mdadm --examine /dev/sd[b-e]
# mdadm --examine /dev/sd[b-e]1
Step 1: Creating RAID 1
4. First let me create 2 sets of RAID 1 using 4 disks ‘sdb1’ and ‘sdc1’ and other set using ‘sdd1’ & ‘sde1’.
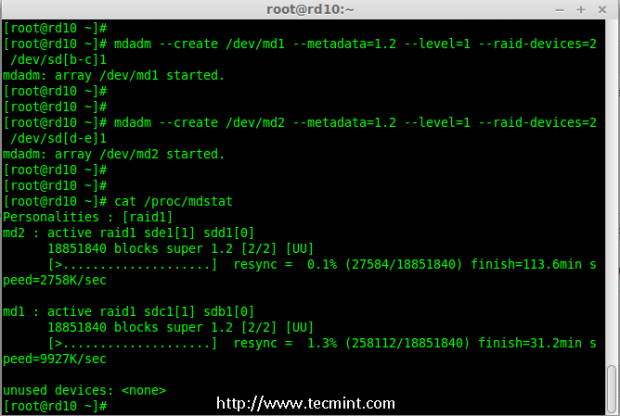
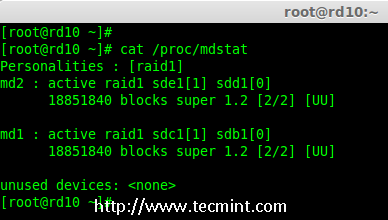
# mdadm --create /dev/md1 --metadata=1.2 --level=1 --raid-devices=2 /dev/sd[b-c]1
# mdadm --create /dev/md2 --metadata=1.2 --level=1 --raid-devices=2 /dev/sd[d-e]1
# cat /proc/mdstat
Step 2: Creating RAID 0
5. Next, create the RAID 0 using md1 and md2 devices.
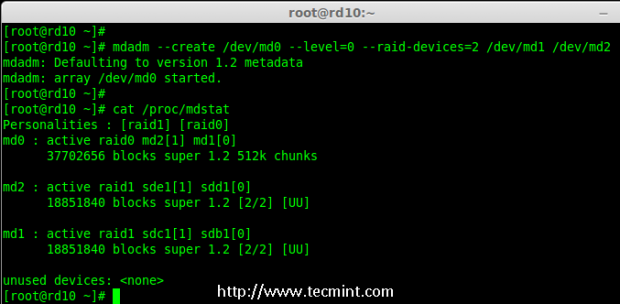
# mdadm --create /dev/md0 --level=0 --raid-devices=2 /dev/md1 /dev/md2
# cat /proc/mdstat
Step 3: Save RAID Configuration
6. We need to save the Configuration under ‘/etc/mdadm.conf‘ to load all raid devices in every reboot times.
# mdadm --detail --scan --verbose >> /etc/mdadm.conf
After this, we need to follow #step 3 Creating file system of method 1.
That’s it! we have created RAID 1+0 using method 2. We will loose two disks space here, but the performance will be excellent compared to any other raid setups.
Conclusion
Here we have created RAID 10 using two methods. RAID 10 has good performance and redundancy too. Hope this helps you to understand about RAID 10 Nested Raid level. Let us see how to grow an existing raid array and much more in my upcoming articles.

Hey there, thanks for your this article, but I need to know how to see “raid10_files.txt” existing on the 4 partition ( I need to see them ) OR I need to verify with a demonstration how Raid already works !
Thank you for replying me .
This article gave me many insights, but I was left with a potential problem I’m trying to resolve which is the protection of the OS install. Based on what I read the OS is running on
/dev/sdaon a single disk.If you loose that disk everything you have here is gone. From experience I know you can do RAID-1 during install. Can you do RAID-10 during install? It must be a graphic install to use LVM.
I’ve a box with 6 drives (4 – 1TB and 2 – 2TB), can this be done? I know you can install and run with /boot on RAID-1 but will it work on RAID-10?
Hi Babin.
Excellent article.
In a subtitle you said: Pros and Cons of RAID 5
Is it not Pros and Cons of RAID 10?
Error under my server setup:
Operating System : CentOS 6.5 Final
IP Address : 192.168.0.229
Hostname : rd10.tecmintlocal.com
Disk 1 [20GB] : /dev/sdd
Disk 2 [20GB] : /dev/sdc
Disk 3 [20GB] : /dev/sdd
Disk 4 [20GB] : /dev/sde
Disk 1 should be /dev/sdb, I would think.
Hi,
Thanks for putting together..
I think you have a “bug” in one of your screenshots?
…Graphic just under “My Server Setup”
======================================
Operating System : CentOS 6.5 Final
IP Address : 192.168.0.229
Hostname : rd10.tecmintlocal.com
Disk 1 [20GB] : /dev/sdd
Disk 2 [20GB] : /dev/sdc
Disk 3 [20GB] : /dev/sdd
Disk 4 [20GB] : /dev/sde
======================================
Disk 1 [20GB] : /dev/sdd
Shouldn’t it be:
Disk 1 [20GB] : /dev/sdb
Leedor & Anonymous,
Sharp finding :), Thanks for reporting.
I would like to know if we need to do something to shutdown the server gracefully?
Or we can juste do shutdown/reboot.
Tks
Great post tks, will come back againt
@Jonathan,
We can shutdown/reboot no issue.
Hi Babin,
Your work is awesome, its very useful for me.
I have successfully configured Raid 10 but i dont how its work in real time.
My point is “real time example for Raid 10” can you help me?
Hello,
is it possible to create RAID10 array on Debian based system durring installation by method 2?
I have created two RAID1 arrays but at that point I dont know how to get them to RAID0.
Thanks.
Will update on this request soon once implement and tested in our test environment.
why all use raid 1+0 instead 0+1 ?
Hi,
I test you method 2 (RAID1 + RAID0) on an Ubuntu Server and I loose my RAID0 when I reboot the server.
Have you got any ideas ?
Best regards
To scan and assemble this will bring back your raid
# mdadm –assemble –scan
Then save the configuration, If in next reboot it won’t disappear..
# mdadm –detail –scan >> /etc/mdadm/mdadm.conf