Think for a moment about what happened when you browsed to the current page. You either clicked on a link that you received via a newsletter, or on the link on the homepage of Tecmint.com and then were taken to this article.
In a few words, you (or actually your browser) sent an HTTP request to the web server that hosts this site, and the server sent back an HTTP response.
As simple as this sounds, this process involves much more than that. A lot of processing had to be done server-side in order to present the nicely formatted page that you can see with all the resources in it – static and dynamic.
Without digging much deeper, you can imagine that if the web server has to respond to many requests like this simultaneously (make it only a few hundred for starters), it can either bring itself or the whole system to a crawl before long.
And that is where Varnish, a high-performance HTTP accelerator and reverse proxy, can save the day. In this article, I’ll explain how to install and use Varnish as a front-end to Apache or Nginx in order to cache HTTP responses faster and without placing a further load on the web server.
However, since Varnish normally stores its cache in memory instead of on disk we will need to be careful and limit the RAM space allocated for caching. We will discuss how to do this in a minute.
Table of Contents
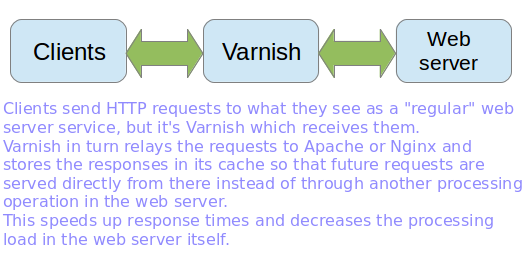
How Varnish Works
Installing Varnish Cache in Linux Server
This post assumes that you have installed a LAMP or LEMP server. If not, please install one of those stacks before proceeding.
- How to Install LAMP Server on RHEL-based Distributions
- How to Install LAMP Server on Ubuntu
- How to Install LAMP Server on Debian
- How to Install LEMP Server on RHEL-based Distributions
- How to Install LEMP Server on Ubuntu
- How to Install LEMP Server on Debian
The official documentation recommends installing Varnish from the developer’s own repository because they always provide the latest version. You can also choose to install the package from your distribution’s official repositories, although it may be a little outdated.
Also, please note that the project’s repositories only provide support for 64-bit systems, whereas for 32-bit machines, you’ll have to resort to your distribution’s officially maintained repositories.
In this article, we will install Varnish from the repositories officially supported by each distribution. The main reason behind this decision is to provide uniformity in the installation method and ensure automatic dependency resolution for all architectures.
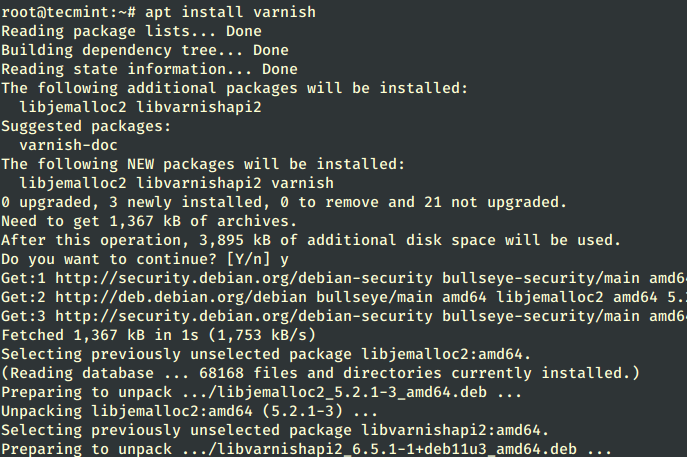
Install Varnish in Debian-based Linux
On Debian-based distributions, you can install Varnish using the apt command as shown.
# apt update
# apt install varnish
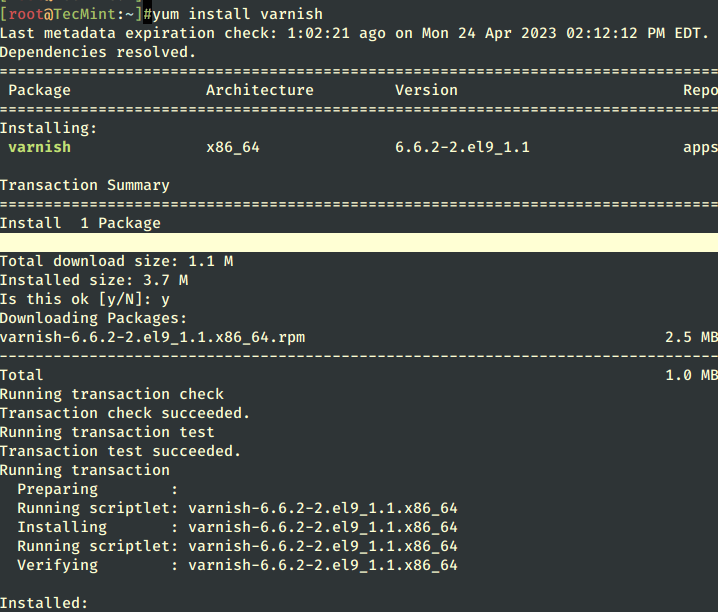
Install Varnish in RHEL-based Linux
On RHEL-based distributions such as CentOS, Rocky, and AlmaLinux, you will need to enable the EPEL repository before installing Varnish using the yum command as shown.
# yum install epel-release
# yum update
# yum install varnish
If the installation completes successfully, you will have one of the following varnish versions depending on your distribution:
# varnishd -V

varnishd (varnish-6.5.1 revision 1dae23376bb5ea7a6b8e9e4b9ed95cdc9469fb64)
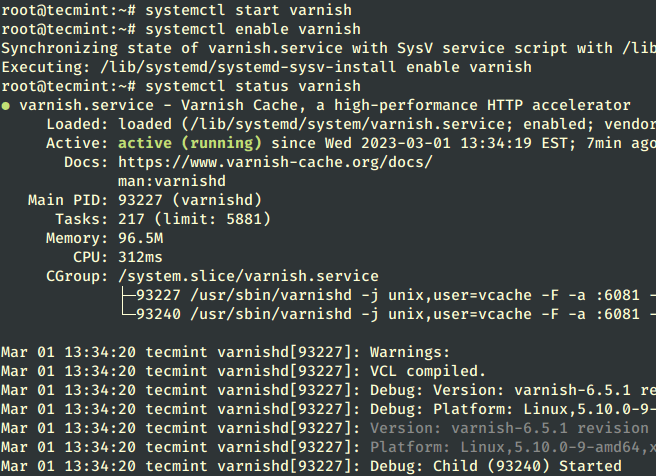
Finally, you need to start Varnish manually if the installation process didn’t do it for you and enable it to start on boot.
# systemctl start varnish
# systemctl enable varnish
# systemctl status varnish
By default port 6081 is used by the varnish service and you confirm it by running the following netstat command.
# netstat -tunlp | grep 6081

Configuring Varnish Cache in Linux
As we said earlier, Varnish stands in the middle of external clients and the web server. For that reason, and in order for the caching to become transparent to end users, we will need to:
- Change the default port 6081 where Varnish listens on to 80.
- Change the default port where the Web server listens to 8080 instead of the default 80.
- Redirect incoming traffic from Varnish to the web server. Fortunately, Varnish does this automatically after we have completed 1) and 2) steps.
Change Varnish Port
The varnishd process is controlled by systemd and has its unit file in /usr/lib/systemd/system/varnish.service, which holds the default Varnish runtime configuration.
Here, we need to change the default varnish port from 6081 to port 80 and the cache size to 1GB as shown by running the following command, which will open the unit file in the editor as shown.
Note: You can change the amount of memory as per your hardware resources or alternatively choose to save cached files to disk.
$ sudo systemctl edit --full varnish
OR
# systemctl edit --full varnish
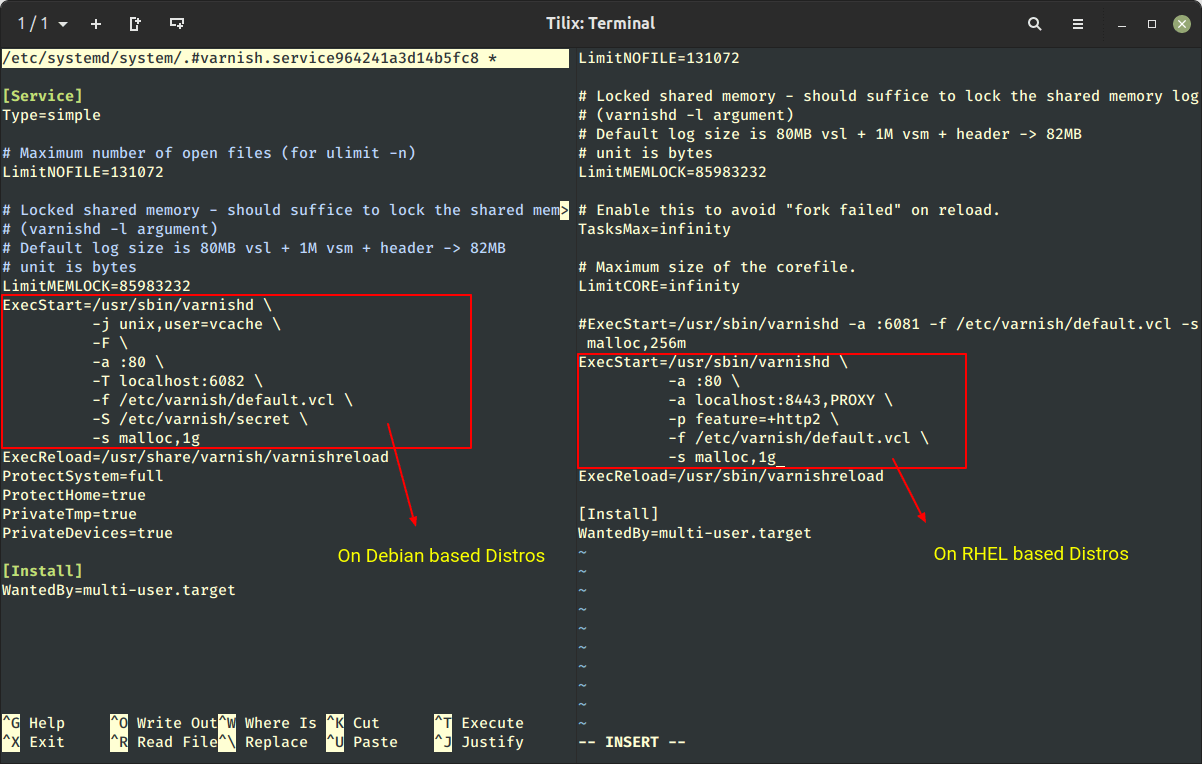
After making changes to /etc/systemd/system/varnish.service file, you need to reload the Systemd daemon by running the following command:
# systemctl daemon-reload
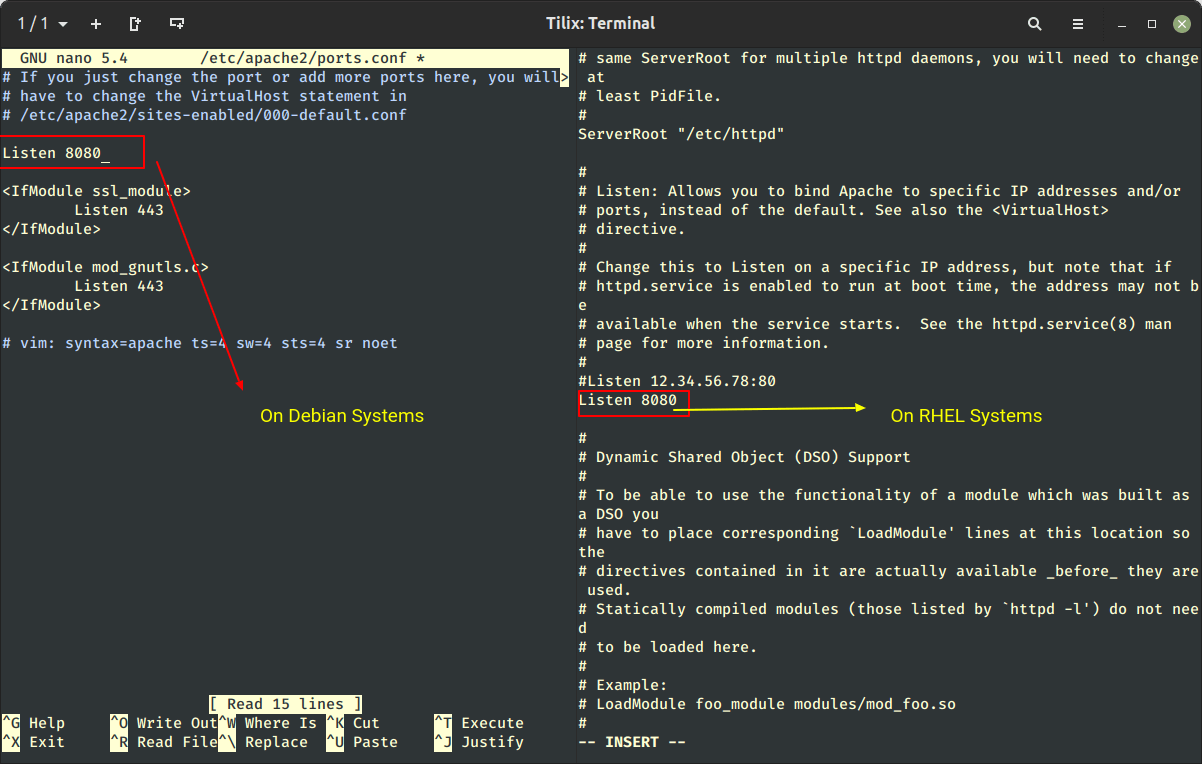
Change Apache or Nginx Port
After changing the Varnish port, now you need to change your Apache or Nginx web server port from default 80 to the most common networking port i.e. 8080.
---------- On Debian-based Systems ----------
# nano /etc/apache2/ports.conf      [On Apache]
# /etc/nginx/sites-enabled/default  [On Nginx]

---------- On RHEL-based Systems ----------
# vi /etc/httpd/conf/httpd.conf   [On Apache]
# vi /etc/nginx/nginx.conf        [On Nginx]
Once you have done changes, don’t forget to restart Varnish and the web server.
# systemctl restart varnish

---------- On Debian-based Systems ----------
# systemctl restart apache2
# systemctl restart nginx

---------- On RHEL-based Systems ----------
# systemctl restart httpd
# systemctl restart nginx
Testing Varnish Cache in Linux
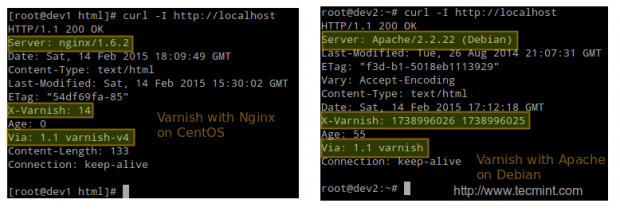
The first test consists in making an HTTP request via the curl command and verifying that it is handled by Varnish:
# curl -I http://localhost
Varnish also includes two handy tools too:
- View in real-time Varnish logs, intuitively called varnishlog.
- Display Varnish cache statistics, called varnishstat.
As a second test, in the following screencast, we will display both the logs and the statistics on a CentOS server (dev1, upper half of the screen) and on a Debian server (dev2, lower half of the screen) as HTTP requests are sent and responses received.
Test Web Server Performance Benchmark
Our third and final test will consist in benchmarking both the web server and Varnish with the ab benchmarking tool and comparing the response times and the CPU load in each case.
In this particular example, we will use the CentOS server, but you can use any distribution and obtain similar results. Watch the load average at the top and the Requests per second line in the output of ab.
With ab, we will be sent 50 (-c 50) concurrent requests at the same time and repeat the test 1000000 times (indicated by -n 1000000). Varnish will return a higher number of requests per second and a much lower load average.
Important: Please remember that Varnish is listening on port 80 (the default HTTP port), while Apache is listening on port 8080. You can also take note of the amount of time required to complete each test.
# ab -c 50 -n 100000 http://localhost/index.html
Conclusion
In this article, we have discussed how to set up a Varnish cache in front of a web server, Apache, or Nginx. Note that we have not dug deep into the default.vcl configuration file, which allows us to customize the caching policy further.
You may now want to refer to the official documentation for further configuration examples or leave a comment using the form below.


I followed all your steps but kept getting 503 service unavailable after reboot. I tried few combinations ( setting KeepAlive off for Apache; increasing the timeout etc. )but that didn’t help. Ultimately had to go back to apache listening on port 80.
What do you think about Nginx vs Varnish ?
Nginx and Varnish are not the same thing… you should read about them a bit! But you could use them on the same server. But with benchmark Apache and varnish is better than Nginx and varnish… but lots of things also depends on number of visitor, server configurations and server materials ;)
hello
it’s good idea but when we install the varnish , that give high resource.
my idea is xcache installation in cpanel.
and yours?
thanks
Excellent article !!!
Thanks you very much….was fun testing on AWS too :)
We have configure SSL so what setting we have to do in below content ?
backend default {
.host = “127.0.0.1”;
.port = “80”;
}
OR
backend default {
.host = “SERVER-IP-ADD”;
.port = “443”;
}
@shraddhesh,
Use that 443 configuration….
Hello,
It was very usefull article;
I have installed on my server and work great for me
http://www.irwebhost.com
Thank you
Is this just for hosting a website? OR can it be used to cache all pages users are browsing. I.e users inside a LAN browsing out to the WWW?
Also can it pre-fetch? I.e. every hour get the pages users have visited on facebook, youtube, (or whatever changes regularly) and update the cache with the newly added posts or videos.
Thanks
As far as a web server works on http, it will cache content as per defined period of time set by you.
I have installed varnish several times but it is not working. when I use curl -I localhost. It shows 403 error at the start.
Kindly help me in resolving this issue
I’ve checked the configuration, seems correctly configured, may I know while browsing site, are you getting any error message. If possible can you send me a link to that error page or screen grab for better understanding..
Hi,
Good article. We are running varnish on redhat using RPM packages. Now we have a been tasked with installing additional VMods to extend the functionality of varnish. From what I have read this morning these VMods are compiled using the varnish code base ?
Is there an alternate method for installing VMods into a varnish server that is managed with RPMs ? A link to a page with instructions would be super !
Cheers
default varnish starts on port 6081. so first of all you can check the status of port via telnet.
to test the varnish whether it is caching or not. please follow below steps.
GET -Used http://localhost:6081/
you will get below response including varnish in last line
GET http://localhost:6081/
User-Agent: lwp-request/2.07
200 OK
Connection: close
Date: Wed, 05 Mar 2014 12:16:09 GMT
Via: 1.1 varnish
Accept-Ranges: bytes
Age: 94
ETag: “7a857f-1c-fa3243c0”
Server: Apache/2.2.3 (Red Hat)
Content-Length: 28
Content-Type: text/html; charset=UTF-8
Last-Modified: Tue, 25 Sep 2012 09:03:19 GMT
Client-Date: Wed, 05 Mar 2014 12:16:09 GMT
Client-Peer: 127.0.0.1:6081
Client-Response-Num: 1
X-Varnish: 1951550557 1951550551
first our request will hit to 6081 and internally connect to 80 as per the configuration /etc/varnish/default.vcl
You can also install varnish on 80 and apache on another port
GET -Used http://localhost:6081/
works to output varnish line, but
curl -I http://mydomain.com
misses varnish lines.. i turned off firewall but it did not helped :(
httpd and varnish was restarted
I followed the instructions and it does not say that varnish is running on my site. Not sure what I missed.
Hi,
I have varnish running but I am confused regarding AGE. As I can see when you checked if you varnish was running or not, it should “AGE 0”. I have the same problem, it shows me “age 0”.
I would like to increase my age, I don’t know if its feasible to increase age or not.
I have seen some other sites which “age” changing frequently.
Cheers,
Aarif
hi
thanks for great articles
i have install but i didn’t see varnish is working on my server
[root@us1 download]# curl -I https://tecmint.com
HTTP/1.1 301 Moved Permanently
Date: Thu, 23 Jan 2014 04:42:31 GMT
Server: Apache
Location: https://www.tecmint.com/
Cache-Control: max-age=86400
Expires: Fri, 24 Jan 2014 04:42:31 GMT
Vary: Accept-Encoding
Content-Type: text/html; charset=iso-8859-1
I have tried Varnish cache too. My website is still very slow. What could be problem here. I have apache2 server. I think Debian 3.2.46-1+deb7u1 x86_64
Thanks for your help.
root@km34416:~# curl -I http://newinternetshopping.com
HTTP/1.1 200 OK
Server: nginx
Date: Mon, 06 Jan 2014 17:43:09 GMT
Content-Type: text/html; charset=UTF-8
Connection: keep-alive
Expires: Thu, 19 Nov 1981 08:52:00 GMT
Cache-Control: no-store, no-cache, must-revalidate, post-check=0, pre-check=0
Pragma: no-cache
X-Pingback: http://newinternetshopping.com/xmlrpc.php
Set-Cookie: PHPSESSID=526d06842a6c6c4e484b7005062ac49f; path=/
Set-Cookie: kpg_stop_spammers_time=1389030189; expires=Mon, 06-Jan-2014 17:44:09 GMT
Set-Cookie: wfvt_3488105620=52caeb2d105ef; expires=Mon, 06-Jan-2014 18:13:09 GMT; path=/
Set-Cookie: slimstat_tracking_code=790638id.ed22868133e1b023ab189d537d4dbeb5; expires=Thu, 06-Feb-2014 17:43:09 GMT; path=/
X-Powered-By: PleskLin
Vary: Accept-Encoding
root@km34416:~#
Hi,
Thanks for the information
Is both Apache and Varnish will run on same port that 80, Do we need to change the port for Apache other than 80, So that Varnish will run on 80 and Apache run other than 80
Thanks
Mohsin
Of course, man you can’t run both on same port, you need to change..
Hello Team,
Why when i try the command to verify the vanish on server. The connection status is ” Close ”
root@bestretails varnish]# curl -I http://www.bestretails.com
HTTP/1.1 200 OK
Date: Thu, 26 Dec 2013 03:25:04 GMT
Server: Apache/2.2.15 (CentOS)
X-Pingback: http://www.bestretails.com/xmlrpc.php
Link: ; rel=shortlink
Connection: close
Content-Type: text/html; charset=UTF-8
Kindly need advise.
Regards
I have the same mistake on my server. Varnish not working, connection: close.
I find this good tutorial and fixed my error.
https://www.rosehosting.com/blog/how-to-install-varnish-and-phpmyadmin-on-a-centos-7-vps-with-nginx-mariadb-and-php-fpm/
Hello,
Its just the installation process. you have not telling us the configuration of Varnish so it work with Apache 2.2.25. because default installation doesn’t integrate varnish server into Apache as both apache and varnish listen 80 port.
Varnish seems to be easier to use and to configure and install unlike the rest.
thaaaaaaaaaaaaaaaaaaank you very much. You helped me aloooooooooot
This was surely an interesting and insigtful glimpse into
your world. Do you think you’re setting up to put in writing some far more during the future?
It is working but just don’t cache anything…
I think this just work good with static html pages, not with dynamic pages, like the ones used in the onlines stores i have in my server.
I have tried Varnish but i don’t see any changes on speed of my sites.
I am usuing a Linode VPS withphp, suphp, apache 2.2, centos 5.8 and kloxo.
The result of curl -I http://google.com is :
HTTP/1.1 301 Moved Permanently
Location: http://www.google.com/
Content-Type: text/html; charset=UTF-8
Date: Sun, 17 Mar 2013 02:58:02 GMT
Expires: Tue, 16 Apr 2013 02:58:02 GMT
Cache-Control: public, max-age=2592000
Server: gws
Content-Length: 219
X-XSS-Protection: 1; mode=block
X-Frame-Options: SAMEORIGIN
What can i do more?
If you are looking for better optimization in speed, you need to check out /etc/varnish/default.vcl configuration file and make necessary changes for this i recommend you to read more on varnish configuration page.
can you provide us zimbra installation on 32 bit and 63 bit
postfix dovecot with amavis clamd
i see you have migrate from varnish. reason?
also curl -I will show my website php version how can i disable it?
also curl -I do not show varnish on command output
Thanks for suggestion. If you want to disable your php version and info just change line that says in your php.ini file.
If you not getting varnish info may be you not installed varnish correctly.
This is what happens on Ubuntu 12.10 64bit:
wingnux@wingnux-desktop:~$ chkconfig –level 345 varnish on
The program ‘chkconfig’ is currently not installed. You can install it by typing:
sudo apt-get install chkconfig
wingnux@wingnux-desktop:~$ sudo apt-get install chkconfig
Reading package lists… Done
Building dependency tree
Reading state information… Done
Package chkconfig is not available, but is referred to by another package.
This may mean that the package is missing, has been obsoleted, or
is only available from another source
E: Package ‘chkconfig’ has no installation candidate
And how it to bridge the nginx?
We will soon provide steps on nginx as well.
i’ve trying to bridge/combined with nginx and it boom my configuration and etc etc, my bad tryin at live server, do some backup before playin with this