CentOS is a most popular and widely used Linux distribution from the RedHat Enterprise family. This CentOS 6.10 release is based on the upstream release Red Hat Enterprise Linux 6.10 comes with bug fixes, new functionalities & updates.
It is strongly recommended to read the release notes as well as the upstream technical notes about the changes before an installation or up-gradation.
Upgrade CentOS 6.x to CentOS 6.10
Those who looking to upgrade from previous CentOS 6.x to a new major CentOS 6.10 version, they can simply run the following yum command to upgrade their system seamlessly from any earlier CentOS Linux 6.x release to 6.10.
# yum udpate
We highly suggest you to perform a fresh CentOS 6.10 installation rather than upgrading from other older CentOS versions.
In this article, we will take you through the steps of performing a minimal CentOS 6.10 network installation, where you install a very minimum set of software, necessary for booting the kernel and performing basic functions on your server, without a graphical user interface (GUI). It allows you to set a foundation for building a future customizable server platform.
Download CentOS 6.10 Net Install
If you’re looking for fresh CentOS 6.10 installation, then download the .iso images from the links provided below and follow the installation instructions with screenshots mentioned below.
- CentOS-6.10-i386-netinstall.iso [32-bit]
- CentOS-6.10-x86_64-netinstall.iso [64-bit]
CentOS 6.10 Network Installation Guide
1. First start by downloading the CentOS 6.10 Network Install ISO and then create a bootable USB stick using LiveUSB Creator called Rufus, Unetbootin or terminal based Bootiso.
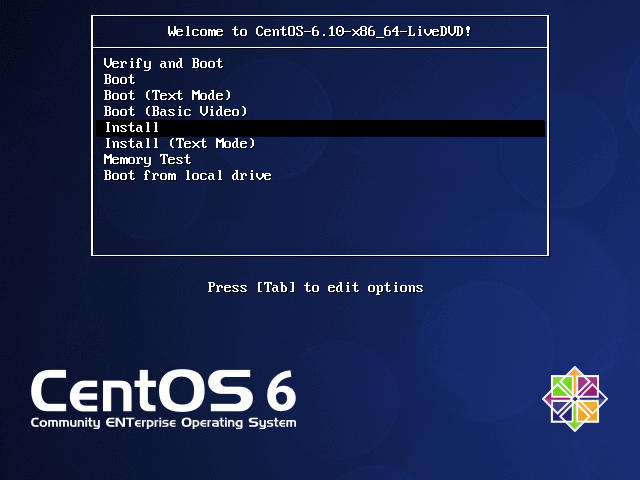
2. Next boot your system using the bootable USB or CD, at the Grub menu, select Install or upgrade existing system and hit enter.
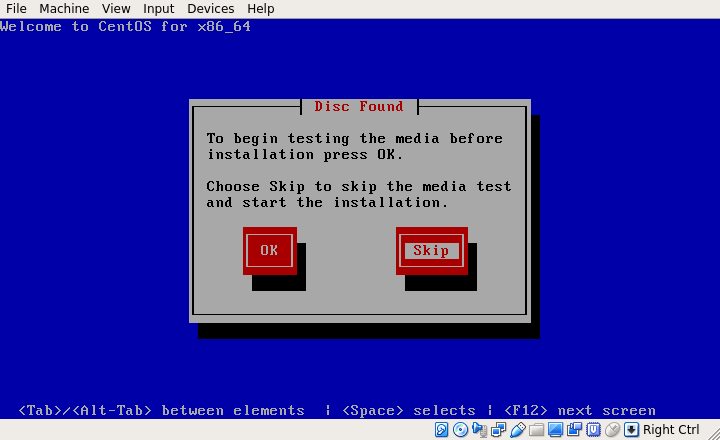
3. Next, skip testing of the installation media to start the installation of the system.
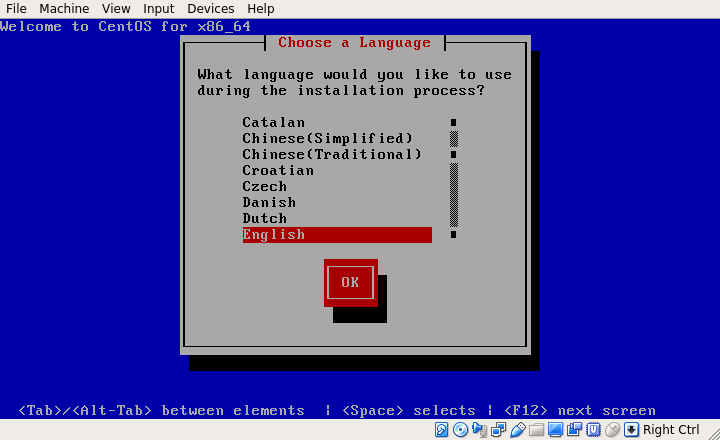
4. Choose the language you would like to use for the installation process, and press Enter.
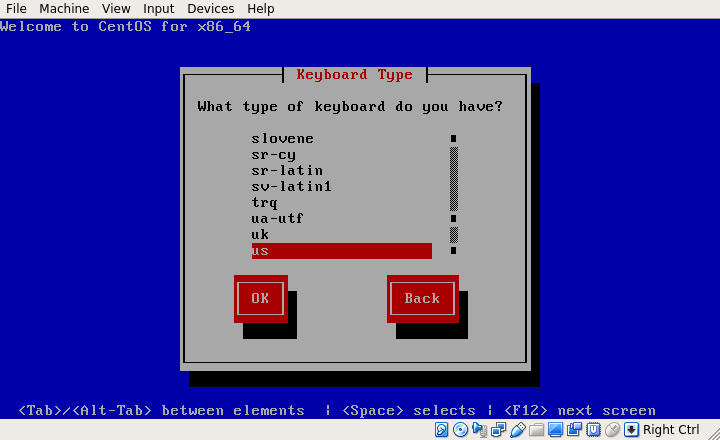
5. Select the keyboard layout you would like to use, and use the right arrow key select OK, and press Enter.
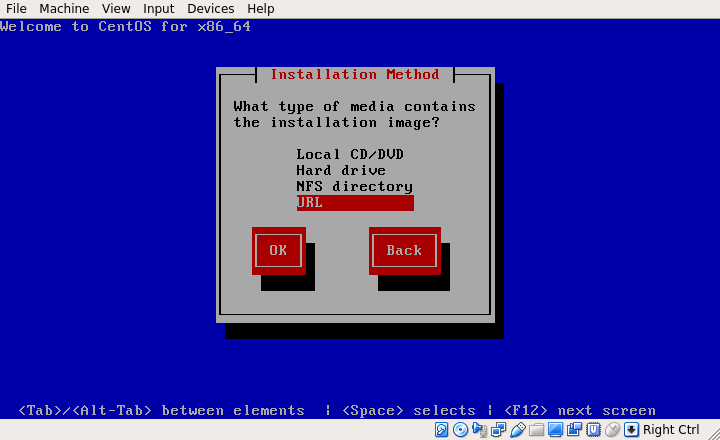
6. Now specify the installation method, since it is a network installation, choose URL and then press OK and hit Enter.
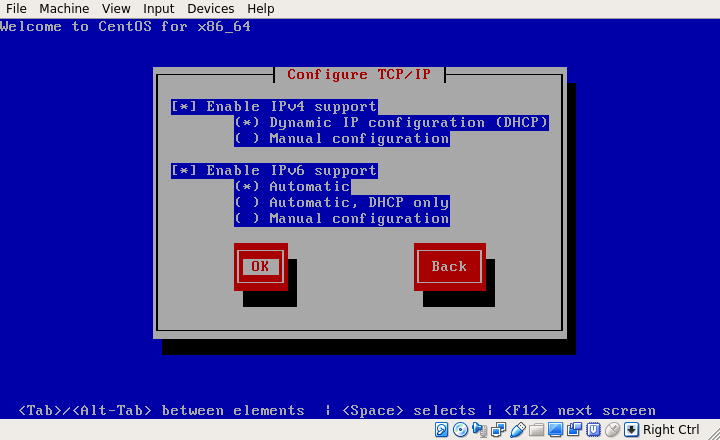
7. Next, configure TCP/IP for connections as shown in the screenshot below.
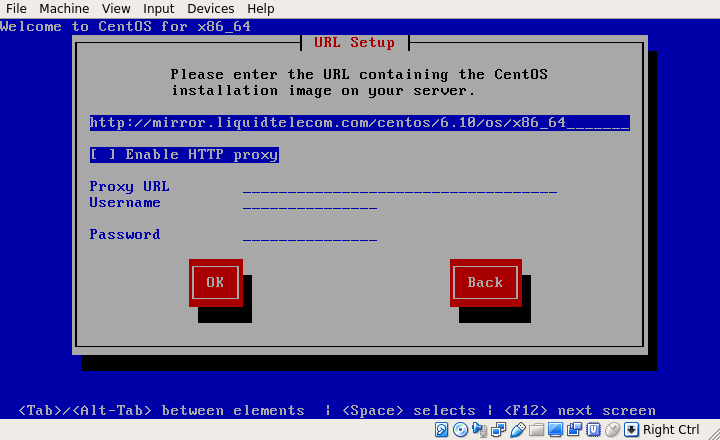
8. Now configure the CentOS 6.10 Netinstall URL, it is recommended to choose a nearest mirror from the available CentOS mirrors list.
Example mirror.liquidtelecom.com
- http://mirror.liquidtelecom.com/centos/6.10/os/i386/ – [32-bit]
- http://mirror.liquidtelecom.com/centos/6.10/os/x86_64/ – [64-bit]
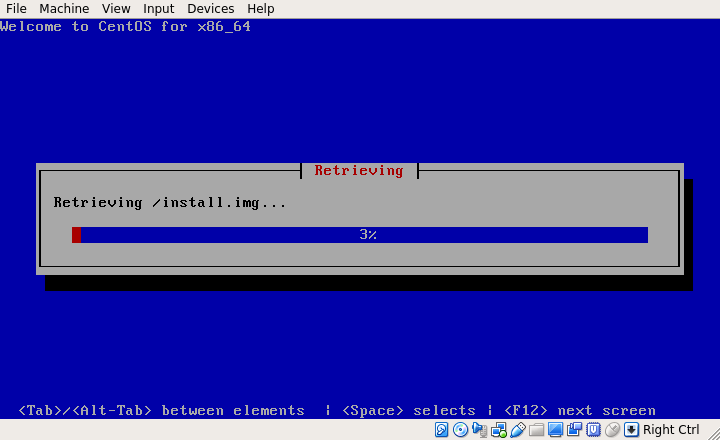
9. After providing the URL and clicking OK, wait for the installer to retrieve the ISO image (this may take sometime, but it should be fast with a good internet connection).
10. After successfully retrieving the ISO image, the CentOS Graphical Installer will be launched, as shown in the following screenshot. Click on Next to proceed.
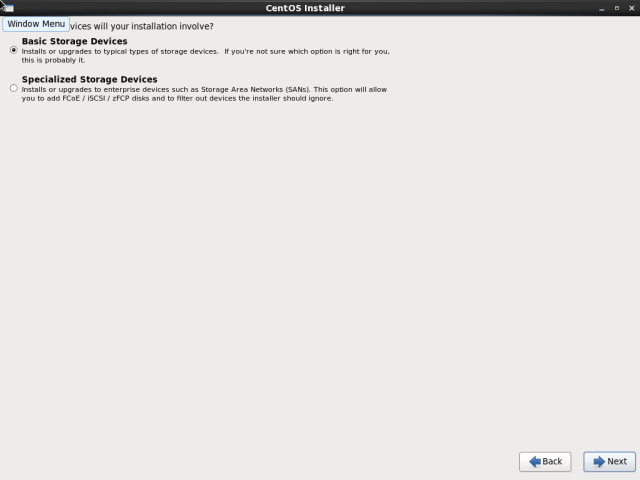
11. Next, choose the type storage devices (basic or specialized) to be used for the installation and click Next.
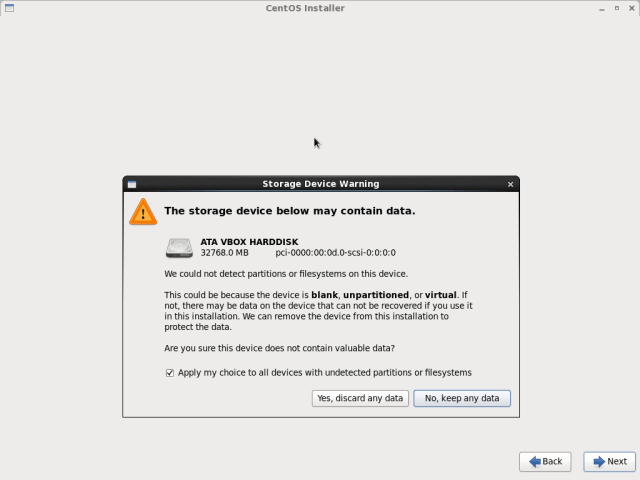
12. Next, select the option to clear data on the storage disk by selecting Yes, discard any data and click Next.
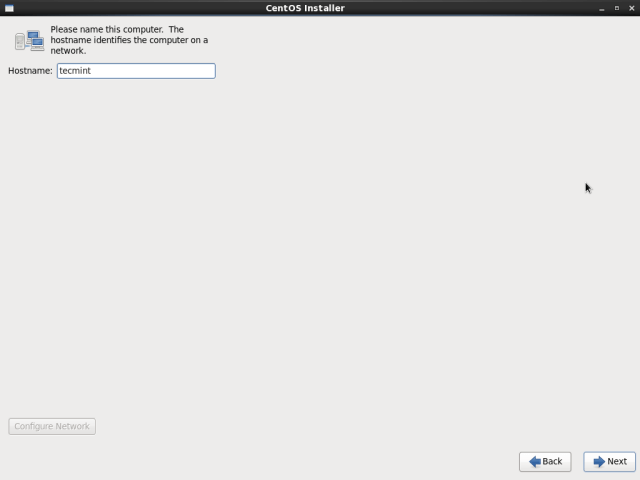
13. Set the Hostname and click Next.
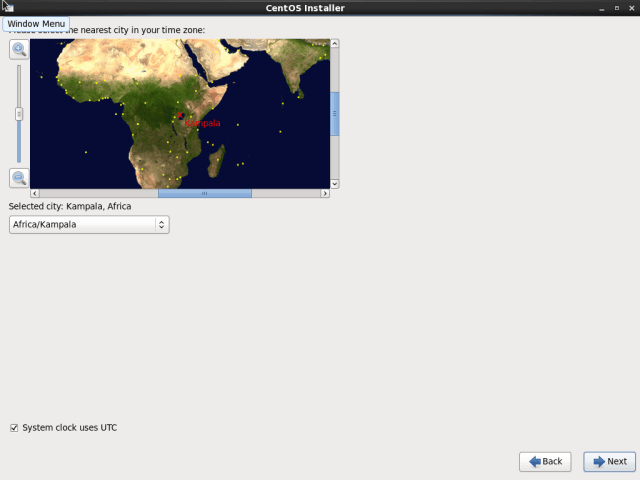
14. Set the Timezone for your location and click Next to proceed.
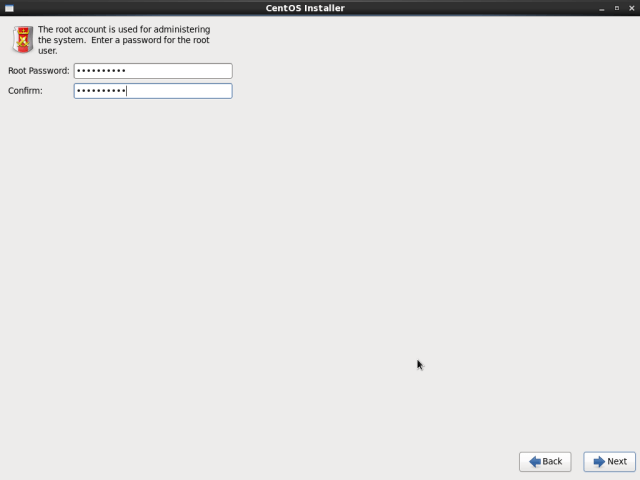
15. Set the root user password and click Next to continue.
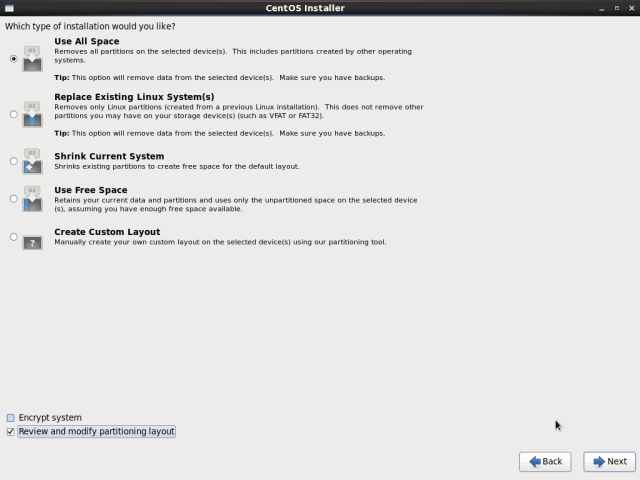
16. Now you need to specify the type of installation you want. Read the descriptions of the options carefully and select the appropriate one. If you want to use the whole disk space, choose Use All Space, but to perform a custom installation, choose Create Custom Layout.
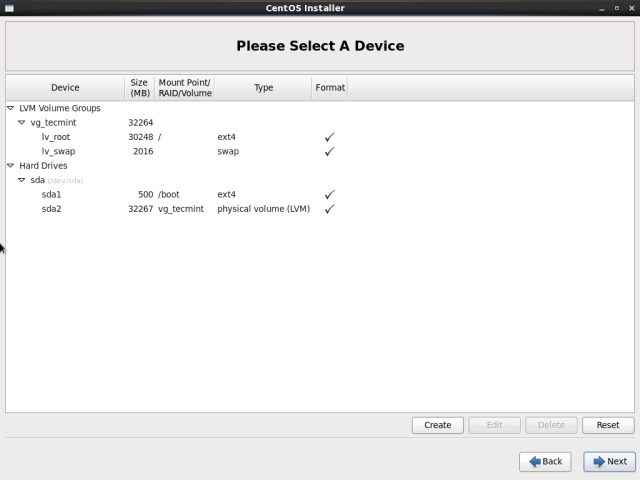
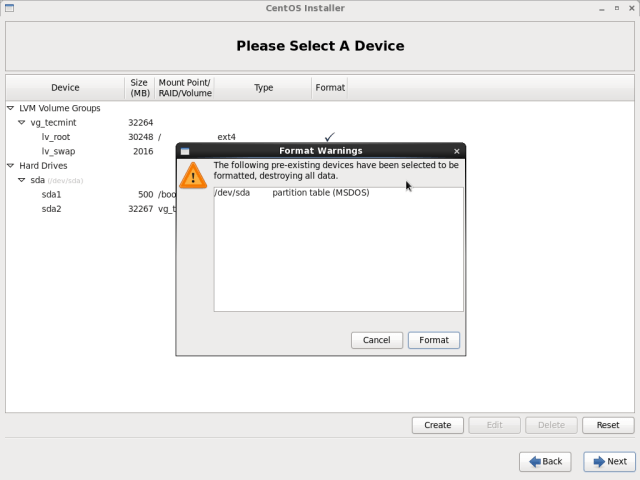
17. The installer will review and modify partition layout. If everything is ok, clik Next.
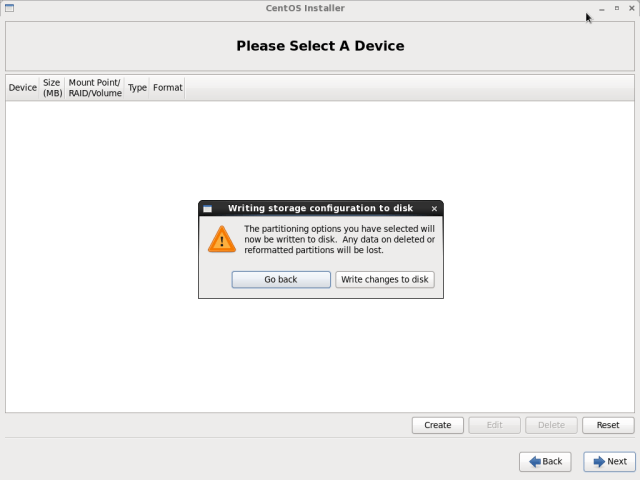
18. Next, apply the disk partitioning scheme created by selecting Write changes to disk and then click Next to proceed.
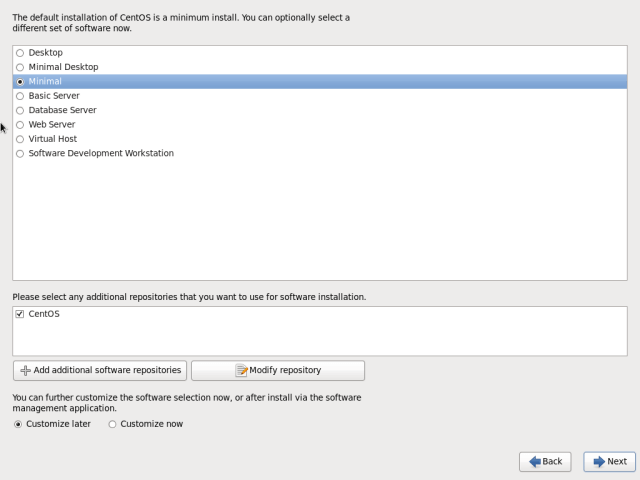
19. In this step, you need to choose the default set of software to be installed on your system. For the purpose of this guide, we will use Minimal and click Next. Thereafter, the installation process will be started.
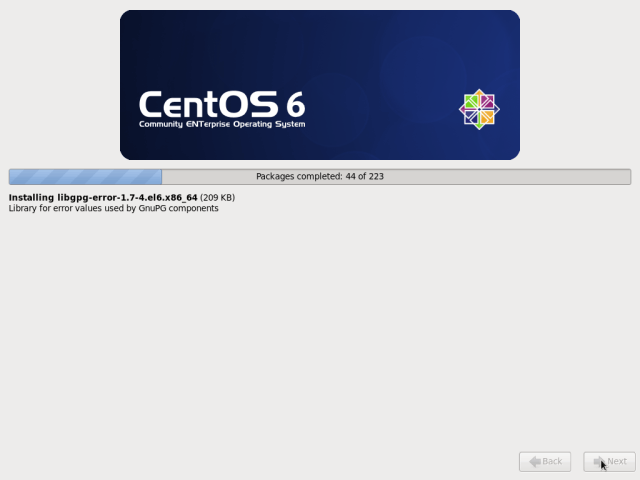
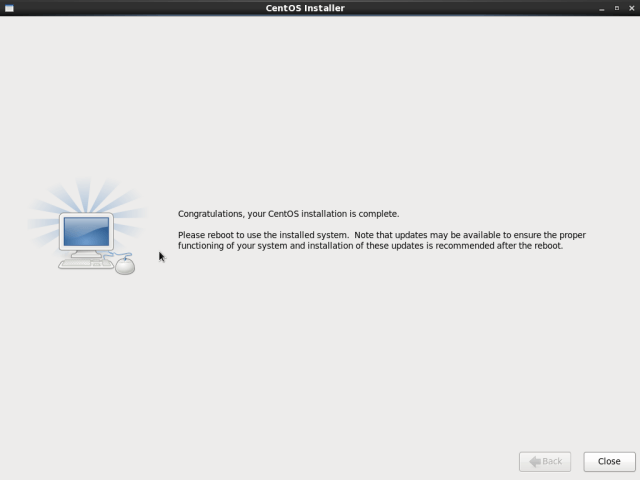
20. At this point, the actual installation of the system (copying of files) to disk will now start. When it is done, click on Reboot.
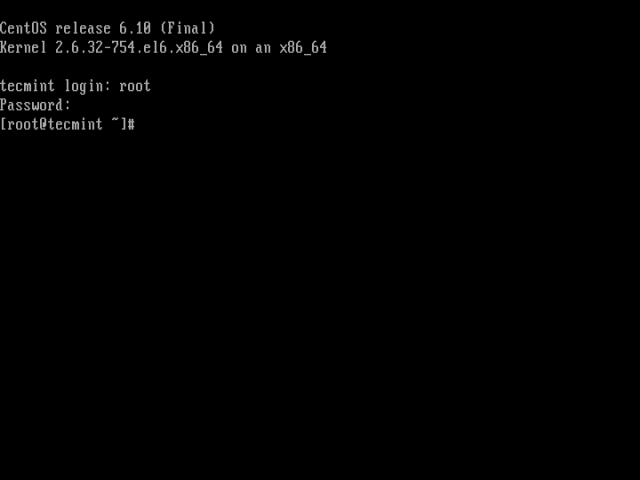
21. Once you have rebooted the system, you will land at login page as shown in the screenshot below. Finally, log into your CentOS 6.10 server with the root credentials.
Congratulations! You have successfully installed CentOS 6.10 server using network installation media. If you have any questions or thoughts to share, use the feedback from below to reach us.


Hi, I have vmware workstation pro 12 and I want to install centos 6. Every time i want to install the centos, a message is display when the os is installing (i mean in the last step ) that please insert disk 1 to continue. what is the reason for displaying this message.
please answer me.
It was very useful, Thanks
I have just installed CentOS 7. Get login screen, log in OK. Now what do I do? Just have a flashing cursor. Tried start x
How to install and configure electronic mail server in centos 6.4?
Thanks for this very helpful post.
Good morning sir
i am working on ATVM(automatic Ticket vendor machine) project in linux but i can not understand how to start this project my project requirement is :
Networking:
* TCP/IP with DNS, DHCP support
* Telnet, FTP,RSH,Rexec,SSH, Cron. Rlogin
* Embedded oS and S/W(total size less than 400 MB)
* Embedded Linux with X-window interface
* java run time environment.
Remote managment software support:
* configure of IP, User Profile programming and soft reset
* remote and unattended updation of os:
* Remote monitoring Of system status
* support: Disk on Key support
* Security: Password Protected setup for Terminal Configuration
I have installed Linux 6.4 using basic devices after that I have installed windows 7 ultimate but now my Linux works fine but windows shows black screen. Please help
@Saud,
No idea about Windows 7, may be your Windows corrupted…
Hi,
I have seen that you use WordPress for your website.
What kind of plugin do you use to get the “New Update” sticker near your more recent articles?
I’m personally searching for such a feature without success!
Regards.
CentOS 3.4 installations is done.but how to login to graphical mode..
root login also done. how to view graphical mode in CentOS 3.4
@Boomanikandan,
During installation, have you selected GNOME Desktop? if yes you can switch to GUI mode by running following command at boot time..don’t forget to reboot the machine after running below command.
After reboot, if system doesn’t boot into GUI mode, then follow guide at:
https://www.tecmint.com/install-gui-in-rhel-centos-7/
Hi,
I have installed CentOS 6.3 with dual boot Windows 7.
Please suggest how to access windows partition in centos.
Thanks & Regards,
Amol Bhosale
@Amol,
I hope this article, will help you out..
https://www.tecmint.com/how-do-i-access-or-mount-windows-ntfs-partition-in-linux/
I have installed Linux enterprise 6.4 now I’m facing a major problem as in I’m not able to install windows..
Hai ravi , this is Ganapathi
I am currently a user of windows 8 and i am intrest to learn linux and i want to install kali linux within the currently existing windows 8 for learning and security purpose…..
Is that possible to install kali linux within windows 8……
Ifso please guide me to install kali or some other like ubuntu within windows 8
Dear Ganapathi,
Yes, you can install any Linux flavour along side with Windows. We’ve already covered a detailed article on how to install Kali Linux or your choice of Linux with Windows as shown at.
https://www.tecmint.com/run-linux-live-images-from-hard-disk-in-linux/
Hi Ravi,
I appreciate your efforts.
I have installed the first dvd only. I am facing problem in installing tata photon max. Is installation of iso-dvd-2 necessary for running internet connectivity, necessary.
Pl help.
Ranvir
Dear Ranvir,
The first DVD is enough for installing all needed packages, the second DVD is optional, but regards to internet connectivity, you need to install some drivers related to your data card provider.
Do you have any ideas on how to customise the Basic server setup after i install Cent OS 6.5 using ISO files? i don’t want to go with YUM installer. Please advise. Thanks
Then only one option, customize the server using CentOS DVD after installing the OS..
ok thank u
hi ravi please tell me complete samba4 installation steps in centos please give EX:
host name:dc1
doman name :laxmi.com
my system ip 192.168.1.100
sub net mask 255.255.255.0
d gate way 192.168.1.1
thank u
Surely laxmi, will try to provide you a guide on this, till then stay tuned.
I am getting error like this when try to install GUI mode
files contains prasing errors: file://///etc/yum.repos.d/iso.repo
[line 2]: name-pkgs
Please check your iso.repo file for any spaces, errors or do a yum clean all to fix the problem.
Hi Ravi,
Thank you for your quick response. How do I access the web using Centos 6.4. I set it up as a basic server with minimal installation. Everything is in command prompt and I dont have a deskktop like I would with Windows..
I have been asked to access the web interface? How do I do that?
Kind Regards
Bro, I am confuse with your question, are you mean to access Desktop? or a Web Server? If it’s desktop, just install KDE or GNOME desktop environment. Just run the following command on the terminal to install Desktop.
Hi Ravi, maybe you can help me out. I have never in my life used Centos 6.4 or any type of linux system. I am used to using Windows, none of this command prompt. I have no idea what I am doing.
I have to install a basic database server for my manager so that another company can access us through ssh etc.
Ok so when I access the login via route I type: ” ip addr show”, it shows one called eth0 and another one but it says eth0 state is down, so I then type: “ifup eth0” and then it says “Determining IP… Done”. When I then typE: “ip addr show” it then shows eth0 state as up and it allows me to ping websites.
The problem I have is trying to obtain the IP address because it just will not show it a tall and to make matters worse everytime I turn the computer off and then back on I have to keep repeating the process of ifup eth0 to turn it on… I am finding this really frustrating.
I know nothing about GUI interfaces or YUM. Far as I was concerned you install centos 6.4 and away you go, this doesn’t seem to be the case. :(
Kind Regards,
Stressed and fed up man.
Dear Ben,
Just add the ‘ifup eth0’ entry in /etc/rc.local at the bottom, your problem will solve.
Hi Ravi,
Thanks for the great and precise article. Can you please spare some time to answer these question.
1. How to add more features (softwares, packages, rpms) to an existing (basic) installation. I got a whole rack with multiple servers and most of them have basic installation. I need to add more features e.g. graphical desktops, vnc etc. How can i do it ?
2. How to create an offline repository of installation media. The purpose is since my servers will be behind firewall in Local area network and most probably Internet will not be available or will not be allowed. Therefore, if some offline media repository is not set, i may not be able to execute ‘yum install package-name’. Please guide or redirect to some post.
Thanks in advance.
For your both the questions, simply create a local repository with complete CentOS package set and allow clients to use these repo as base repository to install packages using yum command. For about setting local repository, please search for the article using our search form.
i have this iso image CentOS-6.5-x86_64-bin-DVD2.iso.But virtual machine give this error when i attached it.
Fatal:No bootable medium found!System Halted
Bro, the first ISO images contains bootable files that allow VM to boot from the first image. Please insert your first ISO image, not second one..
Just wanted to say THANK YOU, it is really awesome that you took the time to write this article, thank you for contribution to the knowledge base.
Awesome work!
Hi, do I have to install CD image? can I do all server stuff with minimum CD without GUI like PHP, Cpanel etc,.? minimum CD is lighter and faster isn’t?
Hi Ravi,
I am new to Linux and was trying to install centOS 6.4 64 bit thru bootable USB. I downloaded dvd1.iso and made the USB bootable and was able to boot the server ( Dell R815) however after 2-3 screens it asks what type of media contains installation image ..
CD DVD
local HDD
NFS
URL
I tried CD DVD but it didn’t work then I used Local HDD which gives me options like dev/sda1 , dev/sdc1, dev/sdc2 but I tried all these options but i get error that drive was failed to mount or something ( I don’t remember exactly ) this server already has 6.3 but I want to use 6.4. Any help would be greatly appreciated.
Hi Ravi,
I done upto last step and ,after completion of 5 steps like date and time kdump, finally clicking the finish button i am getting the error as windows stopped working, Cau you please help me how to solve this problem
Hello,
I followed all the steps and was able to install centos but my changes/data are not persisted in centos i.e whenever i restart centos all my saved data will be lost.
can you please let me know how can I persist all my changes.
Thanks,
Kunal
Hi Ravi,
This is vikas i have a problem in configuring squid server.
i had configured squid server and its working fine but my outlook is not working.
please can you help me out in configuring it.
my mail id [email protected]
plz send me the details how to configure it.
Regards
Vikas Viwanath
I have trouble…. i downloaded CentOS-6.3-x86_64-bin-DVD1to2 ( DVD1 and DVD2)
i burnt the first one and nothing happened during the installation at the end of installation required DVD2. So when i try to burn it says Your file doesn’t look like has iso extension. My question is: How can i burn the DVD2 so that i can keep the installation… Thanks for help
I think you should use Live USB device to install CentOS. For more information how to install a Linux OS from USB, use the following link.
Install Linux from USB Device
during installation of centos i have to edit repository at step no -18
can you tell me , what should be the repository url?
Ravi nice tutorial, but I got stuck, I got the login screen and I enter id:root and my predefine password, it accepted for a few second black screen with loading signal than again back to login screen
Why ?
No idea man, seems something related to Hardware or RAM.
Hi,
I am new to CentOS
while I am installing CentOS 6.4 through DVD First i aksed
“Press any key to install”
after that a message came like
“Loading 984 pages” like message
after that it gave the error like
error 18: there is low space on the cylinder for the BIOS service ”
Can any one help me what could be the reason how to proceede
Thanks for the instruction.
download links are not working
Yeah thanks added working links.
Hi, helpme please…
I installed Centos 6.5 with DB ORACLE 12c
Preview I execute this in .bash_profile:
# vi /home/oracle/.bash_profile
export ORACLE_BASE=/usr/oracle
export ORACLE_HOME=/usr/oracle/product/11.2.0
export ORACLE_SID=orcl
export LD_LIBRARY_PATH=$LD_LIBRARY_PATH:$ORACLE_HOME/lib
export PATH=$ORACLE_HOME/bin:$PATH
, but when I turn off the computer, I then turn on the pc…I am not allowed to log in graphic mode, only in text mode…..
hi Ravi
i am done installing my CentOS 6.4 but now i want to install freeRadius server and openSSH to authenticate the users to login the network . i don’t know what to do . my problem is i don’t want to use telnet. thank you
Please use our search form to search for articles you are looking for.
Sir i am completely newbie to unix.. what unix operating system is a good practice for me?? thanks in advance ravi..
Hi Ravi Saive,
Can you help me. I want to set a setup server , network install automatically. I had read PXE server and Cobbler but i still not understand.
Thank you.
Hi sir,
i have win7 in my pc already, and i would like to have dual boot with centos6.4
Could you please post Dual Boot Windows7 and Centos6.4 or 6.5 tutorial
installation only with pendrive
please….
I’ve installed CentOS 6 a couple times on the same system, once on my own and once following this and then another step-by-step guide. Both times my installation skipped steps 20 & 21. I’m not sure what I’ve done wrong, as I’ve followed what it said exactly. Luckily, it seems I can add them later, but I’d really like to figure out why it skips the packages step.
hi Rav, i want to install linux64_11gR2 on CentOS 6.5 or oracle linux 6.4, which option should I choose between Basic server and Database during OS installation…and why?
If you’re planning to install Oracle, then better go with Oracle Linux 6.4 because it has official oracle repository where you can easily install oracle packages via Yum.
hi Ravi,
i downloaded this file, “CentOS-6.4-i386-bin-DVD1to2.torrent”. i notice it has 2 ISO files, namely:
1) CentOS-6.4-i386-bin-DVD1.iso
2) CentOS-6.4-i386-bin-DVD2.iso
i too notice there are 3 txt files, and 3 asc files.
if i burn to DVD, should i include the 3 txt files and 3 asc files?
based on what i read above, i just need the DVD1 ISO file only, right?
thanks.
Hello am new to Linux i have a server running on centOS 6.4final and is the mail Server all the clients are able to send and receive mails except one which is not able to send or receive. his outlook is failing on Authentication it keeps asking for a password. Can you please give a step by step instructions how i can reset his password. NOTE this started when he was upgraded to windows 7 from XP
how to Install and Configure Mail server using sendmail ?
Simply use yum install sendmail to install and configure it.
for clarification…which is the right one basic server? or webserver im planning to build a web server to my website?
Choose Web Server, if you planning to host website.
Sir, i want to know, can we stop https sites with the use of squid proxy server in webmin?
If yes, then please provide the steps.
In waiting for your response.
Regards
Paras Gupta
Hi,
Kindly mention the steps for installing oVirt via Web UI. Like how many machines are required? What configuration should it be..?
Hi,
I think I missed some steps when I burn this DVD, since I never able to boot from my DVD. following is what I did to install CentOS6.4.
I donwloaded CentOS iso file to my windows 8 laptop
I extract iso to a directory and then burn all files to a DVD
1. I tried to boot from this DVD by click on F12 when text come up, I saw an error: boot file not found….
2. I was never able boot from this DVD, and I do have boot file on my DVD.
3.However, I was able to install centos5.7 on the same machine. the difference is that I didnt burn that DVD
Can you provide some tips to help me to finish this installation?
Thank you very much.
Robin
I think you should give a try installing from USB device. Read the following article the guides you how to create bootable USB device to install Linux in systems.
Install Linux Using USB Device
sir this is what im am up to..
Requirements
– Installation must have /u1 and /u2 directory, with its own partition each.
– SWAP space must be at least 1024mb
– Server must not have any GUI
Rules of engagement
– All configuration file must be accessible through /etc/
– All installation file packages must be in binary form or source form usually (.tar .tar.gz, .gz, .bzip, .tgz), you can’t use yum, up2date, apt-get, so use of rpm, dpkg are not allowed.
– All download and installed service will be put under /usr/local/
– Use “scp” to transfer files to the machine from your pc, or use “wget” to directly download the “binary/source”
– After install of service removed binary/source from /usr/local/ or moved it to other volume.
– Backup all configuration file – that your going to edit.
– All services must run as nobody –
– All HTML files and database files must be in /u1 directory.
– /u2 will be used for backup files only.
Do the following –
– Install Linux – without any services except for SSH.
– Create Account
– Change Password
– Configure Sudo – for you to gain root
– Configure SSH to not allow root login
– Login through SSH –
– Install and Configure Mail server using sendmail – authenticate against passwd
– Setup POP/IMAP – authenticate against passwd
– Setup Apache with HTTPS and Module support and logging to /var/log/apache
– Install and Setup Webmail – use Squirrel Mail or Open Webmail
– Put /usr/local/bin in your user path
– Configure log rotate to rotate logs in /var/log/
– Write a script to check the HTTP process is running and will send mail if it is not running.
– Put the script inside the crontab and have it run every half an hour
– Services HTTPD, MySQLD must autostart when machine boots up.
– Create script to backup /u1/etc /var/log and place backup file in /u2
– Put script in /u2 backup file must have the following format, hostname-“backup.dateofbackup.tar.gz”
– Schedule the backup script to run midnight every 3 days.
– Configure IPTABLES to deny all and only allow connection to port 25, 80, 443 and 22.
what is the step by step things to do?? im done on the other part like creating users, installing httpd, php , mysql but i think something is wrong.. im not satisfied .. i dont know if im doing it right..
This is a very huge list of custom requirement. Will help you out, but will charge per hour $35. If you agree will discuss more..
Hi Ravi,
I am a beginner to Linux, I have installed CentOS 6.4 successfully, But due to less RAM I did not get GUI installer and I completed the installation in text mode, I did not get step 20 mentioned by you, I am not sure what kind of installation I have done, now I am up and running with root login in CLI. Please let me know how to switch to GUI. Also the installer never asked me to use DVD2.iso???
How much RAM you have? the second DVD not required its optional and contains some extra packages.
Hi,
I am facing some difficulty getting to root in GUI when Centos 6.2 boots up. It always prompts normal username.
i have commented out below line in /etc/pam.d/gdm but to no avail.
auth required pam_succeed_if.so user != root quiet
please suggest how can i directly login on root in GUI
Thanks,
Harry Oberoi
I am encountering an issue where YUM is not functioning after attempting to install the EPEL repository to install SquirrelMail.
I followed the guide provided in the following link: Setup Mail Server using Postfix, Dovecot, and SquirrelMail on CentOS/RHEL/Scientific Linux 6.3 – Step by Step.
The problem occurs when I try to install the EPEL repository and SquirrelMail. The installation fails at this step.
Could you please assist me in resolving this issue so that I can successfully install SquirrelMail?
Thank you for your help.
What error you getting? Can you post the output of yum command?
sir i can now use yum command,, i just rm epel repository to remove it., but sir can u give me a link or a way to install squirrelmail on my server?? any workable way.. thanks in advance
Just do yum install squirrelmail.
it apends a message “no package squirrelmail available”
You need a EPEL repository enabled on the system to install squirrelmail. Please first install and enable EPEL repository.
im done downloading using wget, and done with installing using rmp.. but when i check it using yum repolist there’s no epel..
sir how can i set up a SMTP on my CentOS server??
what should i to first?
what should i install first? i will use squirrel mail for my SMTP.
thanks
Just install postfix mail server it will automatically enable SMTP.
after installing CentOS 6.4 I’ve try to use yum to install some other application like mysql but it gives me an error.
14: PYCURL ERROR 6.. what should i do to use yum??
need some help.
You’ve not added DNS correctly in /etc/resolve.conf file. Add proper DNS IP in this file and try execute yum command again.
i am a begginer in linux..
sir can u give me correct format or guide on add a proper DNS??
Is your system is connected to internet? if yes! then open /etc/resolve.conf file.
and add the following line to it.
Press ESC key and hit Shift+ZZ to save.
no sir.. i cant connect to the internet but the system is connected to our network LAN.
oh i got it already.. thanks ravi..
Hi,
I would to make IPA Server in Centos 6.4 and IPA Client installation (Fedora)
if any suggestion pls send to mail id.
Hi
I would to make a server installation so I can install the most services and would to know how can I choose these services.
I even have problem to start the X.
any Suggestions.
during installation i choose basic server
We have installed the centOS6.4 Successfully. But we are unable to access the GUI mode. We also tried to access using the command line. startx and init 5, the Error we receid as retrigger failed u dev events. Please help me out resolve this issue.
Hi Ravi, during installation of CentOS 6.4, up to screen shot 25, every thing was fine. But after successful installation, login screen was not displayed —- only black screen with white bar at the bottom.
what is the exact problem and how to fix it ?
Hi Ravi!
Thanks for responding. I am using BSNL EVDO data card, which connected to Dlink DIR506L wifi rounter. I am using a Dell inspiron 1464 notebook, which is having Broadcom wifi. I tries all that I know. I don’t know even if it is detecting my notebook wifi. Linux is too tough man. Please please help me to set up my internet using wired or wifi.
Ok, I will help you, out send me team viewer details to my email id using contact us link.
HI Ravi,
my Centos 6.3 server is not connected to internet, is there a way to use YUM, or download ll the YUM package, so i can point my yum repository to a local folder?
it’s a bit of a pain for me to get my functionality on my server because of this.
Cheers
PC
Hi Ravi,
thank you for this installation guide.
I’ve installed CentOS using DVD1, but a lot of packages are missing.
You have said that DVD2 is optional, but maybe you can tell me how to use it…
Thank you in advance!
Best regards,
Ivan
You can install those missing packages using yum command from the online repositories. If you don’t connected to internet you can still install those packages from the DVD2 using yum command as shown in the below article. Please follow it.
Install Packages via YUM command using CentOS Installation DVD
Hi Ravi,
I am a new user of CentOS 6.4. I installed it but unable to connect to internet using ehternet or wifi. What could be done. I am using Dell Inspiron 1464 notebook with 6 Gigs RAM. Please help.
Thanks in advance…
Is internet connected to system? If yes, you need to add a DNS in /etc/resolv.conf file. For example, you should add.
Replace 8.8.8.8 with your DNS IP.
Hi Ravi,
can centos be configured as cache Engine / server? if ‘yes’ where can i get step by step procedure for it.
Cache Engine? means what you trying to say, could you explain me clearly.
Nice one……:)
thank you very much…:)
hi ravi…
i have a 64 bit rhel server iso image . may i know how can i install it in virtual box. which type of file system the vm will support.
VM supports all file system format.
Thanks for the general guidelines for centos 6.4 instal. I followed your step-by-step sequence which was fine until Step 24 – remove media and reboot. At the reboot point I got–
error: unknown filesystem
grub: rescue>
I used CentOS-6.4-x86_64-bin-DVD1.iso onto a dual core AMD Athlon 6000+ w/3GB ram on an ASUS M3N78pro M’board.
any thoughts?
i changed 192.168.11.2 with 8.8.8.8 but no luck… Thank you..
DEVICE=eth0
HWADDR=00:0C:29:D7:85:75
TYPE=Ethernet
UUID=8ad80678-82e9-48ce-8c3b-76a25d06e246
ONBOOT=yes
NM_CONTROLLED=”yes”
BOOTPROTO=STATIC
IPADDR=192.168.11.130
NETMASK=255.255.255.0
NAME=”SYSTEAM ETH0″
GATEWAY=192.168.11.1
PEFROUTE=yes
PEERDNS=yes
PEERROUTES=yes
Kernel IP routing table
Destination Gateway Genmask Flags Metric Ref Use Iface
192.168.11.0 0.0.0.0 255.255.255.0 U 0 0 0 eth0
169.254.0.0 0.0.0.0 255.255.0.0 U 1002 0 0 eth0
0.0.0.0 192.168.11.1 0.0.0.0 UG 0 0 0 eth0
; generated by /sbin/dhclient-script
search localdomain
nameserver 192.168.11.2
Replace 192.168.11.2 with 8.8.8.8 and try again.
Hi Ravi,
I have installed centos 4 on my local VM but unable to connect internet..
ping http://www.google.com
PING http://www.google.com (206.169.145.212) 56(84) bytes of data.
8 packets transmitted, 0 received, 100% packet loss, time 7320ms
and unable to download any files through wget.. i keep on getting below..could you please check and let me know what could be the reason..
wget https://packages.sw.be/rpmforge-release/rpmforge-release-0.5.2-2.el6.rf.x86_64.rpm
Resolving packages.sw.be… 78.46.17.228..connection terminated
Thank
Sai charan
Please add correct DNS entries in /etc/resolv.conf file.
Hi Ravi, I have installed the CentOS 6.4 successfully, but it has not taken LAN drivers. Could you please help me for the same? My Laptop is Lenovo G580.
Hi, Ravi I face a problem after installation how can I connect my centos with internet. As per my knowledge I check all network settings after that when I ping 8.8.8.8 its successfully ping but when I ping http://www.google.com or any other URL there is no response. Kindly please help me in detail. I am waiting
Did you added correct DNS IP in /etc/resolv.conf file?
and even Yum command also not found..
Hi Sir,
I have installed CentOS 6.4 in vmware but i didnt get GUI mode.. what should i do …i use startx and init 5 but no luck..below is the output..
-bash: startx: command not found
init 5
Retrigger failed udev events [OK]
Thanks
Jagan
Do you connected to internet? if yes download yum package for your distribution and install it using rpm -ivh command, and then install X windows using YUM package manager.
i connected internet and downloaded yum packages and installed it..then what is the next command.. to get GUI mode.. Thanks.
Run init 5 on the prompt to get GUI mode.
Hi Ravi,
I ran init 5 on command mode but i got below output…
[root@HadoopCentOS ~]# init 5
Retrigger failed udev events [OK]
_
Please advice
Thanks
Jagan
To fix this error, you need have X Windows desktop environment like Gnome or KDE (I am guessing you want a KDE). Run this command.
Then find out what X groups available. For example, you want to install KDE, type the following groups.
Hi Ravi,
Sorry again.. i am getting below error . i created repo for packages and yum command also working but i am getting below erro
[root@HadoopCentOS ~]# yum grouplist
Error: No group data available for configured repositories
i googled but no luck..what could be the reason ..thanks
Jagan
How can i install cent-os by commands in terminal??
waiting for help
thanks
You mean terminal access only? If yes! just select minimal packages without GUI during installation.
I have successfully installed centos 6.4 desktop on virtual box but missing ‘System tools’ from Application menu. Any idea how I can add this?
Install those packages via YUM.
Appreciate your quick response. Would you mind posting the complete command. Tried to google but could not find it.
ravi sir
i have installed Centos 6.4 add packages for making a server also i have uploaded website and also i have ran the website in LAN….i want the website to access from internet and also i have a static ip from my ISP. i want to also add i have opened the port 80 in centos but till i m not able to access my website from internet please help me it will highly regarded
There are lots of factors involves like if you already setup website and its accessible from LAN. May I know here how you accessing your website? means using IP address or localhost from the browser. If port 80 is opened, can you able to telnet it locally or remotely? Is your domain/website resolved to your static IP address? Check all these things and let me know.
yes sir i can run using my localhost ip and i can view my website in lan. using my local ip 192.168.0.100
i have opened the port 80 i m can local telnet it ,i use putty for installing packages for diffrent computer in lan
but still no sucess
if u can mail me at [email protected] or u can send me ur number i will give u a call so that i can sort this problem
Hey strange to me. Ok you can contact me at [email protected]. Will help you out there. thanks.
hi sir
can we install terminal services on centos 6.4 if yes then how .
please revert about this
During installation, just select minimal setup no Desktops.
sir not seeing gui desktop :( what shoud i do i m new in this …
Type “startx” or “init 5” from the command line. If you get any error post here.
dear sir i choosed web server in centos 6.3 then i select packege desktop and desktop platform ..then after reboot .and after complite loading window gui will now show .i did wait 3 hr ..and when i dont use desktop platform after restart show login ..and then i will install from yum groupinstall after then when i try to install desktop platform he show me 2 error about red hat .and gui will not open :( ..and i did startx he gave error
[dix] could not init font path element catalouge:/etc/x11/fontpath.d, removeing from list!
[dix] could not init font path element built-ins ,removing from list!
error is :—- fatal server error: could not open default font ‘fixed;(EE)
please consult the centos support ;
(EE) please also check the log file at “/var/log/xorg.0.log” for addition information
server terminated with error (1). closeing log file
giving up
xinit:no such file or directory (errno 2):unable to connect to Xserver
xinit:no such process(errno 3):server error,
these error showing me .. and i need some suggection if u dont mind ..
yum -y groupinstall “Desktop-Platform”
error- transaction check error:
file /usr/sbin/redhat_lsb_triggger.i686 from install of rehat-lsb-core-4.0.7.e16.centos.i686 conflicts with file from pakage redhat-lsb-4.0-3.e16.centos.i686
file/usr/share/man/man1/lsb_release.1gz.from install of redhat
error summary
———————–
dear sir i did post error here whats happend ..
I have an error ‘command not found’
Can you please tell us which command you trying to execute? and getting command not found.
Is there any way to install from network assuming there is no linux machine ?
That means I want to install my first Linux machine from network.
Yes, you can install latest CentOS 6.4 using Net Install DVD. Obtain it CentOS-6.4-i386-netinstall.iso
Hello Ravi
I have installed everithing and it works. But during de boot process I get an error (after leaving the splach screen with the escape key) appearing in red in the screen(I guess a service wich can’t start). But as soon as the graphical service start it’s not possible anymore to read the message. Of course I can readt it in the log files, but have you a trick to return to the boot screen directly and see it ?
Roland
I just done a fresh install of CentOS 6.4 Server, with an KDE Desktop, on a Dell Optiplex 755 with 2GB DDR2, 1TB Hard Drive & nVida Video. After reboot I get the Command Line only & when I go to login I’m getting an constant “login incorrect” I’ve double checked Username & Password still won’t work, any suggestions?
Might you’ve selected minimal packages during installation, that’s the reason you are not getting GUI mode. About login, and don’t know, but you can reset the password by following article.
Reset Forgotten Password
Thank you, I found I had the username wrong was using non-administrator instead of “root” for login, then my password. New issue is I can’t get online tried pinging google.com, got nothing, but this error “ping: unknown host google.com. Not sure how to fix, should I be reading something since I’m trying to switch from windows to make an PXE Server using CentOS 6.4? Like the Command Lines I should be using.
Add your DNS in /etc/resolv.conf file. and then do a ping.
Would I use all of these things to set up an CentOS PXE Server? I glad you have a great site.
Thanks for your instructions. I am a CentOS newbie. Followed your instructions using Live CD; used text mode. Install seemed to go okay. Pretty sure that I did not include any GUI packages (on purpose; I just wanted to maintain the server using command line). Anyway, I created ifcfg-eth0 to use DHCP. But whenever my ethernet cable is plugged in (and this cable and ethernet jack work fine with other computers), my screen goes black within 5 minutes; cannot even restart with Ctl-Alt-Del. And before the screen freezes, I cannot ping other machines on my LAN (“network is unreachable”); but pinging localhost works fine. My machine’s Ethernet controller, as listed by the command lspci, is a Broadcom NetXtreme BCM5755 Gigabit Ethernet PCI Express (rev 02), vendorID:deviceID = 14e4:167b.
I don’t know how to troubleshoot this problem; any ideas?
No idea man, may be issue with your LAN drivers.
use tool system-config-network becouse without this… net doesnt work ;)
My problem is that I have been trying to install Centos 6.4 from the i386 bin-Dvd’s and wanted to do a “create custom layout” in terms of setting up partitions.
Unfortunately after setting up the boot partition as the mount point and forcing it to be a primary partition I keep getting error messages which tell me I have to set up a root partition before I can proceed.
You must create a “/” partition to proceed further.
Hi Ravi,
Thanks. Very useful.
I have question as I am new to Cent OS (I am Ubuntu user). Is both ISOs required for installation ?
No need of both ISO’s, only one is enough.
Hi Ravi,
I have installed centos 5.9, I want to install PowerDNS on it.
So can you tell me the proper steps for that?
I really need it as soon as possible.
Thanks.
Harry, we soon write a detailed steps for installation of PowerDNS, stay tuned of it. Thanks.
Hi there Ravi
I’ve installed CentOS 6.4 successfully…now with the boot up it’s requesting an login. What am I suppose to put there…? I’ve tried adding the host name or the boot loader but it’s a no go
I’m sorted thanks:)
During installation, it asked you to fill user details and password. Enter those details to login into system.
Use
Login: root
Password: it’s what you filled during installation when wizard asked you about it.
Thanks, I just installed Minimal CD and did not know login:
Thanks Jonathan. How would I ever know that?
Only way to know the root password is to reset again. Follow the below guide to reset again root password.
https://www.tecmint.com/reset-forgotten-root-password-in-rhel-centos-and-fedora/
Thanks. But I have a problem i am confuse of you are Upload Two ISO image First is “CentOS-6.4-i386-bin-DVD1” and Second is “CentOS-6.4-i386-bin-DVD2” . Which one i Download for install CentOS-6.4-i386-bin…….
Please Tell me I am waiting for your reply
Download first DVD is enough for you to install CentOS 6.4, the second is optional, no need of it.
I am trying to install centos 6.4 x86_64 in a intel corei5 (lenova Think Centre) Installation is OK for Basic server installation and final reboot ends in log in screen. However when I choose X window system for GUI interface, the final reboot says “error 1962: no operating system found”. In the same machine I have installed i386 and used it in GUI mode. Can you help me to solve this
Hi Jagannathan,
I am facing this same issue for Cent OS 6.5 on a Lenovo machine. Could you guide me in the right path?
Thanks
Jack
Thanks Ravi.
Hi Ravi, when I install centos I don’t get any option for desktop or anything, it just goees to install after partition. I’m just starting in linux
you mean system starting in command line mode? If yes, install X windows managers like GNOME.
If you like to install KDE, then use:
how do install graphic on centOS through, if you know well about this reply me soon…..i am unable to do this function……
Thanks Ravi, very useful. This is my first time installing this, After booting from cd it gave me an option on the desktop saying “Install to Harddrive” . This is the one I am installing.
during initial installation ,will install need to download system files from internet? , or does everything for installation come with the ISO?
(my English is not very good)
thank you
please reply soon
No need of, everything comes with ISO that enough to run OS.
Hi,
I have just bought a Dell CloudEdge C1100 .
I am trying to run Openstack. I was using CentOS 6.4. But I had an issue with the OS complaining about it could not find the ISO9660 media etc. and aborted after setting up the partitions and LVM. So I went back to 6.2 and I am upgrading this way. The question is once I have got the OS to a State I like what’s a good backup stategy Clonezilla or good ol’ tar and dump?
Clonezilla and dump both are good, you can choose one of them.
in step number 20, what is the different between basic server, virtual host, web server and the others options?…
what are the specifications and description for each of these???
good post!!
Hi Ravi,
Nice post, much needed!!
Just one question – can I copy both iso on a USB drive and then install using that or I have to make the USB bootable with some utility like UNetBootIn.
Thanks,
Suhas
Yes, you can copy into USB and then boot from thereon.
i have installed cent 6.4 ..but im not getting GUI mode …
i have changed “”vim /etc/inittab “” run level 3 to 5 but still im getting CLI mode
increase RAM…
Hi Ravi,
after increasing RAM, Still I am unable to get the GUI mode.
Please suggest what to do..
Have you installed GUI packages?
how to update centos 6.4 in offline
hello dude,
when installation of cent os you need to select gui suppot package from list.
Yes, but only if you want GUI support.
# yum groupinstall basic-desktop desktop-platform x11 fonts
#yum -y groupinstall “Desktop” “Desktop Platform” “X Window System” “Fonts”
# yum -y groupinstall “Graphical Administration Tools”
# yum -y groupinstall “Internet Browser”
# yum -y groupinstall “General Purpose Desktop”
# yum -y groupinstall “Office Suite and Productivity”yum -y groupinstall “Office
Suite and Productivity”
install this packages after that you change /etc/inittab file and restart server desktop will com