RHCSA (Red Hat Certified System Administrator) is a certification exam from Red Hat company, which provides an open-source operating system and software to the enterprise community, It also provides support, training and consulting services for the organizations.
This Red Hat Certified System Administrator (RHCSA) is essential to perform the following core system administration tasks needed in Red Hat Enterprise Linux environments:
- Learn and utilize fundamental tools for managing files, directories, command-line interfaces, and documentation.
- Develop basic shell scripts for automating tasks in Linux.
- Operate live systems by booting into different run levels, managing processes, launching and stopping virtual machines, and controlling services.
- Set up local storage using partitions and logical volumes for efficient data management.
- Create and configure file systems, ensuring attributes such as permissions, encryption, access control lists (ACLs), and network file systems are properly managed.
- Deploy, configure, and maintain Linux systems, including software installation, updates, and essential services.
- Administer user accounts and groups to manage access and permissions effectively.
- Enhance system security through basic firewall setup and SELinux configuration.
- Handle basic container operations for efficient application deployment and management on Linux platforms.
To view fees and register for an exam in your country, check the RHCSA Certification page.
In this 15-article RHCSA series titled ‘Preparation for the RHCSA (Red Hat Certified System Administrator) exam‘, we will cover the following topics on the latest release of Red Hat Enterprise Linux 9.
In this Part 1 of the RHCSA series, we will explain how to enter and execute commands with the correct syntax in a shell prompt or terminal and explain how to find, inspect, and use system documentation.
Prerequisites:
At least a slight degree of familiarity with basic Linux commands such as:
- cd command (change directory)
- ls command (list directory)
- cp command (copy files)
- mv command (move or rename files)
- touch command (create empty files or update the timestamp of existing ones)
- rm command (delete files)
- mkdir command (make directory)
The correct usage of some of them is exemplified in this article, and you can find further information about each of them using the suggested methods in this article.
Though not strictly required to start, as we will be discussing general commands and methods for information search in a Linux system, you should try to install RHEL 9 as explained in the article.
Interacting with the Linux Shell
If we log into a Linux box using a text-mode login screen, chances are we will be dropped directly into our default shell. On the other hand, if we log in using a graphical user interface (GUI), we will have to open a shell manually by starting a terminal.
Either way, we will be presented with the user prompt and we can start typing and executing commands (a command is executed by pressing the Enter key after we have typed it).
Commands are composed of two parts:
- the name of the command itself, and
- arguments
Certain arguments, called options (usually preceded by a hyphen), alter the behavior of the command in a particular way while other arguments specify the objects upon which the command operates.
The type command can help us identify whether another certain command is built into the shell or if it is provided by a separate package. The need to make this distinction lies in the place where we will find more information about the command.
For shell built-ins, we need to look at the shell’s man page, whereas for other binaries we can refer to its own man page.
type cd
type top
type type
type less
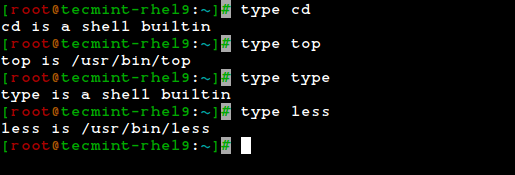
In the examples above, the cd command and type command are shell built-ins, while the top and less are binaries external to the shell itself (in this case, the location of the command executable is returned by type).
Other well-known shell built-ins include:
Linux echo Command
The echo command is used to print simple text, output the value of variables, and format text with escape sequences.
echo "This is Chapter 1 of the RHCSA exam preparation guide brought to you by TecMint.com"
Linux pwd Command
The pwd command is used to display the full path of the current directory you are in, which is useful for confirming your current directory location within the file system.
pwd

Linux exec command
Runs an external program that we specify. Note that in most cases, this is better accomplished by just typing the name of the program we want to run, but the exec command has one special feature:
rather than create a new process that runs alongside the shell, the new process replaces the shell, as can verified by subsequent.
ps -ef | grep [original PID of the shell process]
When the new process terminates, the shell terminates with it. Run exec top and then hit the q key to quit top. You will notice that the shell session ends when you do, as shown in the following screencast:
Linux export command
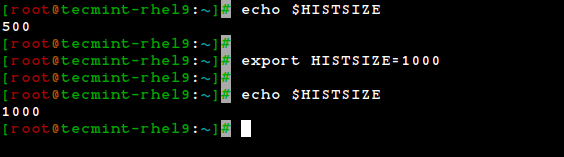
The export command is used to set environment variables so they are available to child processes. For example, export $HISTSIZE sets the size of your command history.
export $HISTSIZE
Linux history Command
The history command displays the command history list with line numbers. A command in the history list can be repeated by typing the command number preceded by an exclamation sign.
If we need to edit a command in the history list before executing it, we can press Ctrl + r and start typing the first letters associated with the command. When we see the command completed automatically, we can edit it as per our current need:
This list of commands is kept in our home directory in a file called .bash_history. The history facility is a useful resource for reducing the amount of typing, especially when combined with command-line editing.
By default, bash stores the last 500 commands you have entered, but this limit can be extended by using the HISTSIZE environment variable:
export $HISTSIZE=1000
export $HISTSIZE
But this change as performed above, will not be persistent on our next boot. In order to preserve the change in the HISTSIZE variable, we need to edit the .bashrc file by hand:
# for setting history length see HISTSIZE and HISTFILESIZE in bash(1)
HISTSIZE=1000
Keep in mind that these changes will not take effect until we restart our shell session or run the following command to take changes on the shell immediately.
source .bashrc
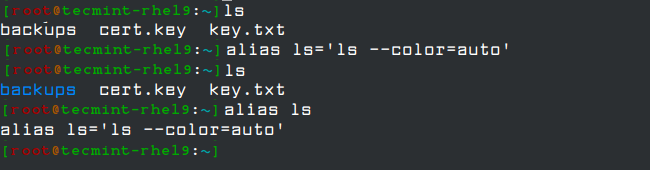
Linux alias Command
With no arguments or with the -p option prints the list of aliases in the form alias name=value on standard output. When arguments are provided, an alias is defined for each name whose value is given.
With alias command, we can make up our own commands or modify existing ones by including desired options. For example, suppose we want to alias ls to ls –color=auto so that the output will display regular files, directories, symlinks, and so on, in different colors:
alias ls='ls --color=auto'
Note that you can assign any name to your “new command” and enclose as many commands as desired between single quotes, but in that case, you need to separate them by semicolons, as follows:
alias myNewCommand='cd /usr/bin; ls; cd; clear'
Linux exit Command
The exit and logout commands both terminate the shell. The exit command terminates any shell, but the logout command terminates only login shells that is, those that are launched automatically when you initiate a text-mode login.
If we are ever in doubt as to what a program does, we can refer to its man page, which can be invoked using the man command. In addition, there are also man pages for important files (inittab, fstab, hosts, to name a few), library functions, shells, devices, and other features.
For example:
- man uname (print system information, such as kernel name, processor, operating system type, architecture, and so on).
- man inittab (init daemon configuration).
Another important source of information is provided by the info command, which is used to read info documents. These documents often provide more information than the man page. It is invoked by using the info keyword followed by a command name, such as:
info ls
info cut
In addition, the /usr/share/doc directory contains several subdirectories where further documentation can be found. They either contain plain-text files or other friendly formats.
Make sure you make it a habit to use these three methods to look up information for commands. Pay special and careful attention to the syntax of each of them, which is explained in detail in the documentation.
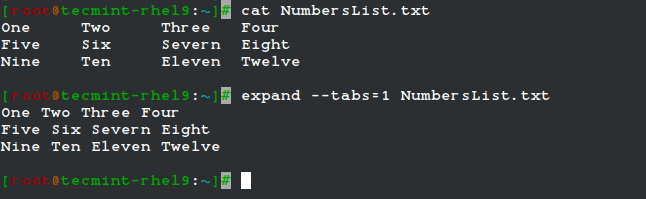
Converting Tabs into Spaces with expand Command
Sometimes text files contain tabs but programs that need to process the files don’t cope well with tabs Or maybe we just want to convert tabs into spaces. That’s where the expand tool (provided by the GNU coreutils package) comes in handy.
For example, given the file NumbersList.txt, let’s run expand against it, changing tabs to one space, and display on standard output.
expand --tabs=1 NumbersList.txt
The unexpand command performs the reverse operation (converts spaces into tabs).
View First Lines of a File
By default, the head command followed by a filename, will display the first 10 lines of the said file. This behavior can be changed using the -n option and specifying a certain number of lines.
head -n3 /etc/passwd
tail -n3 /etc/passwd
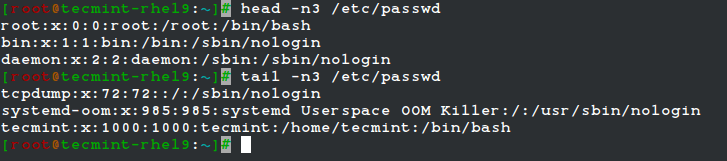
One of the most interesting features of the tail command is the possibility of displaying data (last lines) as the input file grows (tail -f my.log, where my.log is the file under observation). This is particularly useful when monitoring a log to which data is being continually added.
Merging Lines with paste Command
The paste command merges files line by line, separating the lines from each file with tabs (by default), or another delimiter that can be specified (in the following example the fields in the output are separated by an equal sign).
paste -d= file1 file2

Splitting Files with Split Command
The split command is used to split a file into two (or more) separate files, which are named according to a prefix of our choosing. The splitting can be defined by size, chunks, or number of lines, and the resulting files can have numeric or alphabetic suffixes.
In the following example, we will split bash.pdf into files of size 50 KB (-b 50KB), using numeric suffixes (-d):
ls -lh | grep bash | grep -v grep
split -b 50KB -d bash.pdf bash
ls -lh | grep bash | grep -v grep

You can merge the files to recreate the original file with the following command:
cat bash_00 bash_01 bash_02 bash_03 bash_04 bash_05 > bash.pdf
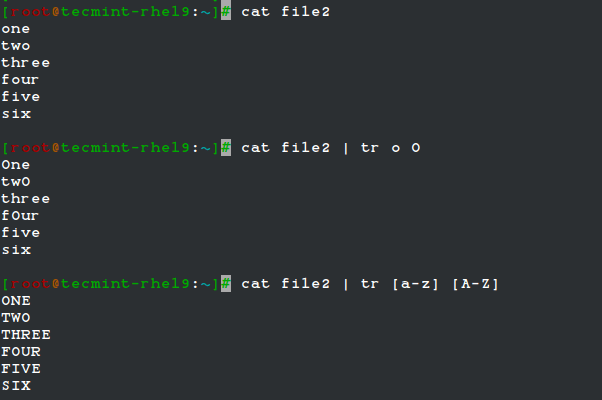
Translating characters with tr command
The tr command can be used to translate (change) characters on a one-by-one basis or use character ranges.
In the following example, we will use the same file2 as previously, and we will change:
- lowercase o’s to uppercase,
- and all lowercase to uppercase
cat file2 | tr o O
cat file2 | tr [a-z] [A-Z]
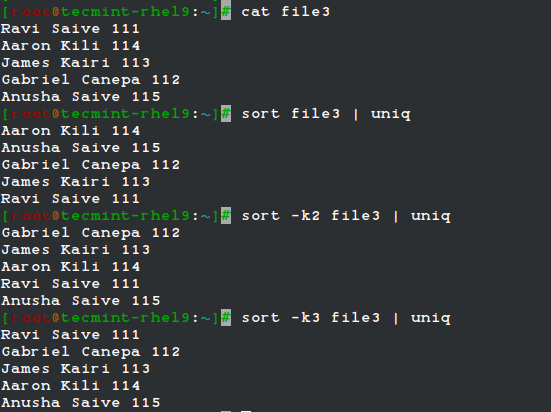
Remove Duplicates Lines with uniq & sort Commands
The uniq command allows us to report or remove duplicate lines in a file, writing to stdout by default. We must note that uniq does not detect repeated lines unless they are adjacent. Thus, uniq is commonly used along with a preceding sort (which is used to sort lines of text files).
By default, sort takes the first field (separated by spaces) as a key field. To specify a different key field, we need to use the -k option. Please note how the output returned by sort and uniq changes as we change the key field in the following example:
cat file3
sort file3 | uniq
sort -k2 file3 | uniq
sort -k3 file3 | uniq
Extract Text cut command
The cut command extracts portions of input lines (from stdin or files) and displays the result on standard output, based on the number of bytes (-b), characters (-c), or fields (-f).
When using cut-based on fields, the default field separator is a tab, but a different separator can be specified by using the -d option.
cut -d: -f1,3 /etc/passwd # Extract specific fields: 1 and 3 in this case
cut -d: -f2-4 /etc/passwd # Extract range of fields: 2 through 4 in this example

Note that the output of the two examples above was truncated for brevity.
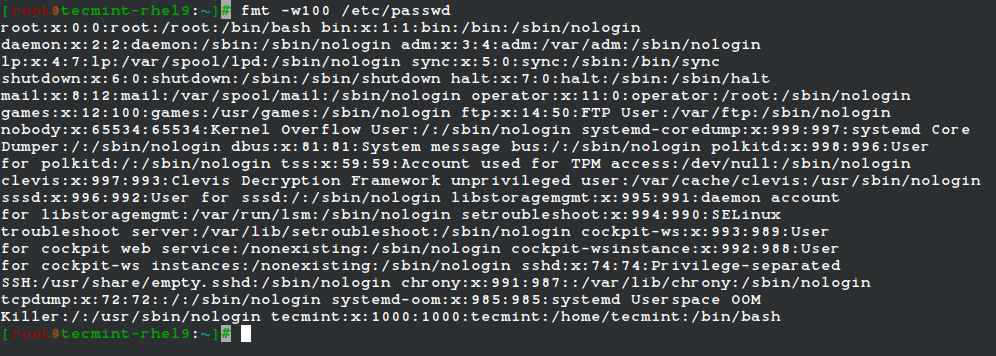
Reformatting files with fmt command
fmt is used to “clean up” files with a great amount of content or lines, or with varying degrees of indentation. The new paragraph formatting defaults to no more than 75 characters wide.
You can change this with the -w (width) option, which sets the line length to the specified number of characters.
For example, let’s see what happens when we use fmt to display the /etc/passwd file setting the width of each line to 100 characters. Once again, output has been truncated for brevity.
fmt -w100 /etc/passwd
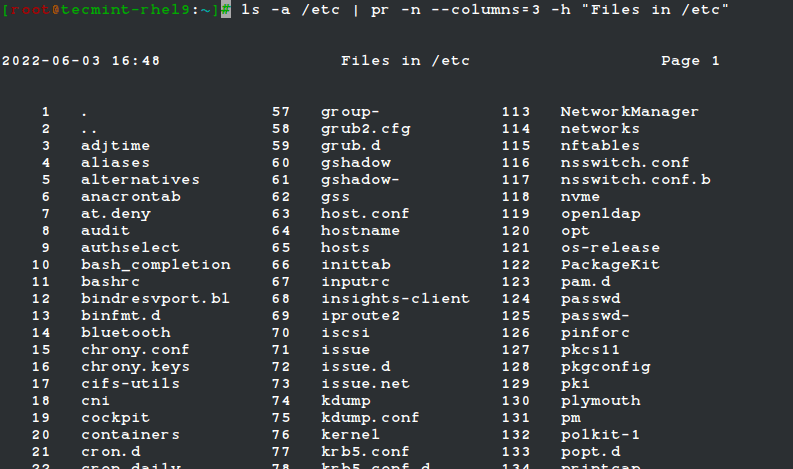
Formatting Content for Printing with pr Command
The pr command paginates and displays in columns one or more files for printing. In other words, pr formats a file to make it look better when printed.
For example, the following command:
ls -a /etc | pr -n --columns=3 -h "Files in /etc"
Shows a listing of all the files found in /etc in a printer-friendly format (3 columns) with a custom header (indicated by the -h option), and numbered lines (-n).
Summary
In this article, we have discussed how to enter and execute commands with the correct syntax in a shell prompt or terminal and explained how to find, inspect, and use system documentation. As simple as it seems, it’s a large first step on your way to becoming a RHCSA.
If you would like to add other commands that you use on a periodic basis and that have proven useful to fulfill your daily responsibilities, feel free to share them with the world by using the comment form below. Questions are also welcome. We look forward to hearing from you!
For comprehensive RHCSA exam preparation, we have created a comprehensive ebook titled ‘RHCSA Exam Study Guide‘, covering all the objectives with practical examples.


Today i attempted RHCSA exam. In that LDAP + AutoFS configuration done, but when i tried to login with ldapuser, it has given error message “Permission denied“. I tried all the way to rectified it but no luck.
Second question was to create LV, PV, VG, but when i tried to create PV, it given error message “value of range. LV was 8*100 size“. Can you identify this issue?
I am worrying about my result.
How to deny 1.1.1.1 ip address to access proxy services and allow to access all ather services??
@Ashok,
Install a Firewall, and block the IP address of Proxy server, that’s it.
Hi
Are these 15 parts enough to prepare and appear in RHEL7 EX200 exam.?
You should *NOT* assume that this series cover all you need to know to pass the RHEL 7 EX200 exam. You are highly encourage to go through the official docs by RH as well: https://access.redhat.com/documentation/en/red-hat-enterprise-linux/7/
i am getting below error plz help .
[root@centos1 ldap]# ldapadd -H ldapi:/// -f /root/ldaprootpasswd.ldif SASL/SCRAM-SHA-1 authentication started
Please enter your password:
ldap_sasl_interactive_bind_s: Invalid credentials (49)
additional info: SASL(-13): user not found: no secret in database
Please confirm if gui installed on rhcsa test machine or I have to install it using yum groupinstall gnome desktop
You should contact RH directly to answer this question, not us.
I just passed the RHCA with flying colors thanks in part to your materials.
Great work putting all this materiel up.
Thank You.
@KP – I am so glad to hear that! Congratulations!
Gabriel Cánepa,
Before of all, I want to thank you for the good work you are doing. One question is it possible you make all those topic already made to pdf?
Regards,
Fernando
@Fernando,
Actually, we are planning on putting all of these materials in PDF in the near future. Stay tuned!
YES!…..PDF’s my FAVORITE “travel document” format!…..Please hurry, I want them all for my tablet / laptop when I’m traveling!
Gabriel,
Thank you so very much for the excellent tutorial. I am assuming that you currently certified as RHCSA? I am currently preparing to go and present the text so these tutorials you have been created are excellent for practice and preparation. Gracias de nuevo!
@Jairusan,
I appreciate your taking the time to comment on this post and for your kind words about my work. To answer your question – no, I am not certified as RHCSA. More of a logistics issue than anything else – I live ~450 miles from the nearest testing center. Hopefully in the future.
Thanks. Very useful. Waiting for the next part.
@Senthilkumar, you will see Part 2 live in 2-3 days from today. Stay tuned! And thanks for following Tecmint.com.
Open the /etc/ssh/sshd.conf file and change the Port=22 entry to Port=
Restart SSh to see your new SSh port.
Make sure your firewalls are also updated for incoming requests to this new port.
HI Gabriel,
Thanks for the RHCSA tutorial, how do i get access to parts 2 onwards?
Thanks
@abdi,
Part 2 has not been published yet. I am going to submit it today so you can expect to see it live in 2-3 days.
Plzzz provide a tutorial on how to change the ssh port and listen on different port
@Gurdeep,
Please refer to another comment where @ctwhatexit answered your question.