Redis Cluster is a builtin Redis feature that supports automatic sharding, replication and high availability which was previously implemented using Sentinels. It is designed for two major purposes: one is to automatically split your dataset among multiple instances and secondly to provide some degree of availability during partitions, to continue operations when some instances (especially masters) fail or are not able to communicate with the majority of nodes in the cluster.
However, the cluster stops to operate in the event of larger failures (e.g when the majority of master instances are unavailable). Also, if a master and slave fail at the same time, the cluster cannot continue normal operations (though the workaround is to add more nodes or create an asymmetry in the cluster, to auto-change the cluster layout).
According to the Redis cluster documentation, the “minimal cluster” that works as expected requires to contain at least 3 master nodes. But the most suitable setup for high availability should have at least 6 nodes with three masters and three slaves, each master having a slave.
Important: Redis Cluster also has some limitations which are lack of support for NATted environments as well those where IP addresses or TCP ports are remapped for instance under Docker. Additionally, not every client library supports it.
This article shows how to set up a Redis Cluster (with Cluster-Mode Disabled) in CentOS 8. It includes how to install Redis, configure the cluster nodes, create a cluster and test the cluster failover.
Note: For this guide, we will use fresh/empty Redis instances to run the cluster mode. The cluster mode will not work with some configurations done in the first two guides of our Redis Series, particularly it doesn’t work when the replica of the parameter is being used.
Prerequisites:
Test Environment Setup
Redis Master1: 10.42.0.247
Redis Master2: 10.42.0.197
Redis Master3: 10.42.0.132

Redis Slave1: 10.42.0.200
Redis Slave2: 10.42.0.21
Redis Slave3: 10.42.0.34
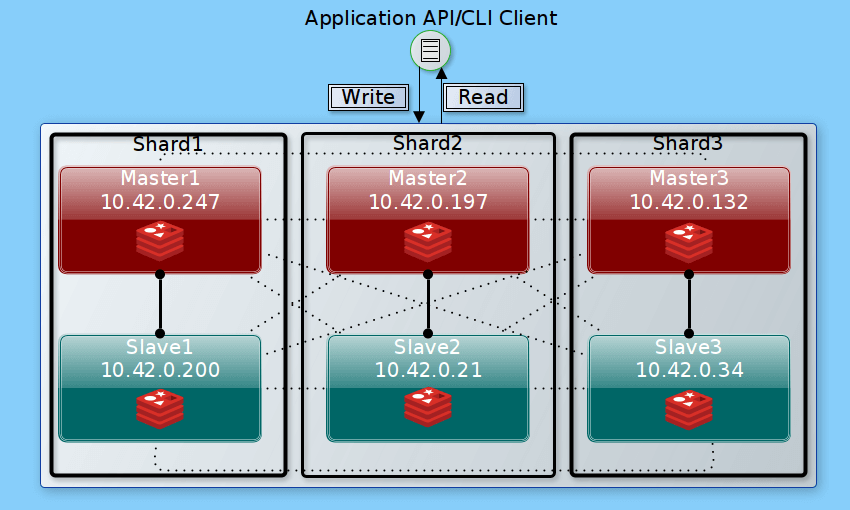
Our setup has 3 read/write master nodes and 3 read-only replica nodes, each master having one replica, so three shards contain all of the cluster’s data in each node. An application API or CLI client can write only to the master nodes but read from any node in the cluster.
Step 1: Installing Redis on All Nodes
1. Log into all the instances via SSH, then run the following command to install the Redis module using the DNF package manager as shown.
# dnf module install redis
2. Next, start the Redis service, enable it to automatically start at system boot and check its status to verify that it is running (verify the service on all the 6 instances):
# systemctl start redis
# systemctl enable redis
# systemctl status redis
Step 2: Configuring Redis Instances on all Nodes
3. This section describes how to configure the Redis cluster nodes. Remember to perform the configurations here on all the nodes.
Use the /etc/redis.conf configuration file to configure the Redis server. As a recommended practice, create a backup of the original file before editing it using a command-line text editor of your choice.
# cp /etc/redis.conf /etc/redis.conf.orig
# vi /etc/redis.conf
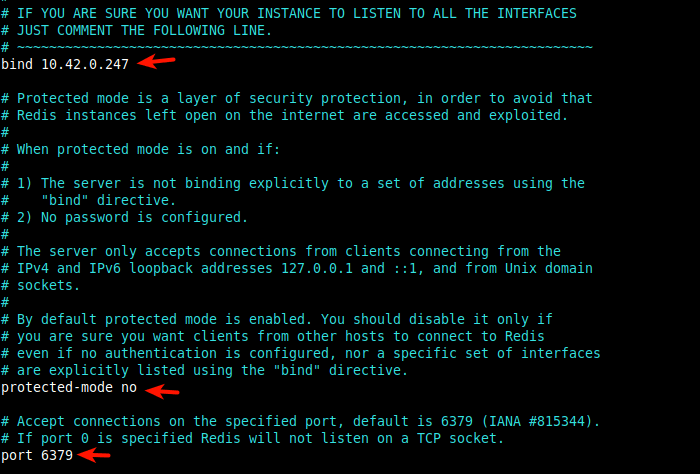
4. Next, find the following configuration parameters and edit their values as shown. The bind parameter sets the interface of the Redis server will listen on, set its value to the instance LAN IP. Remove the 127.0.0.1 because we realized leaving it there slows down the process of cluster creation, particularly the stage of joining the cluster.
bind 10.42.0.247
Then set the protected-mode to no to allow connections from the other instances on the cluster.
protected-mode no
The port parameter defines the port the Redis server will listen on for connections, the default is 6379. This is the data port for communicating with clients.
port 6379
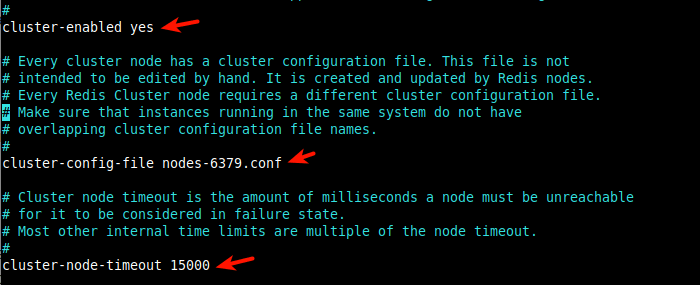
5. The next set of parameters will enable the cluster mode and set some of its useful features. The cluster-enabled parameter, when set to yes, activates the cluster mode.
cluster-enabled yes
Next, the cluster-config-file parameter sets the name of a cluster node’s cluster configuration file (e.g nodes-6379.conf). The file is created in the working directory (default is /var/lib/redis defined using the dir parameter) and is not user editable.
cluster-config-file nodes-6379.conf
The next useful cluster option is cluster-node-timeout, it is used to set the maximum amount of time in milliseconds an instance can be unavailable for it to be considered in a failure state. A value of 15000 is equivalent to 15 seconds.
cluster-node-timeout 15000
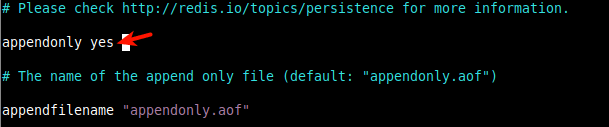
6. We also need to enable Redis persistence on disk. We can use one of the persistence modes, that is the Append Only File (AOF): it logs (in the file appendonly.aof created under the working directory) every write operation successfully received by the server. The data will be played during the server startup to reconstruct the original dataset.
To enable it, set the appendonly parameter to yes.
appendonly yes
7. After making all the changes, restart the Redis service on all the nodes to apply the recent changes.
# systemctl restart redis
8. At this point, every cluster node should now have an ID. You can check this in the logfile located at /var/log/redis/redis.log.
# cat /var/log/redis/redis.log

9. Next, open port 6397 and 16379 on all the instances. The later port is used for the cluster bus (a node-to-node communication channel using a binary protocol). This is a basic requirement for the Redis cluster TCP connections.
# firewall-cmd --zone=public --permanent --add-port=6379/tcp
# firewall-cmd --zone=public --permanent --add-port=16379/tcp
# firewall-cmd --reload
Step 3: Creating the Redis Cluster
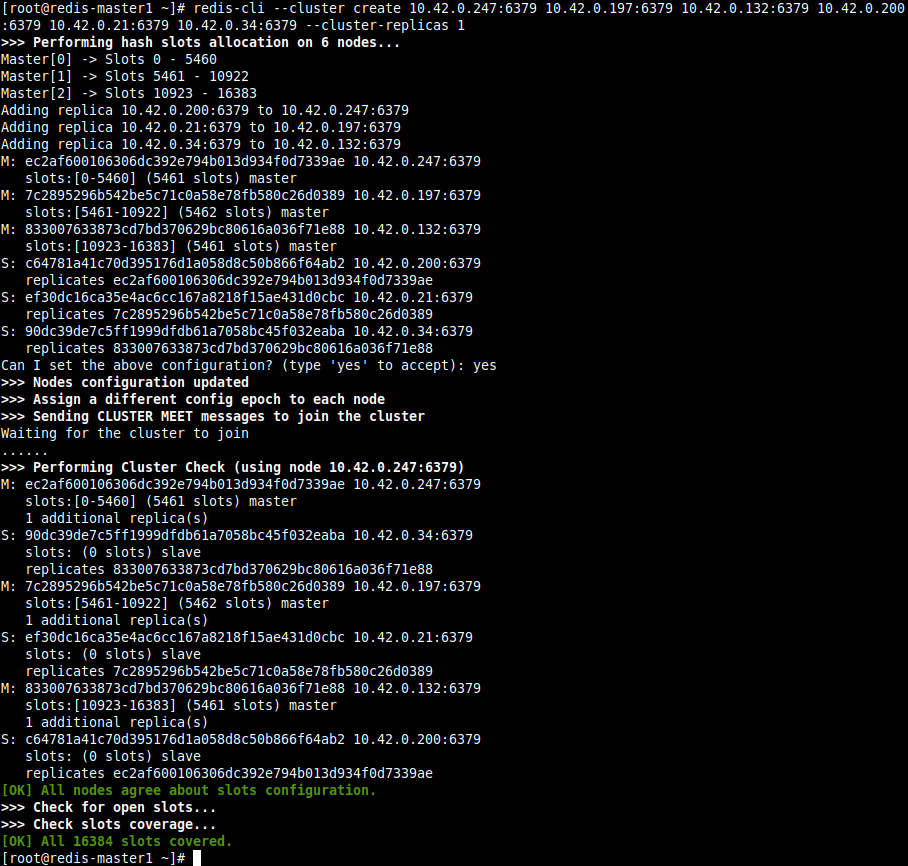
10. To create the cluster, use the redis-cli command-line client as follows. The --cluster create enables cluster creation and --cluster-replicas 1 means create one replica per master.
For our setup which has 6 nodes, we will have 3 masters and 3 slaves.
Note that the first 6 nodes will be considered masters (M) and the next three will be considered slaves (S). The first slave i.e 10.42.0.200:6379 replicates the first master i.e 10.42.0.247:6379, the second slave replicates the second master, in that order.
The following command is formatted in a way that the outcome will represent our logical setup above.
# redis-cli --cluster create 10.42.0.247:6379 10.42.0.197:6379 10.42.0.132:6379 10.42.0.200:6379 10.42.0.21:6379 10.42.0.34:6379 --cluster-replicas 1
11. Once the cluster creation is successful, run the following command on any host (specify its IP address using the -h flag) to list all cluster nodes.
# redis-cli -h 10.42.0.247 -p 6379 cluster nodes
You should be able to see all the cluster nodes, with the slaves indicating their masters, as shown in the following screenshot.

The different fields are in this order: node ID, IP address:port, flags, last ping sent, last pong received, configuration epoch, link-state, slots (for masters).
Step 4: Testing Redis Cluster Failover
12. In this section, we will demonstrate how to test a cluster failover. First, let’s take note of the masters.
# redis-cli -h 10.42.0.247 -p 6379 cluster nodes | grep master

Also, take note of the Redis slaves.
# redis-cli -h 10.42.0.247 -p 6379 cluster nodes | grep slave

13. Next, let’s stop the Redis service on one of the master nodes e.g 10.42.0.197 and check all master nodes in the cluster.
# systemctl stop redis
# redis-cli -h 10.42.0.247 -p 6379 cluster nodes | grep master
From the following screenshot, you can see that the node 10.42.0.197:6367 is in fail state and its slave 10.42.0.21:6379 has been promoted to master status.

14. Now let’s start the Redis service once again on the failed node and check all the masters in the cluster.
# systemctl start redis
# redis-cli -h 10.42.0.247 -p 6379 cluster nodes  | grep master

Also, check the cluster slaves to confirm that the failed master is now a slave.
# redis-cli -h 10.42.0.247 -p 6379 cluster nodes | grep slave

Step 5: Testing Data Replication Across the Redis Cluster
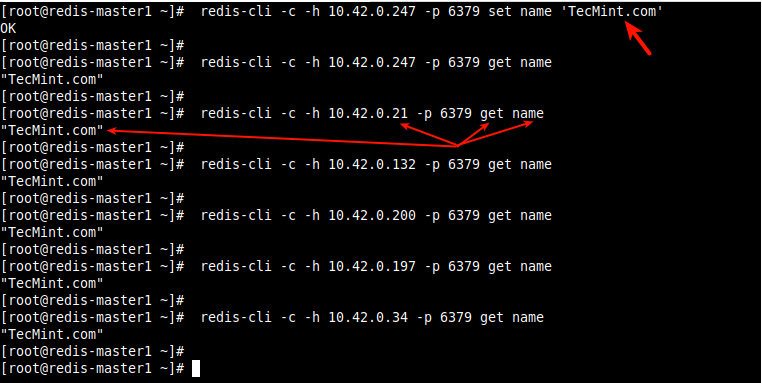
15. This last section explains how to verify cluster data replication. We will create a key and value on one of the masters, then try to read it from all the cluster nodes as follows. Use the -c switch to enable cluster support under redis-cli utility and access data in cluster mode.
# redis-cli -c -h 10.42.0.247 -p 6379 set name 'TecMint.com'
# redis-cli -c -h 10.42.0.247 -p 6379 get name
# redis-cli -c -h 10.42.0.21 -p 6379 get name
# redis-cli -c -h 10.42.0.132 -p 6379 get name
# redis-cli -c -h 10.42.0.200 -p 6379 get name
# redis-cli -c -h 10.42.0.197 -p 6379 get name
# redis-cli -c -h 10.42.0.34 -p 6379 get name
The bottom line is the Redis Cluster is the preferred way to get automatic sharding, replication, and high availability. There are many other well-documented configuration parameters in the rest of the /etc/redis.conf file, you can find more information in the official documentation: Redis cluster tutorial and Redis cluster specification.
This brings us to the end of the three-part Redis tutorial series. The feedback form below can be used to post questions or comments.


I have a question, how to scale the new node?
Hello, I have a question. Where did you get the IP address for the master nodes and slave nodes? Do you have a step-by-step guide for this? Sorry, I am still new to redis and by far your guide is the easiest to follow. I hope to hear from you soon!